Data Store Administration Tool Guide
System Requirements
The Data Store Administration Tool shares the same system requirements as CaseWare Working Papers. >>Quick Reference
Overview
Introducing the CaseWare® Data Store Administration Tool
Data such as users and file lists are automatically stored in the local computer the first time that CaseWare® Working Papers is launched. This collection of data is contained in private storage, accessible only to the single user, and is referred to as the Personal Data Store.
Important: Since the storage is private, there is no way to share user lists between computers if this configuration is used.
Alternatively, a Data Store can be created and accessed on multiple machines. All users connected to the same Data Store have access to a common set of users, global groups, file list, Tracker settings, and store configuration information.
Working Papers does not rely on any application servers, our data is stored on your existing Windows files servers. Working Papers will operate even if the Data Store is offline.
Data Store Administration Tool is a part of the CaseWare Working Papers suite of products. The Data Store Administration Tool enables administrators to create, customize, and maintain Data Stores that will be accessed by multiple users. It is intended for use by an administrator with a fairly high level of IT experience.
Deciding Whether to Use a Data Store
Using a Data Store is necessary if one or more of the following hold true:
- You want the protection system on all computers in your firm to have access to a common list of users and global groups.
- You want Tracker on all computers in your firm to have access to a common list of accessed client files.
- You want to use the Active Directory features to populate the user list and to enable Windows authentication.
-
You want to use the Security ID feature.
Note: If you are upgrading from a previous version of Working Papers, please review the latest Data Store updates.
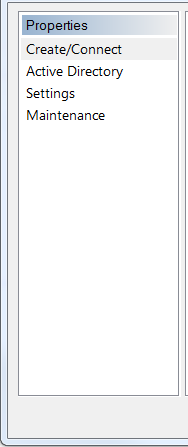
Using the Data Store Administration Tool, you will be able to:
- Create a Data Store
- Connect to a Data Store
- Import Users and Groups
- Customize Data Stores
- Maintain the Data Store
Installing The Data Store Administration Tool
The Data Store Administration Tool is a component separate from Working Papers, which allows you to create, connect to, and customize Data Stores. It is intended for use by an administrator.
The Data Store Administration Tool can be installed on a server or directly onto the administrator's workstation. If installed on the server, the administrator will have to physically log in to the server and run the program from there to perform the actions. A more convenient option is to install the program on his or her own workstation. However, if installing SQL Server or SQL Express Server, the SQL component must be installed on the server.
- Ensure that you have access to a supported SQL server as listed in the Working Papers system requirements.
- Launch setup.exe for the Data Store Administration Tool. The Data Store Administration Tool – InstallShield Wizard launches.
- On the Welcome screen, click Next.
- On the License Agreement screen, read the terms, and select the option to accept the terms and click Next.
-
On the Select Options screen, select the Install the Data Store Administration Tool.
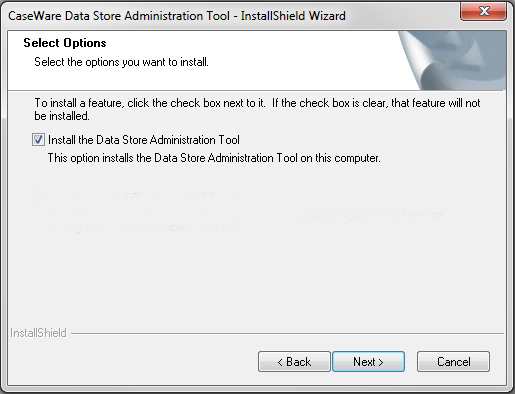
- Click Next.
- Click Install.
Creation and Connection
Creating a Data Store
The Data Store Creation Wizard allows you to create an xBase or SQL Data Store.
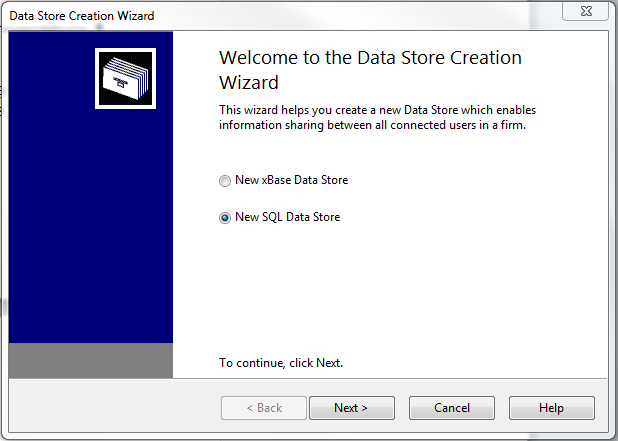
For step-by-step instructions on creating an xBase data store, click here.
For step-by-step instructions on creating a SQL data store, click here.
Connecting to a Data Store
To connect to an existing Data Store using the program:
- Launch the Data Store Administration Tool.
-
Click the Create/Connect option.
You will see the currently connected Data Store and its state, all of which are read-only. If you are not connected to a Data Store, the Data Store field will read “No store currently active.” and the Status will be “N/A”.
If you are connected to an xBase store, the location of the .cws file as well as its status will be shown. When connected to the store with no errors, the status will be “Online”. When unable to connect to the store (e.g. the store folder is deleted or moved), the status will be “Offline”.
If you are connected to a SQL store, all SQL connection properties will be shown, along with the status.
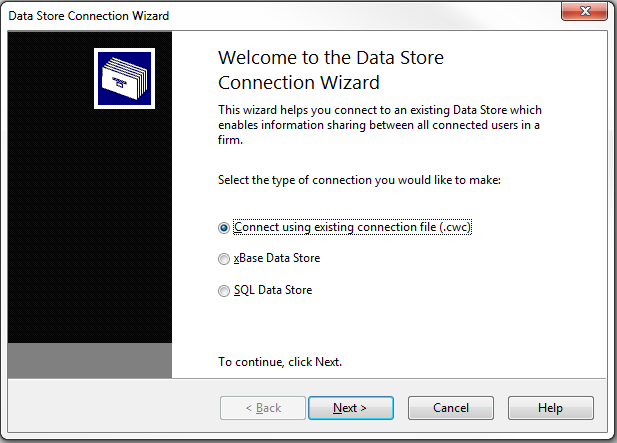
- Click Attach. The Data Store Connection Wizard opens.
-
Select whether you are connecting using the .cwc file, connecting to an xBase store, or connecting to a SQL store. Click Next.
-
Based on your previous selection, perform one of the following:
a. If you are using an existing connection file (.cwc), enter the location of the .cwc file.
b. If you are connecting to an xBase store, enter the location of the existing xBase Data Store (.cws file).
c. If you are connecting to a SQL store, enter all SQL connection information.
- Click Next.
- Follow the instructions on the wizard to finish connecting to the Data Store.
To connect to an existing Data Store using the Connection (.cwc) file:
Non-administrators can use the .cwc files created by administrators to connect to or disconnect from Data Stores.
- Double-click the connection file created by the administrator.
- Restart Working Papers by closing and re-opening the program.
Note: Non-administrator users do not need to install SQL Server or SQL Express to connect to a SQL-based Data Store. The user should have access to the folder where the connection file resides.
To disconnect from a Data Store using a Disconnection (.cwc) file:
- Double-click the disconnection file created by the administrator.
- Restart Working Papers by closing and re-opening the program.
Note: Ensure your SQL Server is configured to accept remote connections before connecting to a Data Store or else users may experience difficulty connecting to the store. To enable remote connections you need to run the SQL Server Configuration Manager tool (bundled with the SQL Server installation package) and in the section of SQL Server Network Configuration | Protocols for 'Your SQL Instance Name', make sure TCP/IP is enabled.
Turning off Auto Close in the SQL Server
When you create a Data Store in a SQL Server, you must set the Auto Close property for the SQL database to False. This ensures that the database does not unexpectedly go offline if no one is connected to it.
- Launch Microsoft SQL Server Management Studio Express.
- In the Databases folder, locate the database that you created for the Data Store.
- Right-click the database folder and click Properties.
- In the Select a page panel, click Options.
- In the Automatic panel, click the drop-down beside Auto Close. Choose False.
- Click OK.
Creating Connection (.cwc) Files
The main purpose of .cwc files is to distribute the Data Store settings to users without administrator rights so that they can connect to or disconnect from a Data Store. The .cwc files can be sent to other users (i.e. non-administrators) who can then use the file to access the Data Store.
To create a .cwc file to connect to a Data Store:
Ensure you are currently attached to a Data Store.
- Launch the Data Store Administration Tool.
- Click the Create/Connect option.
- Click Save.
-
Type in or click Browse and navigate to a location to save the .cwc file.
Note: It is recommended that you name the .cwc file "Connection file.cwc" to distinguish it from a disconnecting .cwc file.
To create a .cwc file to disconnect from a Data Store:
Ensure you are currently not attached to a Data Store.
- Launch the Data Store Administration Tool.
- Click the Create/Connect option.
- Click Save.
-
Type in the location or click Browse and navigate to a location to save the .cwc file.
Note: We recommend that you name the .cwc file "Disconnection file.cwc" to distinguish it from a connecting .cwc file.
Viewing the Status of the Data Store
Access these options by right clicking the Data Store menu within Working Papers.

| Number | Screen Element | Description |
|
|
Properties |
Shows the properties of the data store such as Tracker settings and Data Store information. Note: This information is the same as the properties shown when selecting Tools | Options | Data Store from within a client file or Options | Data Store when a client file is not open. |
|
|
Refresh Now |
Forces the Personal Data Store and Data Store to synchronize. The Data Store icon will change to the synchronization icon for a short period of time and then change back. If not connected to a Data Store, this icon will be grayed out. |
|
|
Connect/Disconnect |
When connected to a Data Store that is online, selecting Disconnect will take the Data Store offline. If connected to a Data Store that is offline, selecting Connect will take the Data Store online. The online/offline state of the Data Store will be preserved when you exit and re-open Working Papers. If no Data Store exists, this option will be grayed out. |
Managing Users
Populating the User List
When the Data Store is first created, it contains one administrative user, SUP with the password sup (note lowercase on the password). Subsequent users can be imported in one of the following ways:
- Active Directory import
- For legacy import from previous versions of Working Papers, please refer to Upgrading from previous versions of Working Papers.
Notes
- It is not necessary to import a user list: users may instead be added manually as described in the Working Papers help topic "Creating a new user".
Active Directory Import
You can import users and groups from Windows Active Directory to enable single sign-on for the Working Papers application. With single sign-on enabled, users can use their domain credentials (Windows username and password) to automatically log in to Working Papers. Imported users and groups can be synchronized at any time to reflect new, deleted, or modified accounts in Active Directory; these accounts cannot be modified from Working Papers.
For Active Directory groups, there are additional considerations when importing to the Data Store:
- All users from the group will be imported.
- For groups that contain sub-groups, only users from the sub-group will be imported (that is, sub-groups themselves are not automatically imported). Users are imported as part of the top- level group.
- New users of the group will be imported to the Data Store the next time Active Directory is synchronized.
- Users removed or deleted from a group will be removed from the Data Store the next time Active Directory is synchronized.
- Removing or deleting a group will result in all users of that group to be removed from the Data Store (assuming users are not members of another imported group).
The Data Store can manage users in conjunction with Windows using the LDAP protocol to check the user’s login and workstation hostname for logins. Hostnames can be up to 260 characters in length when validating Active Directory logins.
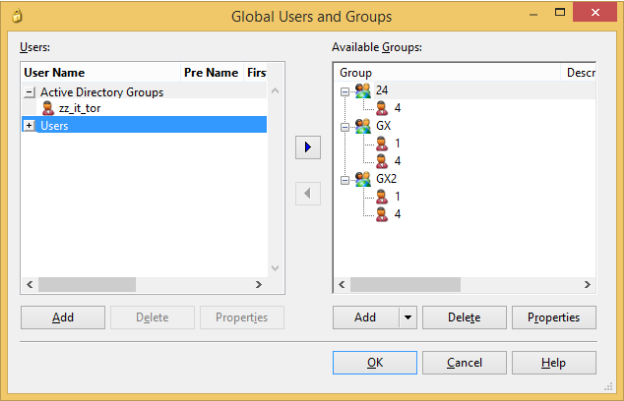
Once users and groups have been imported to the Data Store, you can run Working Papers to assign Active Directory users and groups to Working Papers global or local groups. When users are assigned to a global group in Working Papers (either explicitly or via Active Directory groups), they will be granted the Protection Rights defined for the global or local group.
Notes
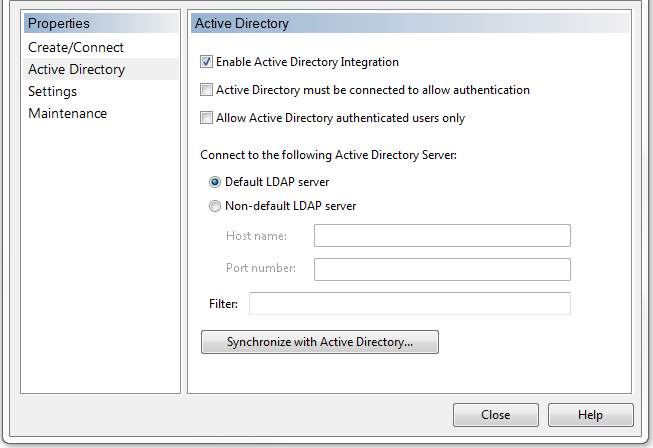
- The Active Directory Import is available only if a Data Store is being used and if Active Directory Integration is turned on in the Administrator options dialog (Tools | Options | Data Store | Administrator Options).
- If a Time-integrated Data Store is being used, users are imported as non-Timekeepers for Time. If a user is to be designated as Timekeeper, the user must be explicitly set as such in the Staff dialog in Time.
Importing users and groups from Active Directory
Prerequisites
Assigning an Active Directory admin user may be useful in the event that you Allow Active Directory authenticated users only.
To import users from the Active Directory to your Data Store:
- Launch the Data Store Administration Tool.
- Click the Active Directory option. You will be required to enter your administrator's login and password.
- Specify the fields.
For more information, see Active Directory.
- Click Synchronize with Active Directory. The Active Directory Integration screen that appears should display all of the Active Directory users and groups that can be integrated with the Data Store. Expand the groups to select the check box in the Synchronize column for any staff or staff groups that will have access to Working Papers.
-
The Default Offline Password can also be set on the screen above. This password is shared for all logins and enables users to access the Data Store even if the Active Directory authentication is unavailable. Once you have selected all of the required users and filled in the Default Offline Password if required, click OK to continue.
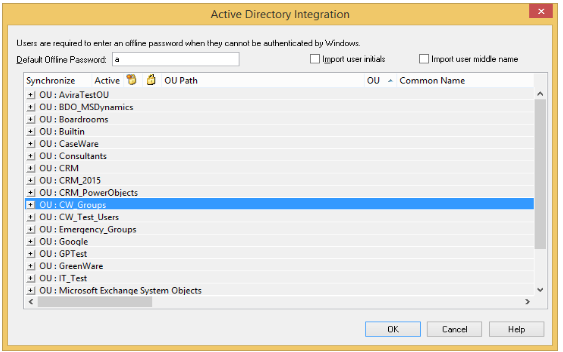
Note: By default Active Directory will never include disabled users in an LDAP import.
Results
After all users and groups are imported to the Data Store, open Working Papers to assign these users/groups to Working Papers global or local groups. Users assigned to global/local groups will be granted any Protection rights defined for that group.
Note: Active Directory groups will appear in its own section on the left-side of the dialog.
Enabling Windows Active Directory
- Launch the Tools | Options | Data Store screen.
- Click the Administrator Options button.
- Click to check the box beside Enable Active Directory Integration.
- Click OK to close the dialog.
Adding a Login Using SQL Server Management Studio
When Windows Authentication is turned on you must login through the SQL server. If your login is not recognized you will not be able to login. You can add logins to SQL Server Management studio. This is useful when Windows Authentication is turned on for an SQL Data Store.
Prerequisites
Ensure SQL Server Management Studio is installed on your machine (bundled with the SQL Server installation package).
Procedure
- Launch SQL Server Management Studio.
- Login using your credentials. Click Connect.
- Navigate into the folders Security | Logins.
- In the Logins window, right-click and select New Login.
- Specify all of the fields in the Login - New dialog. Click OK.
Results
Your login has been created. Reattempt logging into Data Store if you were having issues.
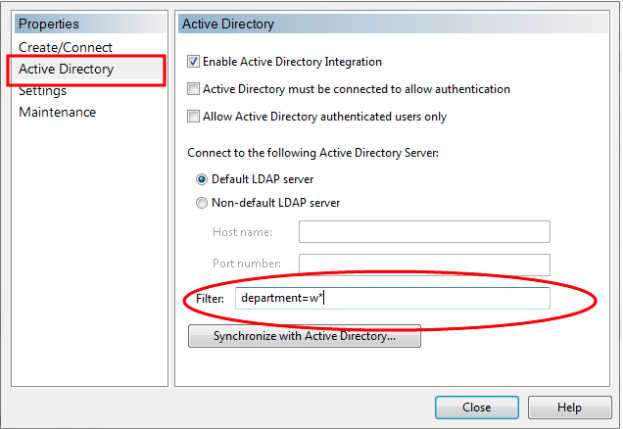
Using LDAP Import Filters
You can use the Filter field to customize your Active Directory import based on users or groups. To see both users and groups, no filter is required.
Note: The Filter field is available only when Enable Active Directory Integration has been selected.
Procedure
- From the Data Store Administration Tool, click the Active Directory tab. Enter any credentials.
- In the Filter field, enter a filter for:
- Groups as follows: "(objectcategory=group)"
- Users as follows: "(&(objectCategory=person)(objectClass=user)(!userAccountControl:1.2.840.113556.1.4.803:=2))"
- Click Synchronize with Active Directory.
Results
Based on the filter that you specify (users or groups), the Active Directory Integration dialog opens with all active users and/or groups listed.
Other filter examples for users:
- To retrieve users last modified between Jan. 01, 2013 and April 04, 2013 type: (&(whenChanged>=20130101050000.0Z) (whenChanged<=20130402035959.0Z))
- To retrieve all active users in a department that starts with the letter 'w' type: (department=w*)
- To retrieve all active users from the LDAP server type: (!userAccountControl:1.2.840.113556.1.4.803:=2)
- To retrieve users in some Windows group membership type: (memberOf=xxx) - where, xxx, represents the distinguished name of the Windows group
Other Filter examples for groups:
| All group objects | (objectCategory=group) |
| All distribution groups (Notes 4, 15) | (&(objectCategory=group) (!(groupType:1.2.840.113556.1.4.803:=2147483648))) |
| All security groups (Notes 4, 19) | (groupType:1.2.840.113556.1.4.803:=2147483648) |
| All built-in groups (Notes 4, 16, 19) | (groupType:1.2.840.113556.1.4.803:=1) |
| All global groups (Notes 4, 19) | (groupType:1.2.840.113556.1.4.803:=2) |
| All domain local groups (Notes 4, 19) | (groupType:1.2.840.113556.1.4.803:=4) |
| All universal groups (Notes 4, 19) | (groupType:1.2.840.113556.1.4.803:=8) |
| All global security groups (Notes 17, 19) | (groupType=-2147483646) |
| All universal security groups (Notes 17, 19) | (groupType=-2147483640) |
| All domain local security groups (Notes 17, 19) | (groupType=-2147483644) |
| All global distribution groups (Note 19) | (groupType=2) |
Filter Parameters
| Parameter | Description |
|---|---|
| -LDAP | Perform LDAP import |
| -DP | Default offline password |
| -UI | Import user initials |
| -MN | Import middle name |
| -Filter | (Optional) LDAP filter expression |
| -Host | (Optional) LDAP host name |
| -Port | (Optional) LDAP port number |
| -LU | (Optional) User name |
| -LP | (Optional) User password |
| -LD | (Optional) Domain name |
Using Command Prompt for Import Filter
Follow this procedure to use command line parameters for your Active Directory Import instead of the filter field.
Procedure
- In your C: drive, navigate to the Windows | System32 folders.
- Navigate to cmd.exe. Right click and select Run as administrator.
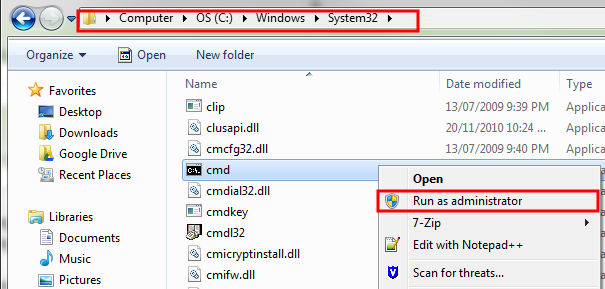
- Enter cd \. Press ENTER.
- Enter cd program files (x86). Press ENTER.
- Enter cd "CaseWare Data Store Administration Tool". Press ENTER.
- Type sharedstoreadmin.exe (followed by your customized filter). Press ENTER.

Results
The Data Store Administration Tool and the Active Directory Integration dialog opens to begin your import.
Filter example
You can type SharedStoreAdmin.exe -U sup -P sup -LDAP (replace sup with your username/password) to perform an LDAP import.
In this example, SharedStoreAdmin executes Data Store, -U and -Prepresent login on with a username and password and-LDAP will perform an LDAP import.
Note:
- If there is a space between parameters you must use quotation marks around the parameters. e.g. Instead of using SharedStoreAdmin -U sup -P sup -LDAP -filter (department=working papers), you must put quotation marks around "working papers". The correct syntax is SharedStoreAdmin -U sup -P sup -LDAP -FILTER (department="working papers").
- As of Working Papers 2016, additional command line options are available:
- “-Delete -Filter (...)” will delete all users from the Data Store based on an optional filter. For example, to delete all records from departments that start with the letter ‘w’, run this command: SharedStoreAdmin -U sup -P sup -LDAP -Delete -Filter (department=w*)
“-Update” will update only records that have been marked. For example, to sync selected records, run this command: SharedStoreAdmin -U sup -P sup -LDAP -Delete -Filter (department=w*)
Settings
When you are connected to a Data Store, you will need to log in before accessing the Settings tab. Use this tab to specify custom properties for your file information. Click the Settings tab to access these options.
Security ID Overview
The security ID feature prevents unauthorized administrative access to a client file that has protection enabled.
As an administrator, you can prevent administrators of other Data Stores from having full access to client files by setting a security ID. The first time a client file is accessed, the security ID of the data store is written into the client file. This ID ensures that only administrators connected to the proper Data Store be granted full access to a particular file. The security ID adds another level of protection to the client file; however, you can choose not to set it and allow administrators of other Data Stores to have full administrative access to files.
The Security ID is set using the Data Store Administration Tool. For more information, see Setting the Security ID.
Important: The security ID feature does not affect non-administrators. It only serves to prevent unauthorized administrative access.
When a Security ID is set
Once a security ID is set, it is locked to that Data Store. When a client file is first opened by someone connected to the Data Store, the security ID of the Data Store is written into the client file.
If a security ID is set, an administrator may log into a file only if the security ID of the data store matches the security ID of the client file. The security ID matching only occurs if a client file contains a security ID.
If the IDs do not match, a message is displayed indicating that the security ID for the Data Store does not match the security ID of the client file.
The Security ID feature can be disabled to allow administrators connected to a different data store to log into your files.
Important: It is not required that the same Data Store that was active when a client file was first accessed be used when subsequently accessing the client file as an Administrator. It is only required that the Security ID remain the same. If the user list in the data store needs to be recreated for any reason, it is then only necessary to re-enter the same ID to have continued access to client files as an administrator. For this reason, it is important that a record of the security ID be made when creating a Data Store.
Disabled Security ID
Once the security ID is disabled and an administrator of a different Data Store opens the client file, the following occurs:
- The Allow administrators connected to a different data store to log onto this file check box is cleared.
- The security ID of the new store is linked to the client file and can only be opened with the new Data Store.
- If no security ID exists in the new Data Store, the security ID is removed from the file.
Note the file is maintained under the original Data Store in the following circumstances:
- When a non-administrator connected to a different Data Store opens the client file.
- If the Allow administrators connected to a different data store to log onto this file check box is cleared before the file has been opened by an administrator of a new store.
Copy Components and Security ID
The Working Papers Copy Components function has the following limitations where security IDs are concerned when you are logged in as an administrator:
| Copy all components |
The template is copied. The security ID is copied. |
| Copy some components to a new file |
The template is copied. The security ID is copied. |
| Copy some components to an existing file |
The security ID is not copied. Note the following:
|
Year End Close and Security ID
If the source file is protected and has a security ID set, that security ID overwrites the security ID of the destination file.
Disabling the Security ID
When a security ID is set on the Data Store, client files linked to that Data Store cannot be opened by an administrator of a different Data Store.
If you are an administrator of the Data Store, you can disable the security ID. By doing so, the protection-enabled client file can be opened by an administrator connected to a different Data Store.
Once the security ID is disabled and an administrator of a different Data Store opens the client file, the following occurs:
- The Allow administrators connected to a different data store to log onto this file check box is cleared.
- The security ID of the new store is linked to the client file and can only be opened with the new Data Store.
- If no security ID exists in the new Data Store, the security ID is removed from the file.
Note: The file is maintained under the original Data Store in the following circumstances:
- When a non-administrator connected to a different Data Store opens the client file.
- If the check box is cleared before the file has been opened by an administrator of a new store.
To disable the Security ID:
- From within a Working Papers client file select Tools | Protection | Protection Setup. The Users and Groups dialog opens.
- Click the Setup button. The Setup Dialog opens. Note that you must be logged in as an administrator to access this tab.
- Select the Allow administrators connected to a different Data Store to log onto this file check box.
- Click OK.
Maintenance
There are two tools that can be used for Data Store Maintenance:
- The Personal Data Store Maintenance Tool (for personal Data Stores)
- The Maintenance tab of the Data Store
Advanced Options and Troubleshooting
This section is meant to provide you with detailed background knowledge for the CaseWare® Working Papers Data Store; how it operates, its requirements and how to repair the Data Store if an error occurs.
Note: This documentation contains information for all features of the Working Papers Data Store, some of which may not have been released for your specific region.
The Data Store is meant to be, for each user, a central location for certain types of information. Information that is stored in the Data Store comprises:
| Information Type | Description |
|---|---|
| File meta data | Stores information about Working Papers files such as location, version information, compression state as well as meta data related to each file. |
| Terminology | Stores shared terminology for use in Working Papers. |
| Security users | Stores list of users available for use in Working Papers security. |
| Security groups | Stores Global group information; group properties and user assignment to these groups. |
| Shared settings | Stores Data Store configuration information. Ex. Database GUID, security ID, file tracking settings |
| Local Settings | Stores information about the state of the Personal Data Store such as the last time the store was synced and against which Data Store (Personal Data Store Only). |
Other than Local Settings, which is contained only in a Personal Data Store, the above information will be contained in both the Personal Data Store and the Data Store. If the user has specified a Data Store, then the information will be synchronized between the user's Personal Data Store and the Data Store. If multiple users connect to the same Data Store, then the information will be synchronized between all connected users.
The Personal Data Store is contained within a folder called C:\Users\<user account name>\AppData\Local\CaseWare. The files within this folder are stored as xBase database files. The Data Store is either contained in a SQL database if an SQL Data Store is being used or in a “Data Store” Windows folder if an xBase Store is being used. The table names are as follows:
| File(s) | Personal Store | Data Store (xBase) | Data Store (SQL) |
|---|---|---|---|
| File meta data | files.dbf | files.dbf | TrackedFiles |
| Terminology | terms.dbf | terms.dbf | Terminology |
| Security users | users.dbf | users.dbf | Employees |
| Security groups | groups.dbf | groups.dbf | SecurityGroups |
| Shared settings | shprefs.dbf | shprefs.dbf | SharedSettings |
| Local Settings | prefs.dbf | n/a | n/a |
| Addition file. Points to the location of the Data store. | storeinfo.cws | storeinfo.cws | n/a |
By default the Data Store always uses the Personal Data Store to retrieve any information because it should always contain accurate information due to synchronization (except when the Data Store is offline, in which case information will become stale as expected) and it is always guaranteed to be online.
To ensure a correct and up-to-date list of client files, always manipulate a client file using Working Papers. For example, use File | New or File | Copy Components to create a new client file rather than copying the file through Windows Explorer.
Software Environment
The following illustration shows two Data Stores running and both are connected to the same online Data Store. Store 1 is requesting information from the Data Store which will then retrieve it from the Personal Data Store (in most cases) because the Personal Data Store is always considered to be synchronized with the Data Store.
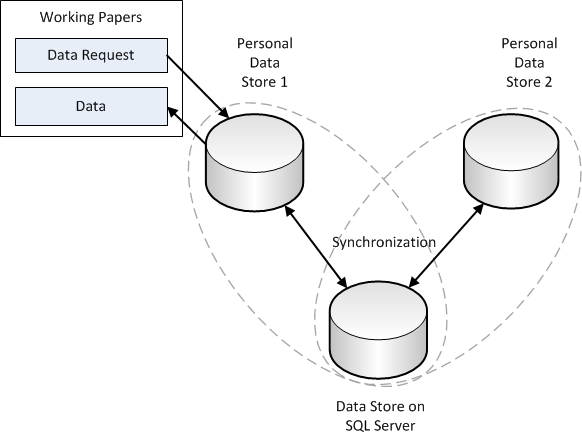
Synchronization between the Personal Data Store and Data Store takes a variable amount of time depending on the size of the databases and how out-of-date the Personal Data Store is.
Unlike all other operations the Data Store does not queue other requests (such as requesting an ICWCentralStoreFileInfo through the GetFileInformation() method) during synchronization, which means it is possible to request information that is not synchronized.
Lifecycle
The order of events for the Data Store is as follows. The following assumes that the Data Store has already been set up and configured. For Data Store setup, please refer to DataStore.pdf in the CaseWare® Data Store Administration Tool directory.
- A CaseWare application (e.g. Working Papers, Tracker, etc.) is launched; this will automatically connect to the Data Store.
- The Data Store will try to create the Personal Data Store if it does not already exist.
- If anything goes wrong, the Data Store will put itself in the Disabled state (
 ). To determine what is wrong, navigate to the Tools | Options | Data Store dialog.
 - If there is only a Personal Data Store and it was successfully created, the Data Store will enter the Enabled state (
 ). Skip to 7.
 - If the Data Store is available then the Data Store will enter the Online state (
 ) followed by the Synchronizing state (
 ) and once synchronization is complete the Online state again. If the Data Store is not available then it will immediately enter the Offline state (
 ).
). - The Data Store periodically monitors the availability of the Data Store (if specified) and if it changes, the current state of the Data Store will be modified.
- Once all the applications using the Data Store are exited, all connections to the Data Store will be closed.
Registry
The initialization of the Data Store is primarily controlled by the following registry key and its children (described later on):
- HKEY_CURRENT_USER\Software\CaseWare International\Data Store
The Personal Data Store and Data Store settings are saved in the following registry keys, respectively:
- HKEY_CURRENT_USER\Software\CaseWare International\Data Store\Personal Store
- HKEY_CURRENT_USER\Software\CaseWare International\Data Store\Shared Store
Each registry type can have the following values:
| Type | Registry Values | Description |
|---|---|---|
| Personal Data Store | Class | Constant. Must have the value {ea56dd50-b33d-460c-9326-78da507e4f11} |
| COM Class | {a55fcf6b-3982-475b-86ad-8ca1e955e9c9} | |
| Description | Personal Data Store | |
| Parameters |
The parameters used to create the Data Store. Typically this will be: C:\Users\<user account name>\AppData\Local\CaseWare |
|
| Data Store (xBase) | PATH | Path to the Data Store not including the “Data Store\” part |
| StorageType | 2 (xBase) | |
| Data Store (SQL) | Database Name | Name of the Data Store database on the SQL server |
| Password | Encrypted password to the SQL store | |
| Product Type | Type of SQL server | |
| Server Name | Name of SQL server | |
| StorageType | 1 (SQL) | |
| Use Windows Authentication |
0 - use SQL authentication 1- use Windows authentication |
|
| User Id | Encrypted SQL user ID |
The standard procedure for users to connect to a Data Store is to use a connection file (.cwc). The connection file is described in the Data Store Administration Tool document.
However, some firms may want to have users connect to a Data store by pushing down the registry keys for the Data Store to each user. The recommended way to do this is to copy the registry keys from the administrator of the Data Store:
- Launch the Data Store Administration Tool. Ensure that the administrator is pointing to a Data Store. Create a Data Store if required.
- Run regedit.exe. Find the key HKEY_CURRENT_USER\Software\CaseWare International\Data Store\Shared Store. Right click on the key and select “Export” from the context menu. The resultant .reg file may be pushed down to users (for example in a windows login script).
The Registry and Citrix
This registry information is particularly useful for installations of the Data Store on a Citrix server. After installation of the software is complete, locate the top level branch of the registry HKEY_CURRENT_USER\Software\CaseWare International\Data Store. This can then be pushed to each user’s registry through a login script or copied to the shadow directory. The CaseWare Best Practices for Citrix and Terminal Server guide for here should be consulted for all Citrix implementations of Working Papers.
Folder Security
The Personal Data Stores and Data Stores always reside in a folder called "Data Store". Note that in Working Papers version 2008 and lower, the folder was named "Store". All users have a Personal Data Store usually located (although this can be different depending on the operating system) in the following folder:
C:\Users\<user account name>\AppData\Local\CaseWare
-
For xBase Stores
The Data Store should be placed in a location such as a network file server that is accessible to all users who will need to connect to it. All users using the Data Store must have sufficient permissions to create, read, and write to the Data Store folder. In addition, the parent folder must have sufficient permissions to allow the Data Store to create the Data Store’s Data Store folder.
-
For SQL Stores
The SQL server must be accessible by all users who will be using the store. We recommend that the server be on the same Windows domain as users who will be accessing the store. If Windows Server Authentication is being used, the database administrator must grant access to all Windows domain users that will be connecting to the Data Store.
Backing Up
It is recommended that you keep a regular backup (once a week) of the Data Store. The backup method depends on whether an xBase or an SQL Data Store is being used.
For xBase stores, ideally the backup solution would obtain an exclusive lock on all the files in the Store folder to ensure that the database indexes and memo fields are consistent with the database. Working Papers and Tracker only open database files when needed (ie. when idle, no open connections to databases are maintained. However, in a large firm, it may be difficult to time the backup while no user is accessing the Data Store. For this reason, we recommend that the backup be timed to occur when it is unlikely that users will be actively accessing the store (at 3am for example).
For SQL stores, we recommend that the normally installed SQL administration tools (ex. SQL Server Management Studio) be used to perform the backup. Although it is possible to create a backup at any time using SQL, we recommend again to perform the backup it is unlikely that users will be actively accessing the store.
Restoring
The method for restoring from backup depends on the type of store involved. Restoring from an xBase backup simply requires all the files in the Store folder to be replaced by the backed up files. This can only be performed when no users are actively accessing the store. If it is suspected that the indexes are out of date, Data Store Maintenance application can be run (see next section).
We recommend that the normally installed SQL administration tools (e.g. SQL Server Management Studio) be used to perform a restore of SQL Data Stores. See more...
Making the Data Store Read-Only
Making the Data Store read-only has been found to prevent any corruption in an xBase Data Store. Setting a Data Store to read-only is not applicable to SQL stores.
Prerequisites
Ensure that everyone in the firm is not using the Data Store.
Procedure
- Navigate to the Data Store folder in the location the store was created.
- Select all the files except the .cws, .bin and .clg files.
- Right-click on one of the files and select Properties.
- Select the Read-only check box and click OK.
Results
Making the Data Store read-only will have the following side effects since no data will be able to be written to the databases:
- File tracking will be partially disabled. For example, if a user creates a new client file on their hard drive they will be able to see it in Tracker, but other users connected to the same Data Store will not (unless they specifically open it on their computer).
- Users and groups will not be modifiable; adding, modifying, or deleting will not be possible. Assignment of users and groups to client files will still function correctly.
Setting a Data Store to be read-only can also be performed using Windows Security. This can allow an administrator to retain full access and write to the Data Store (to create new users and groups for example) while write permission can be denied for normal users.
Troubleshooting
This page provides documentation for issues and advisories that have been noted and have solutions.
Virus Scanners
-
PROBLEM
It is possible that a virus scanner can cause problems when it tries to access the Data Store due to additional file locking issues.
-
SOLUTION
Therefore, we recommend, especially for large firms, to exclude the files contained within the Data Store folder from examination by the virus scanner.
Note: The Data Store folder refers to the folder in the location where the store was created.
Corruption
-
PROBLEM
Under some circumstances a firm’s Data Store can become corrupted frequently, causing the Data Store to report errors.
Frequent corruption is generally caused by having a large number of users connected to the same Data Store using a network with low bandwidth and/or frequent network losses (dropouts).
-
SOLUTION
The two general solutions are to limit the amount of bandwidth and disk access the Data Store has, or to make the Data Store read-only. To limit the bandwidth the Data Store uses please see the section Low Bandwidth.
Low Bandwidth
-
PROBLEM
The Data Store performs poorly in low bandwidth environments.
-
SOLUTION
Disable File Tracking.
Data Store Best Practices
The best practices in this section all relate to the setup and configuration of the Working Papers Data Store.
- The Data Store should be set up using the Data Store Administration Tool for optimal performance.
- In the Settings tab of the Data Store Administration Tool, ensure that the Synchronization field is set to Only on program startup.
-
The Track Engagement field, also in the Settings tab, controls how files are tracked by the Data Store. For these environments, either Track But Do Not Share with Firm or Disable Tracking should be selected in this field. The Track and Share with Firm setting should not be used unless you are using CaseWare Tracker and have a requirement to monitor the files other users are working on as this feature requires increased network bandwidth.
Note: Working Papers will frequently ping the Data Store to check its connection status. If one ping fails, the program will stop pinging and the Data Store status icon will remain as a red cross (offline) until you manually reconnect or restart the program.
Upgrading from Previous Versions
Data Stores from previous versions of Working Papers are not automatically converted. You can convert your Data Store to a newer version without losing any information when installing new versions.
Prior to upgrading everyone in the firm to the latest version of Working Papers, we recommend that one user (i.e., an administrator) upgrade existing Data Stores to the new Data Store.
Upgrading Data Stores involves the following steps:
To upgrade everyone in the firm to use the new Data Store, distribute the connection files along with Working Papers.
Note: Older versions of both the Data Store Administration Tool and Working Papers are backwards compatible.
Understanding the Data Store Interface
The screen shot below displays the main Data Store menu.
 Click on an area in the screen shot below to view its description