 SmartSync Server Quick Start Guide
Table of Contents
- Introduction
- System Requirements
- Accounts and Permissions
- Setting up the User for SmartSync Server
- Installing IIS WebServer on Windows Server
- IIS Options for SmartSync Server
- SmartSync Server Wizard Installation
- Storing Parent Files
Use SmartSync Server to maintain your client files in a central location on your network, enabling you to securely access your files from anywhere, anytime without the need for VPN. Some of the benefits to using the SmartSync Server include:
- Server Managed Changes
- Transmit Your Changes Securely with HTTPS/SSL
- More Robust
- Low Bandwidth Support
- Fully Integrated with Working Papers
How It Works
SmartSync Server is an add-on for Microsoft Internet Information Server. If you have a Windows server, you already have this web service available. The diagram below shows how it all works together.
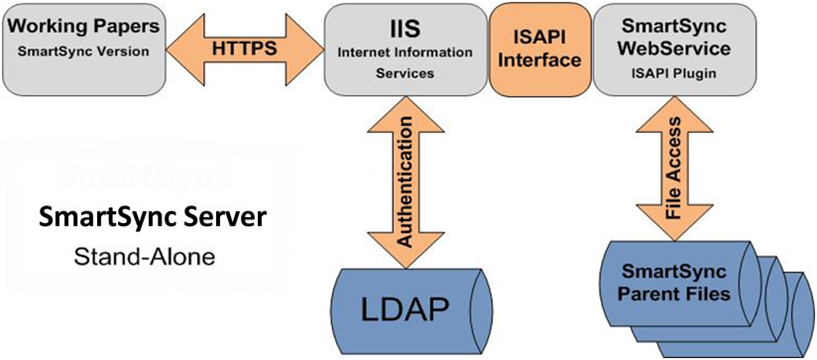
ISAPI Server Component (IIS)
SmartSync Server is a component that you integrated with your IIS web server. For most firms, no additional hardware is required to provide this functionality. Simply install the SmartSync server as an add-on to your current web server and you are ready to go.
Handles all SmartSync file traffic
Once the SmartSync server is installed, transmit all SmartSync traffic within you organization using this service. By utilizing the latest web services technology, SmartSync updates to your client files are synchronized from anywhere with an internet connection.
Pass-through Authentication
SmartSync Server authenticates users by leveraging your existing Windows Active Directory system. Therefore, if the user can log onto their computer, they can also access SmartSync server. This alleviates the need for your users to remember other passwords or for your IT staff to maintain an additional set of credentials.
Supports SSL/HTTPS
To ensure confidentiality, SmartSync Server supports SSL and HTTPS encryption. All client file updates synchronized through SmartSync Server are encrypted during transmission. When making changes at the head office or over the Internet, rest assured that all of your client’s information stays between you and your client.
System Requirements
Workstations
Hardware
The following are the minimum, recommended, and maximum hardware requirements to run SmartSync Server. SmartSync Server will run with the minimum requirements on the listed Microsoft Windows Server versions. The following minimum hardware requirements are provided by Microsoft for Windows Server 2008R2 with IIS 7.5.
- Minimum 1 GHz 64-bit (x64) processor; 2 GHz recommended for improved performance.
-
Minimum 2 GB of RAM; 8 GB recommended for improved performance, with an additional 1 GB for every 100 users and 5000 files.
Note: Computers with more than 16 GB of RAM require more disk space for paging, hibernation, and dump files.
-
Minimum 10 GB hard disk space. 40 GB or higher recommended for improved performance.
Note: These are the approximate disk space requirements for the system partition. Itanium-based operating systems will vary from these estimates. Additional disk space may be required if you install the system over a network.
File server/networks
Operating systems
- Microsoft® Windows Server® 2016
- Microsoft® Windows Server® 2012 (with IIS 8)
- Microsoft® Windows Server® 2008 R2 (with IIS7.5 and version 6 compatibility pack)
- Failover server and regular backups recommended for High Availability (HA)
Additional Components
-
A licensed copy of Working Papers with SmartSync must be installed on the same server as the SmartSync service.
Firewall Rules
- SmartSync Server: Port 80 for HTTP access and port 443 for HTTPS access.
- Client workstations: Port 80 for HTTP access and port 443 for HTTPS access to the IIS web server where SmartSync Server is installed.
- For parent client files stored on a separate server, ports 135 and 139 are required for communication between the two servers.
Accounts and Permissions
Service Account Selection
SmartSync Server installs a Windows Service called CaseWareFileService to the server to process requests such as Sync Log Flushing and converting client files to the server installed version of Working Papers SmartSync. It is recommended that one of the following service accounts be used to manage the SmartSync File Service:
-
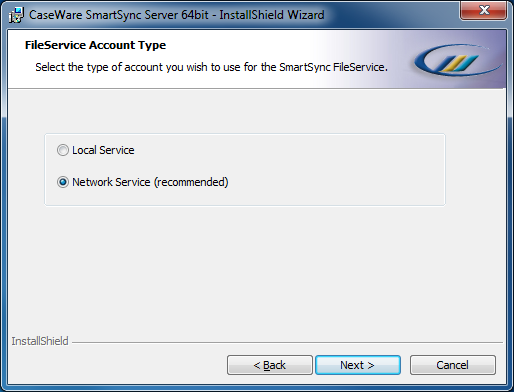
Local Service
Use this setting when setting up the SmartSync File Service on the same server as the SmartSync server and the copy of SmartSync. The client files must be stored on the same server. Local service is recommended when no network resources will be used by SmartSync Server.
-
Network Service
Use this setting when the SmartSync File Service and the copy of SmartSync are on different servers than the IIS web server with SmartSync Server or when accessing client files through a UNC. Network Service is recommended when the service requires domain authentication abilities
Note: A user account must have permission to Log on as a service on your server to manage the SmartSync File Service and is not recommended
File Level Permissions
We recommend the use of an NTFS volume to set up the top level parent directory (root folder hosting the SmartSync parent files).
If using the Network Service account for the CaseWare Application Pool and the File Service, the following permissions should be applied to the top level directory:
- SYSTEM - Full Control
- NETWORK SERVICE - Full Control
- Domain Admins - Full Control
- Administrators - Full Control
If using the Local Service or a specific user account for the CaseWare Application Pool and the File Service, that account should be given rights to the server with log on as a service in the Local Security Policy.
Note: Do not use 'Creator Owner' to attach specific NTFS permissions to the top level or to any directories under it. This will cause permissions errors when users attempt to access files via SmartSync.
Setting up the User for SmartSync Server
To operate the SmartSync File Service follow these steps to assign the required service properties to the desired account.
Prerequisites
Administrator credentials.
Procedure
- Open Local Security Policy from Administrative tools or using the search on the Windows task bar..
-
Select Local Policies | User Rights Assignment in the left navigation pane.
-
Scroll down in the right pane and select Log on as a service from the list.
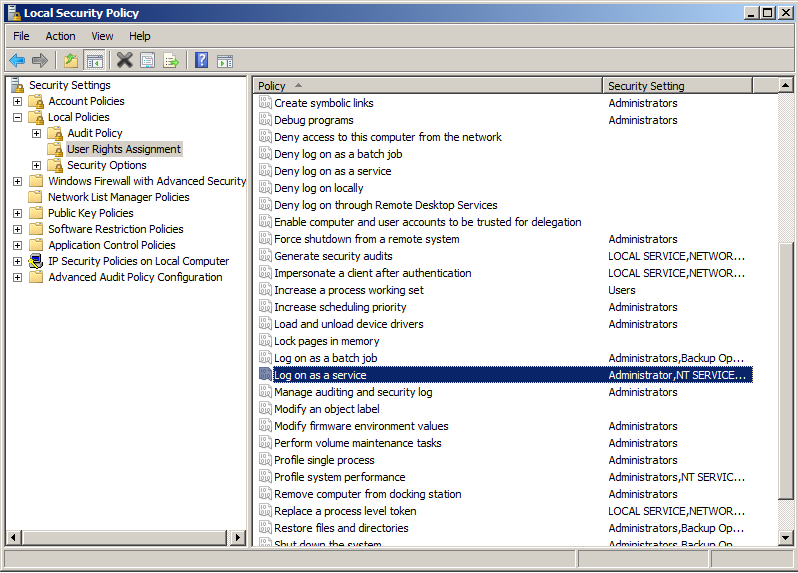
- Right click Log on as a service | Properties.
- Click Add User or Group.
- Use the dialog to add a user or service account to this right.
- Click OK and close the Local Security Policy dialog.
Results
The rights and credentials are ready. Provide these credentials during the manual SmartSync Server Installation to operate the SmartSync File Service.
Installing IIS WebServer on Windows Server 2008R2
This section provides instructions for installing the IIS web server on Windows 2008r2.
Prerequisites
Administrator credentials.
Procedure
-
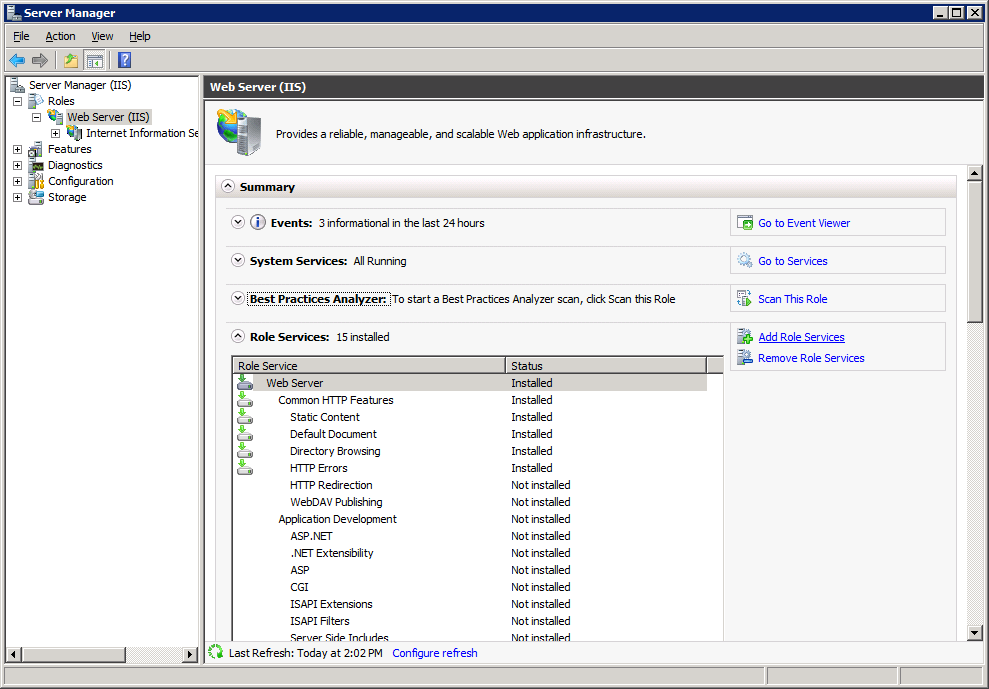
Open Administrative Tools | Server Manager.
-
Right-click on Roles and select Add Roles.
- Follow the on-screen instructions to add all of the IIS roles listed in IIS Options for SmartSync Server.
Results
The IIS web server is set up and ready for the SmartSync Server Installation.
IIS Options for SmartSync Server
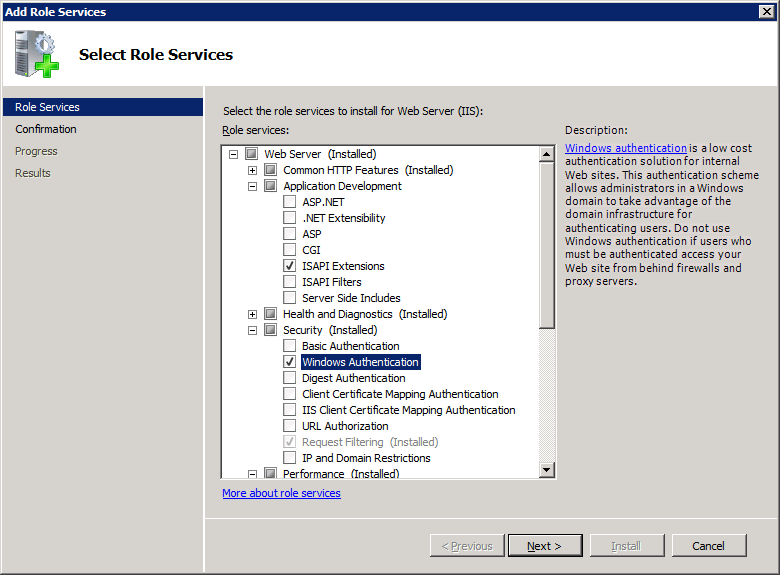
The following options should be selected in Add Role Services section of the Server Manager console on your Windows Server:
Web Server (IIS)
-
Common HTTP Features
-
Static Content
-
Default Document
-
Directory Browsing
-
HTTP Errors
-
-
Application Development
- ASP .Net
- .Net Extensibility
- ISAPI Extensions
- ISAPI Filters
-
Security
- Basic Authentication
- Windows Authentication
- Request Filtering
-
Management Tools
- IIS Management Console
- IIS Management Scripts and Tools
- Management Service
- IIS 6 Management Compatibility
- IIS 6 Metabase Compatibility
- IIS 6 WMI Compatibility
- IIS 6 Scripting Tools
- IIS 6 Management Console
SmartSync Server Wizard Installation
The following procedure walks you through the process of installing SmartSync Server or upgrading your version of SmartSync Server using the Installation Wizard. Firms using a named user account to run the SmartSync FileService must perform a manual installation
Prerequisites
Complete the procedures for the topics listed under Configuring Your Windows Server.
Procedure
- Download the SmartSync Server installer.
- Double-click the Setup file.
- (If applicable) Click Yes or Continue on the User Account Control dialog.
- Click Next on the CaseWare installer Welcome screen.
- Accept the license agreement and click Next.
- Click Change to modify the Request Folder path. Click Next.
- Select to run the SmartSync FileService as a Local Service or Network Service. Click Next.
-
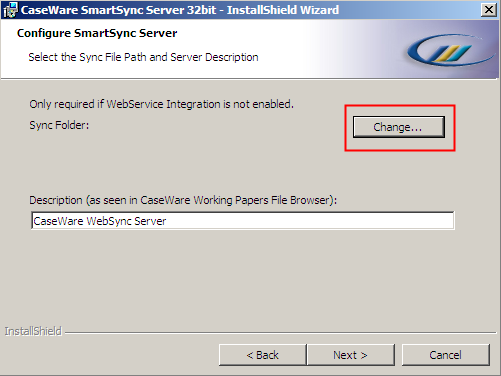
Click Change to navigate to the Sync File Path where the SmartSync top-level parent files will be stored on this server. Also known as the Publish Folder.
Note: For network shares, use a UNC Path. Example: \\SERVER01\Shared_Sync_Folder
- Type a Description for the server. This will display on the Servers tab in Working Papers. Click Next.
- Click Install.
-
(If required) Microsoft .Net 4.0 Framework is installed. Accept the license agreement and click Install. Click Finish once the .Net installation is complete.
Note: Microsoft Server 2012 requires .Net 4.5 Framework to be installed.
- (If required) Microsoft C++ 10.0 is installed. Accept the license agreement and click Install. Click Finish once the C++ installation is complete.
- Click Finish.
Results
SmartSync Server is installed.
Notes
- If the Publish Folder is local to the server where SmartSync Server is installed, do not share it.
- If the Publish Folder is on a mapped drive or a network share, the folder must be shared.
- The network service or user account that runs the file service requires full Read and Write access to three (3) folders: the location of the parent file (Publish Folder), "C:\CWRequests", and "C:\Program Files\CaseWare SmartSync Server".
- The IIS application pool account called CaseWareAppPool requires full Read and Write access to the location of the parent file (Publish Folder).
For more information on SmartSync Server, see SmartSync Server Installation Guide.
Storing Parent Files
Storing parent files on the same drive hosting the SmartSync Server application is the suggested practice for optimal performance and reliability. In scenarios where this is not possible, you can use a Windows Network Share on a different computer or NAS/SAN drive if the following requirements are met:
-
The file locking semantics must match those documented here.
-
File monitoring at the file system level must perform as documented here.
Testing a Network Share for use with SmartSync Server
When using a network share of any type, CaseWare recommends extensive testing before deployment, including completion of the following:
- Run the SyncStress test between the system hosting SSS and the network share.
- Publish files with the expected configuration used in production, including (if applicable) the use of metadata.
- Create new Sync copies.
- Synchronize changes by multiple concurrent users.


