CCH ProSystem fx Engagement Import Reference Guide
Overview
The ProSystem fx Engagement Import Wizard has been enhanced with an Advanced Conversion feature to ease the transition from ProSystem fx Engagement to Working Papers. There are specific steps that you need to perform before using the Import Wizard. This guide will highlight these steps, specifically:
- Installing and configuring a SQL Server instance required to facilitate the conversion.
- Importing ProSystem fx Engagement Binders.
- Converting ProSystem fx Engagement links in Microsoft Office documents into CaseWare Connector links that can access the data from the newly created Working Papers file.
- Importing multiple ProSystem fx Engagement files using the Advanced Conversion feature.
Note: The steps below describe three different import scenarios varying from a single engagement import to a more advanced import that is customizable based on a configuration file. The advanced import scenario requires familiarity with both Working Papers and ProSystem fx features, as well as familiarity with the process of installing and configuring a SQL Server Express instance. When planning to attempt a bulk import process, we recommend contacting CaseWare Customer Support for additional assistance.
Mapping and Templates
Working Papers makes use of the Mapping functionality that enables the use of a master chart of accounts. Mapping numbers can be used to automatically populate account properties to provide consistency and accuracy for engagements and to take advantage of advanced functionality within Working Papers.
Map numbers can be assigned automatically to each file using the Automap feature by selecting Tools | Options | Mapping. For each account, the Automap feature looks at either the Class or Tax Export Code and matches it against the client file mapping structure. Word matching with the account description is then used to narrow down an appropriate map number.
For Binders containing trial balances that have been grouped to the Account Class or Tax grouping, the import into Working Papers will automatically populate the chart of accounts with the Working Papers equivalent. If the Binder trial balance has not been grouped to the Account Class or Tax grouping, the Automap feature will not work. In this case, we recommend that map numbers be manually assigned using the Assign Mapping Numbers dialog accessed from Account | Assign Mapping Numbers.
Consolidation
Working Papers
Multiple non-consolidated Binders can be converted into a single consolidated Working Papers file. Prior to converting, ensure that a new Entity is created within Working Papers for every Binder that will be d. If you are importing a consolidated Binder then you will see multiple mapping dialogs as each ProSystem fx trial balance is imported.
The import process is followed for each Binder to be imported. During the import process, an Entity Selection dialog will appear where you can use a drop-down menu to select the Entity that the Binder should be imported into. This dialog only appears when a consolidated Working Papers client file is used.
When the option to Import Client Documents is selected, the Binder documents are imported into a separate folder in the Working Papers client file. Ensure the folder is renamed before the next import to ensure that the folder and its contents will not be overwritten.
ProSystem fx Engagement
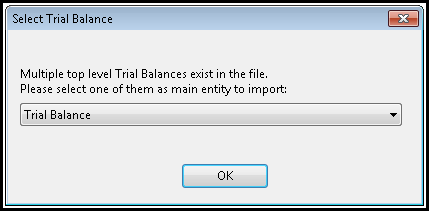
If an Engagement Binder is a consolidated Binder, it may contain multiple trial balance data sets. Working Papers can import one trial balance data set at a time, including one top level trial balance and all of its sub trial balances.
If there is more than one top level trial balance in the Binder, you will be prompted to select one of the top level trial balances to be imported as the top entity in your Working Papers file. The following dialog enables you to select a top level trial balance for import:
Preparing the CCH File for Import
Prior to importing, the ProSystem fx Engagement Binder must be checked out / synchronized to the Local File Room (LFR). Files from the Central File Room are not supported by the Working Papers import process.
Note: If the Binder already resides in the LFR, we recommend that the Binder be synchronized to ensure that all files are up to date. The ProSystem fx Engagement database files are constantly being updated and the import may fail if you are importing out-dated database files.
In ProSystem fx Engagement:
- Select the Binder.
- Click Tools | Synchronize Binder.
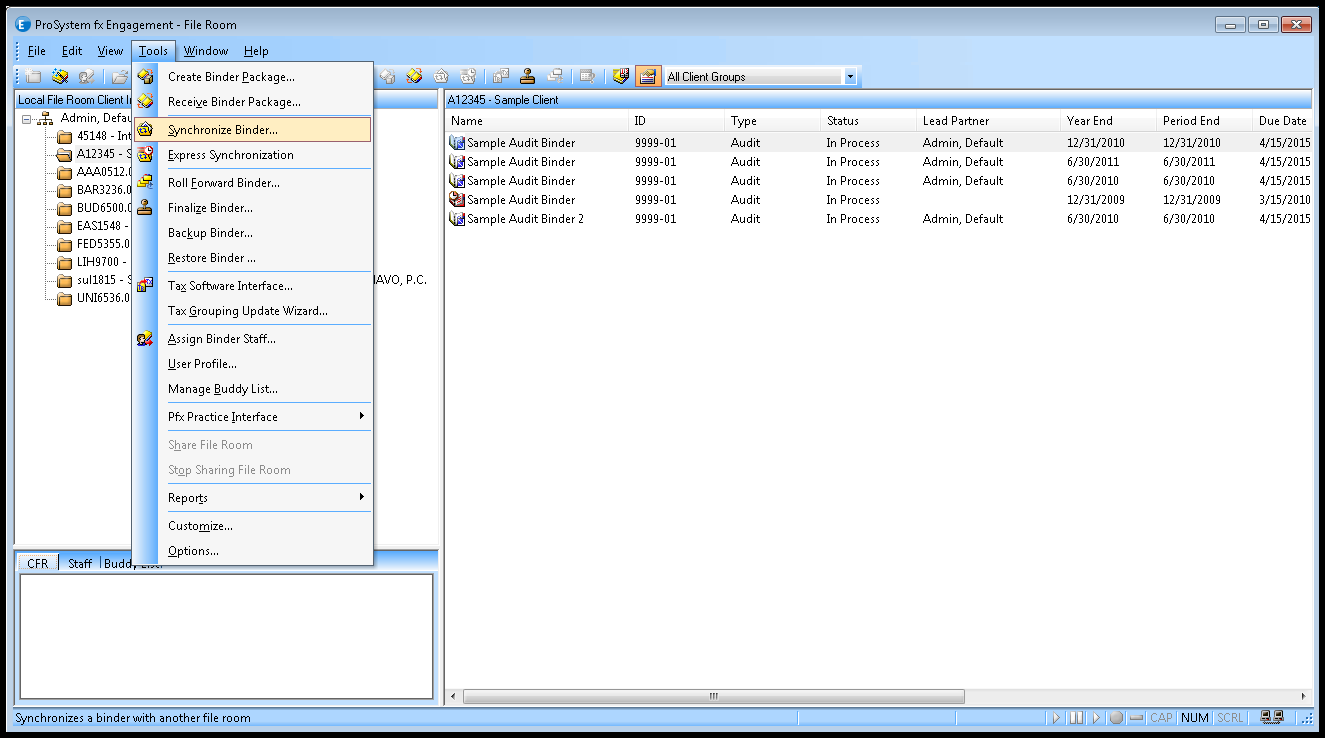
- Complete the Synchronize Binder Wizard as required.
SQL Sever Installation
Since ProSystem fx Engagement databases use the SQL data engine, ProSystem fx requires its own instance of the SQL Server. To prevent modifications to the SQL Server instance and the functionality of the program itself, we recommend installing an independent SQL Server instance on your machine prior to importing into Working Papers.
The import will require that the instance of SQL Server called PROFXENGAGEMENT be stopped to prevent any modifications. The independent SQL Server instance will then process your Binders. Once the Binders have been imported, the data will be stored in a Working Papers file rather than the SQL database. The instance used for the import will no longer be required; it can be uninstalled.
SQL Server Versions and Requirements
The version of SQL Server should be the same or later than the version used by CCH ProSystem fx Engagement to create the Binder. The latest ProSystem fx Engagement software was released with Microsoft SQL Server 2014 SP1.
The following flowchart will help you distinguish which version of SQL version you need to install:
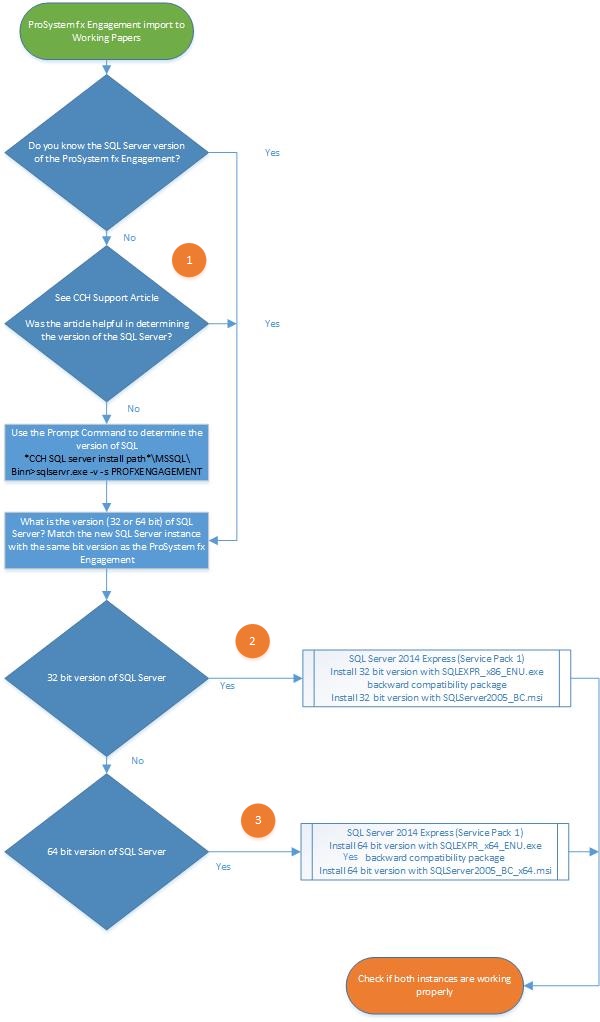
1) Do you know the SQL server version of the ProSystem fx Engagement?
Refer to this article if you are having difficulties distinguishing the SQL server version of the ProSystem fx Engagement.
2. 32-bit SQL Server 2014 Express (Service 1 Pack 1)
Download and Install 32 bit version with SQLEXPR_x86_ENU.exe
For backward compatibility,
Download and Install 32 bit version with SQLServer2005_BC.msi
3. 64-bit SQL Server 2014 Express (Service 1 Pack 1)
Download and Install 64-bit version with SQLEXPR_x64_ENU.exe
For backward compatibility,
Download and Install 64-bit version with SQLServer2005_BC_x64.msi
The following is the latest free, redistributable lightweight editions of SQL Server:
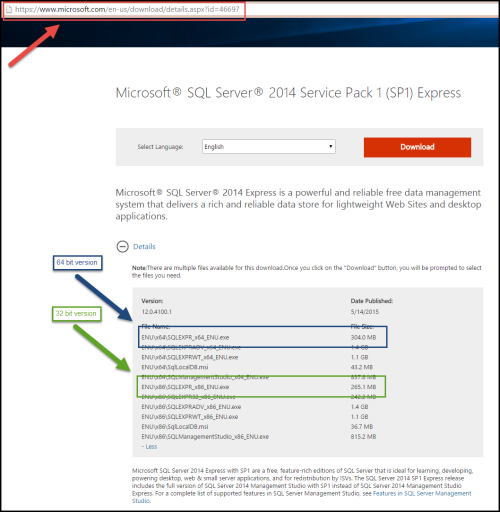
Microsoft does not include Backward Compatibility Components in the SQL Server download. These components are required for imports into Working Papers and can be found at the following location:
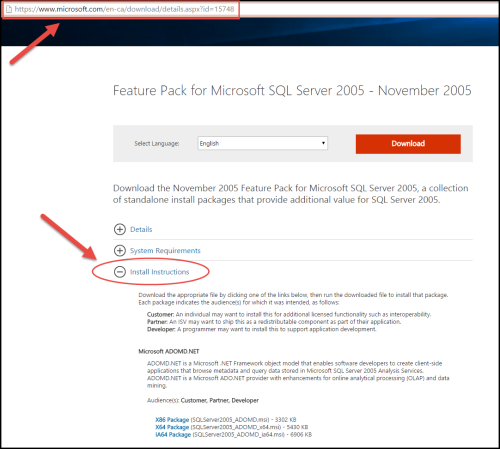
For information on system requirements, instructions, and installation files, visit the Microsoft Download Center.
Installing SQL Server 2014 SP 1 Express
The SQL Server Setup Wizard guides you through the installation of the SQL database. The installation instructions in this section are relevant to both the 32 and 64 bit versions of SQL 2014 Express.
-
The installation file for the 32 bit SQL Server 2014 SP 1 Express is SQLEXPR_x86_ENU.exe
-
The installation file for the 64 bit SQL Server 2014 SP 1 Express is SQLEXPR_x64_ENU.exe
Note: The versions listed above will require you to install the Backward Compatibility Components in order to complete the import.
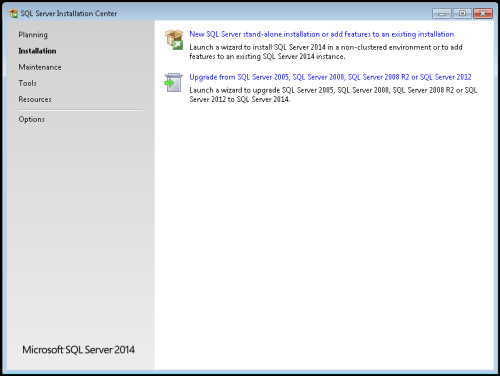
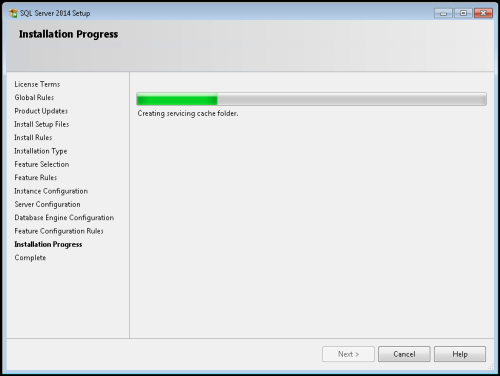
When installing SQL Server 2014 SP 1 Express, use the default settings:
-
Select New SQL Server stand-alone installation or add features to an existing installation.
-
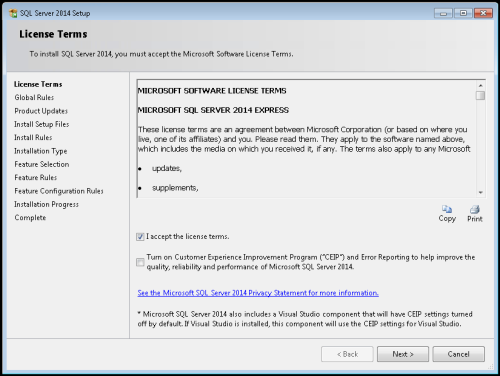
Select the checkbox I accept the license terms and click Next.
-
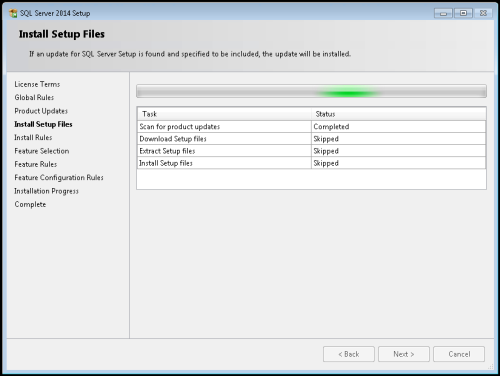
Click Next.
-
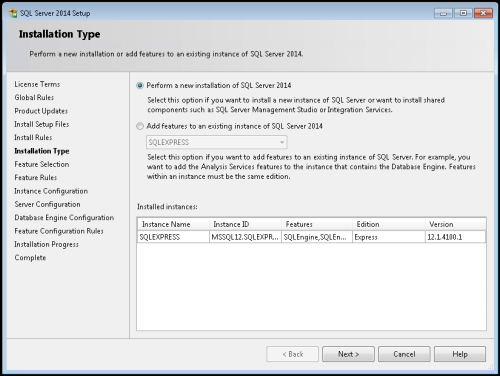
Select Perform a new installation of SQL Server 2014 and click Next.
-
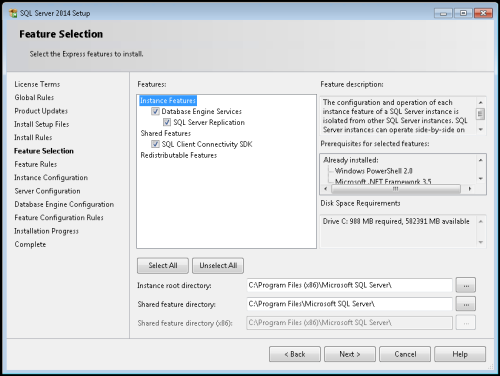
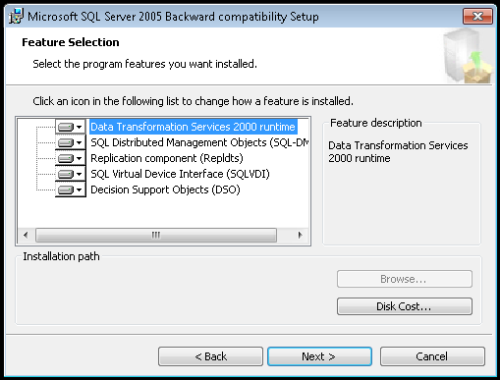
Ensure all the features are marked, and click Next.
-
Specify the name for this instance of SQL Server, and click Next.

-
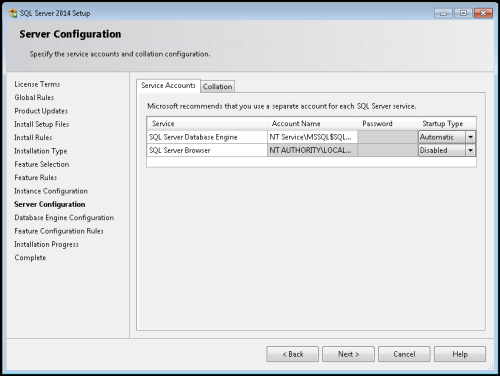
Ensure the Startup Type for the SQL Server Browser is set to Disabled, and click Next.
-
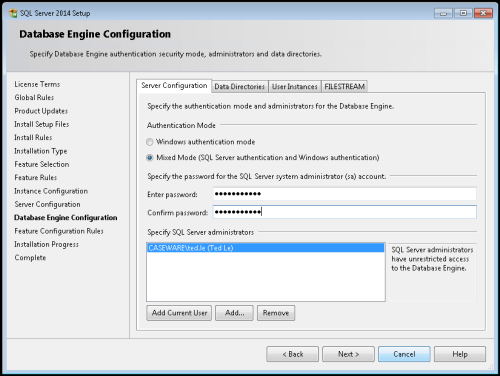
Select Mixed Mode, provide a password, and click Add Current User. Click Next.
-
Click Next.
-
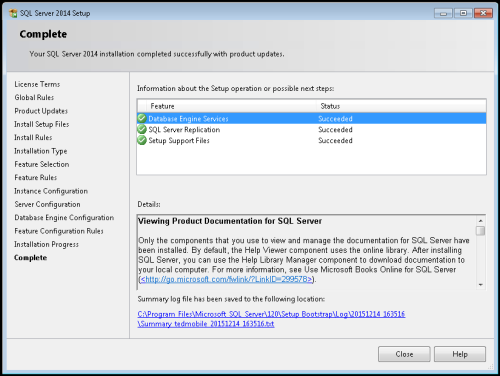
Click Close.
Result
The SQL Server database was installed on your local machine; however, you will not be able to import your Binders into Working Papers until you have installed the Backward Compatibility Components.
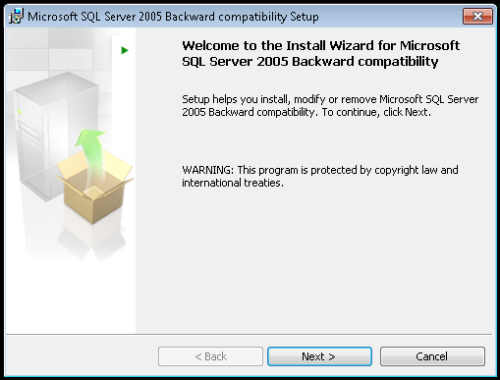
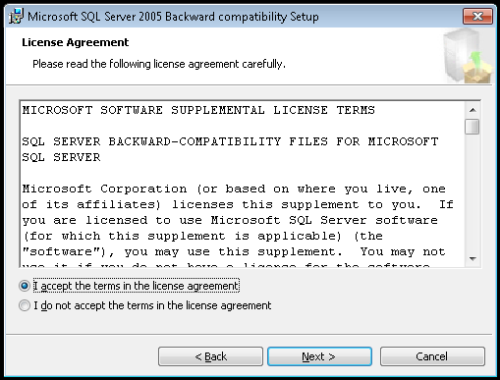
Installing Backward Compatibility Components
-
Click Next.
-
Select I accept the terms in the license agreement and click Next.
-
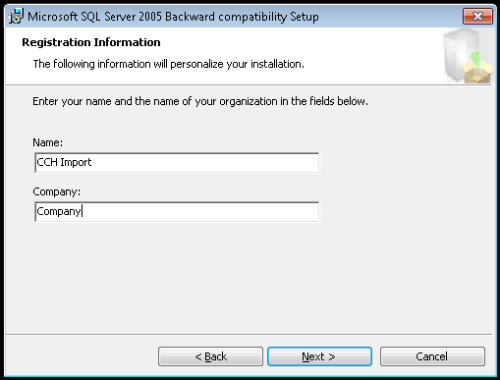
Provide a Name and a Company name, and click Next.
-
Click Next.
-
Click Install.
-
Click Next.
-
Click Finish.
Verifying the SQL Server Installation
After completing the installation, use the SQL Server Configuration Manager to verify that all components have been installed correctly.
- On the workstation where SQL Server was installed, go to Start | All Programs.
- Locate the program Microsoft SQL Server and select Configuration tools.
- Click SQL Server Configuration Manager.
- In the SQL Server Configuration Manager, select SQL Server Services to display the installed instances. The Instance Name for the instance that you just installed displays in brackets: (SQLEXPRESS).
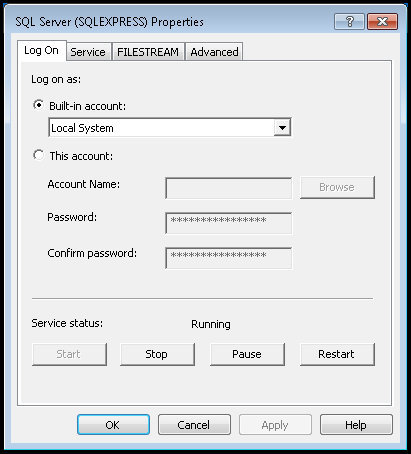
- Right-click on the SQL Server instance to access the properties of the instance.
- Ensure Built-in account is set to Local System in the Log On tab.
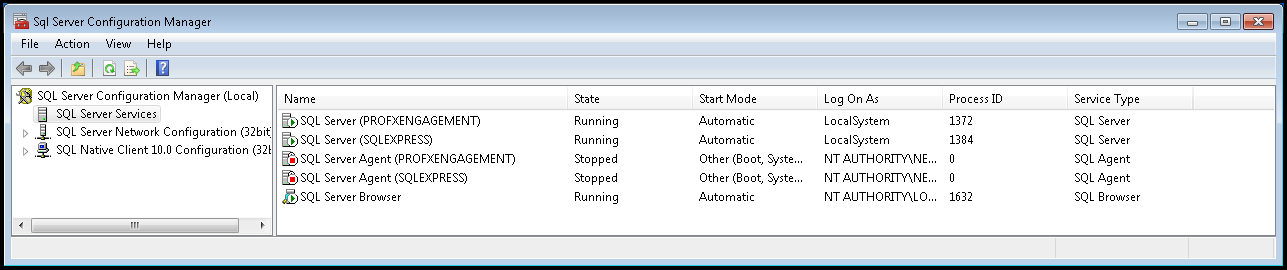
Failing to set your SQL Server to this account will result in User Access Control errors during the import.
Result
If the SQL Server is configured properly, you will be able to import from ProSystem fx Engagement into Working Papers.
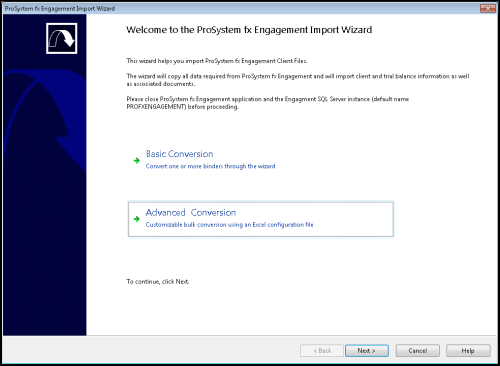
Determine the Best Import Option
 Click on an area in the screen shot below to view its description
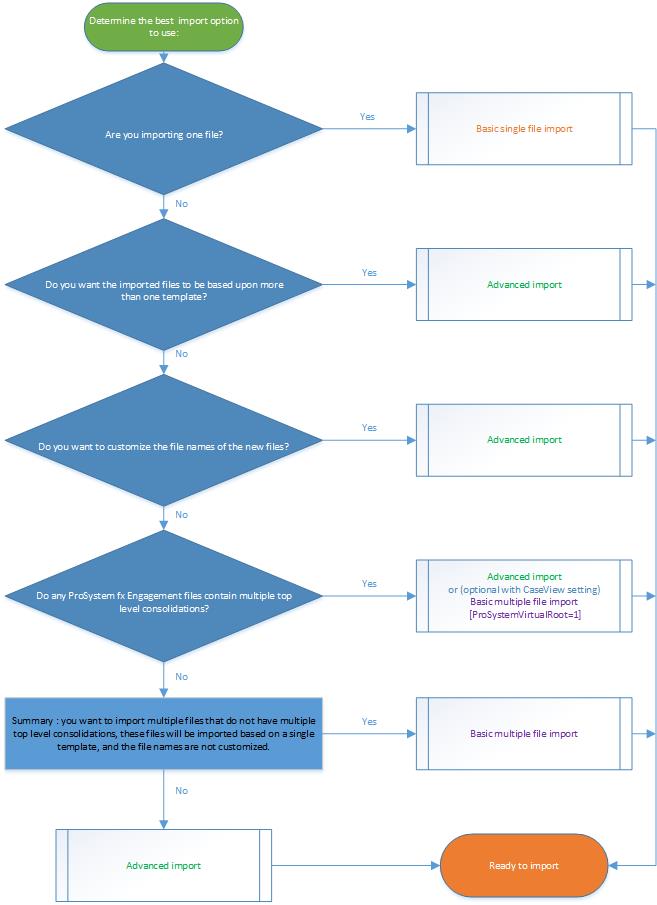
Basic Single File Import
Prerequisite
- If Protection is activated in Working Papers, you must have the File: Import right within the Data Store .
- ProSystem fx Engagement software is closed.
Procedure
- Run Working Papers as Administrator. Right-click on the shortcut for Working Papers and select Run as Administrator.
- Open an existing file or create a new one. This file can be created using the File | Copy Components or the New from Client Data options in Working Papers.
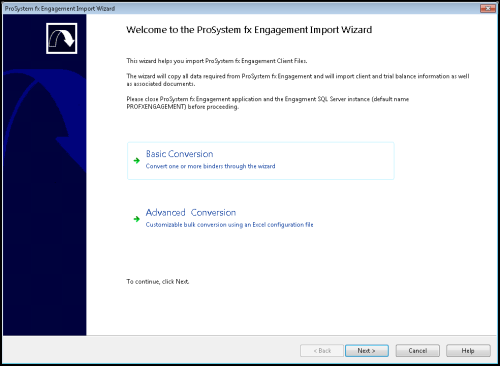
- In your Working Papers file, select Engagement | Import | ProSystem fx Engagement Import Wizard to begin the import process.
- Select Basic Conversion.
- Complete the Import Settings screen.
- Click Next.
- Working Papers will confirm if you want to continue.
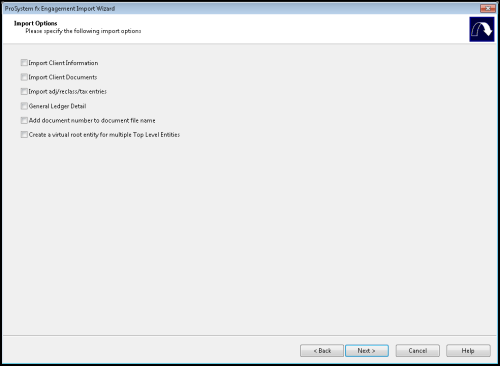
- Complete the Import Options screen to specify the information you would like to import with the wizard.
- Click Next.
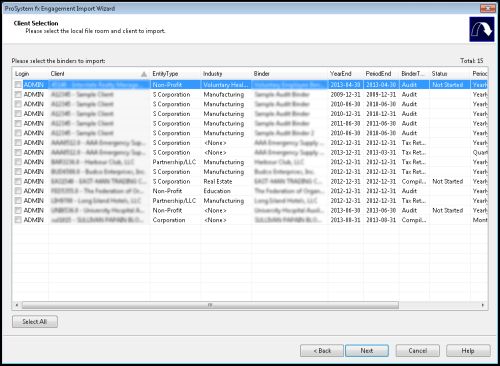
- Complete the Client Selection screen. This screen enables you to select the file that you will be importing. Files are organized according to the Local File Room they are part of and the client's name. Click the checkbox to select a file.
- Click Next.
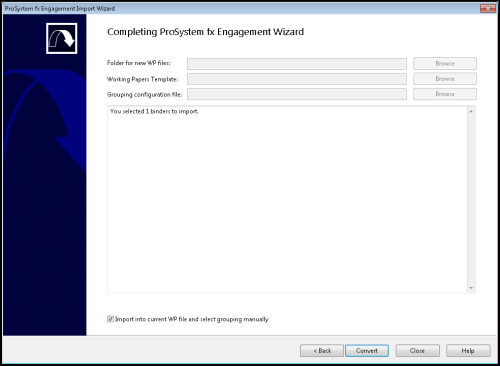
- Complete the ProSystem fx Engagement Wizard by selecting Convert. The Completing ProSystem fx Engagement Wizard screen will indicate the number of files being imported.
- Working Papers begins processing your data for import. For the trial balance in a Binder or for each trial balance in a consolidated Binder, a required grouping needs to be selected.
- Click OK.
The Welcome to the ProSystem fx Engagement Wizard screen appears.

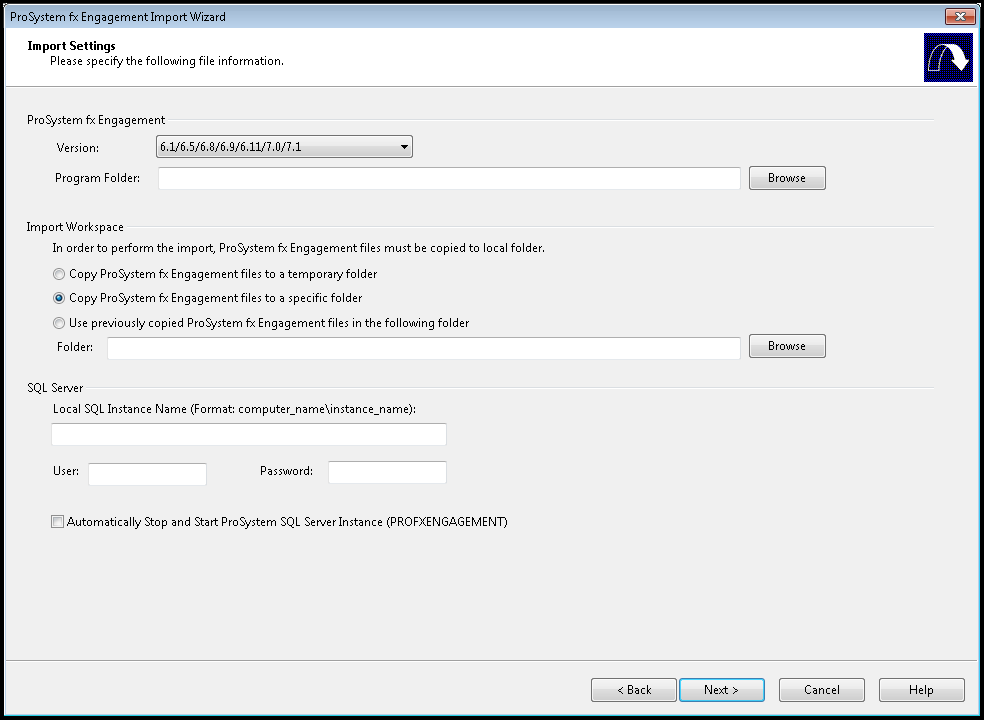
ProSystem fx Engagement
| Field | Description |
| Version | Select the version of ProSystem fx being used. |
| Program Folder | Enter the path to the folder where your ProSystem fx files are located or use Browse to locate the folder manually, for example C:\Pfx Engagement. |
Import Workspace
To prevent modifications to the production version of your files, the Working Papers import copies your ProSystem fx Engagement files from the ProSystem fx program folder to another folder and uses these copied files for the actual import. The copies can either be placed in a temporary folder or in a specific folder depending on the option that you choose here. You can also use files that have already been moved to an import folder.
Note: Do not use a folder located in one of your Windows libraries such as My Documents. The import will not be able to utilize the files correctly. Instead, create an import directory in a location such as C:\ that you have full permissions to administrate.
| Field | Description |
| Copy ProSystem fx Engagement files to a temporary folder | If this option is selected, ProSystem fx files will be copied to a system temporary folder, for example C:\Users%USERPROFILE%\AppData\Local\Temp.The import will use the files in this folder. |
| Copy ProSystem fx Engagement files to import folder |
Note: Select this option when importing for the first time. The program will copy ProSystem fx files into the specified folder and will run the import using the files in that folder. |
| Use the ProSystem fx Engagement files located in the import folder |
Note: Select this option when running subsequent imports. The copying step will be skipped and the import will run using the files already present in the specified directory. The copying step is not necessary as the files have already been copied from the first run. |
SQL Server
| Field | Description |
| Local SQL Instance Name | Enter the local SQL instance name that you created. The format of the instance is: computer_name\instance_name. |
| User | Enter the User name. |
| Password | Enter the password for the specified user. |
Select the checkbox to Automatically Stop and Start ProSystem SQL Server Instance (PROFXENGAGEMENT)
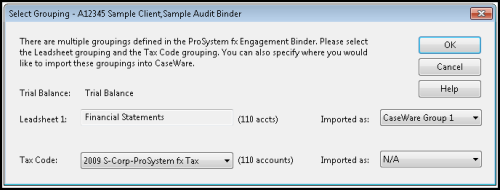
Note: It is imperative that the correct groupings be selected here as these selections will be applied throughout the import and cannot be changed afterward. Generally, the main leadsheet is mapped to Working Papers Group 1.
Result
Once the import process is completed, you will be returned to the Working Papers interface and your file will be ready to use. The Binder will be in your Working Papers file.
Converting Links with Connector
Like ProSystem fx Engagement, Connector can link information and data in Microsoft Word and Excel using custom functions.
Connector can scan the current document, locate ProSystem fx Engagement links, and adapt them to be compatible with Working Papers, saving the manual work of replacing the links. This feature is useful if a file has been imported into Working Papers and legacy Excel or Word files need to be rebuilt to link to the Working Papers client file.
For example, Connector automatically converts ProSystem fx Engagement functions, such as the TBLink trial balance function, into Connector functions in a format such as ACT("BR","102").
Procedure
- Open the Word or Excel document from the Document Manager.
- On the Connector toolbar,
- If working in Word, select Tools | Convert Third Party Formulas.
- If working in Excel, select Tools | Convert then select Third Party Formulas.
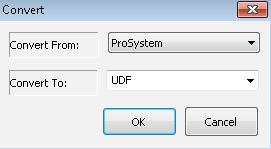
- In the Convert dialog, choose to convert from ProSystem. Click OK.
- The Convert dialog will inspect every cell within an Excel document and every field within a Word document and will translate their formula for Connector. The Convert dialog will then populate with the Old Formula and the New Formula:
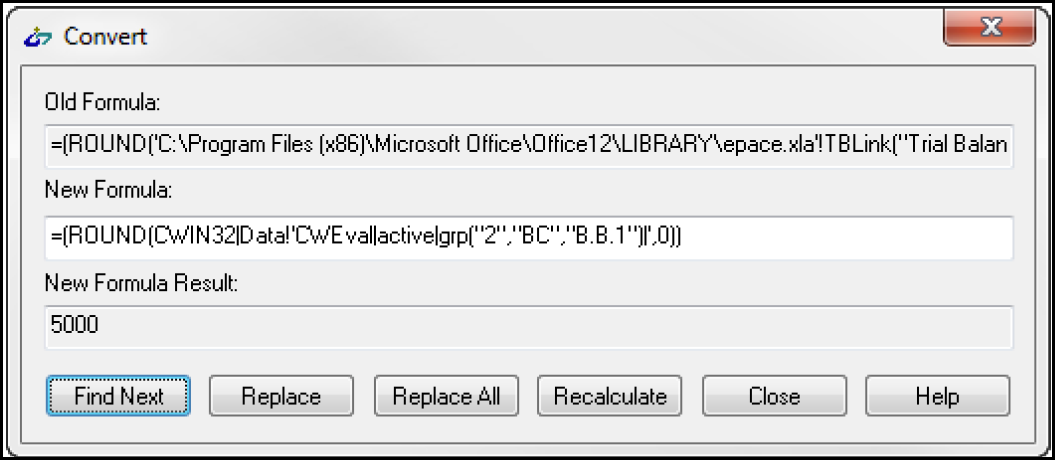
The Old Formula refers to the ProSystem fx Engagement formula being converted. The New Formula refers to the resulting connector formula. The New Formula Result contains the value of the new formula. You can edit the new formula if the conversion is not appropriate.
The Convert dialog provides the following options:
| Option | Description |
| Find Next | Skips the conversion of the current field or cell and moves to the next field or cell. |
| Replace | Replaces the formula for the current field or cell and moves to the next field or cell. |
| Replace All | Automatically converts all remaining cells or fields without further prompting. |
| Recalculate | Recalculates the new formula. This is useful if you want to edit the formula converted by Connector. |
Conversion Limitations
Connector will not convert a ProSystem fx Engagement formula when:
- There is an error in the original ProSystem fx Engagement formula.
- The original formula is longer than 1024 characters.
- There is no equivalent function in CaseWare.
- The original formula contains a range, e.g. TBLink(Trial Balance,FINAL[7],1200:1800,15,3).
In these cases, the Convert dialog will display "Error: Unable to convert the formula" in the New Formula Result field. When such an error occurs, you can add a new formula, remove the formula, or skip the conversion by clicking Find Next.
ProSystem fx formulas that link to a specific entity will have their entity information ignored during conversion. As a result, the converted formulas point to the default entity (the currently selected entity in Working Papers).
Basic Multiple File Import
Note: If you are new to importing multiple ProSystem fx Engagement files, we recommend the Advanced Import option. When planning to attempt a bulk import process, we recommend contacting CaseWare Customer Support for additional assistance.
Prerequisite
- If Protection is activated in Working Papers, you must have the File: Import right within the Data Store .
- ProSystem fx Engagement software must be closed.
Procedure
- Run Working Papers as Administrator. Right-click on the shortcut for Working Papers and select Run as Administrator.
- Open an existing Working Papers file or create a new one. This file can be created using the File | Copy Components or the New from Client Data options in Working Papers.
- In your Working Papers file, select Engagement | Import | ProSystem fx Engagement Import Wizard to begin the import process.
- Select Basic Conversion.
- Complete the Import Settings screen.
- Click Next.
- Working Papers will confirm if you want to continue.
- Complete the Import Options screen to specify the information that you would like to import with the wizard.
- Click Next.
- Complete the Client Selection screen. This screen enables you to select the client file that you will be importing. Files are organized according to the Local File Room they are part of and the client name. Click the checkbox to select a file.
- Click Next.
- Complete the ProSystem fx Engagement Wizard by selecting Convert. The Completing ProSystem fx Engagement Wizard screen will indicate the number of files being imported.
The Welcome to the ProSystem fx Engagement Wizard screen appears.
ProSystem fx Engagement
| Field | Description |
| Version | Select the version of ProSystem fx being used. |
| Program Folder | Enter the path to the folder where your ProSystem fx files are located or use Browse to locate the folder manually, for example C:\Pfx Engagement |
Import Workspace
To prevent modifications to the production version of your files, the Working Papers import copies your ProSystem fx Engagement files from the ProSystem fx program folder to another folder and uses these copied files for the actual import. The copies can either be placed in a temporary folder or in a specific folder depending on the option that you choose here. You can also use files that have already been moved to an import folder.
Note: Do not use a folder located in one of your Windows libraries such as My Documents. The import will not be able to utilize the files correctly. Instead, create an import directory in a location such as C:\ that you have full permissions to administrate.
| Field | Description |
| Copy ProSystem fx Engagement files to a temporary folder | If this option is selected, ProSystem fx files will be copied to a system temporary folder, for example C:\Users%USERPROFILE%\AppData\Local\Temp. The import will use the files in this folder. |
| Copy ProSystem fx Engagement files to import folder |
Note: Select this option when importing for the first time. The program will copy ProSystem fx files into the specified folder and will run the import using the files in that folder. |
| Use the ProSystem fx Engagement files located in the import folder |
Note: Select this option when running subsequent imports. The copying step will be skipped and the import will run using the files already present in the specified directory. The copying step is not necessary as the files have already been copied from the first run. |
SQL Server
| Field | Description |
| Local SQL Instance Name | Enter the local SQL instance name that you created. The format of the instance is: computer_name\instance_name. |
| User | Enter the User name. |
| Password | Enter the password for the specified user. |
Select the checkbox to Automatically Stop and Start ProSystem SQL Server Instance (PROFXENGAGEMENT)

Advanced Import
Prerequisite
- If Protection is activated in Working Papers, you have the File: Import right.
- ProSystem fx Engagement software is closed.
Before using the advanced import for the first time, a couple of ini files must be created that have the parameters for the templates, final destination of the Working Papers files, and any grouping / mapping relationships. This is only required to be performed once when setting up the import.
Creating .ini files
CCHBulkAutofill.ini
This file will help generate the Excel configuration file.
-
In Windows, select the Start Menu, select Programs | Accessories, and then click Notepad.
-
Enter the following information:
[Template]
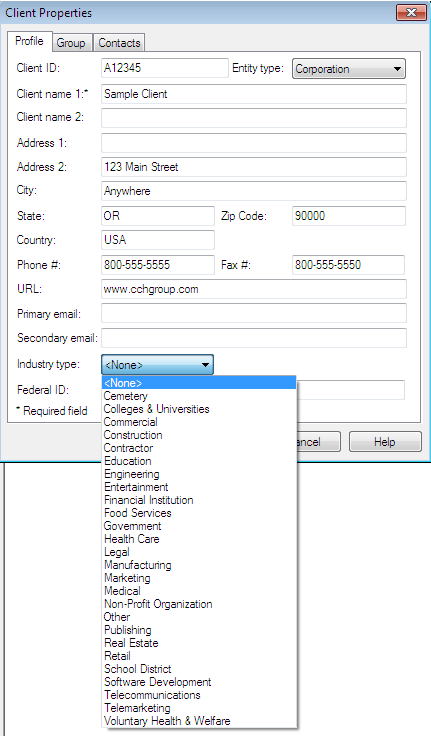
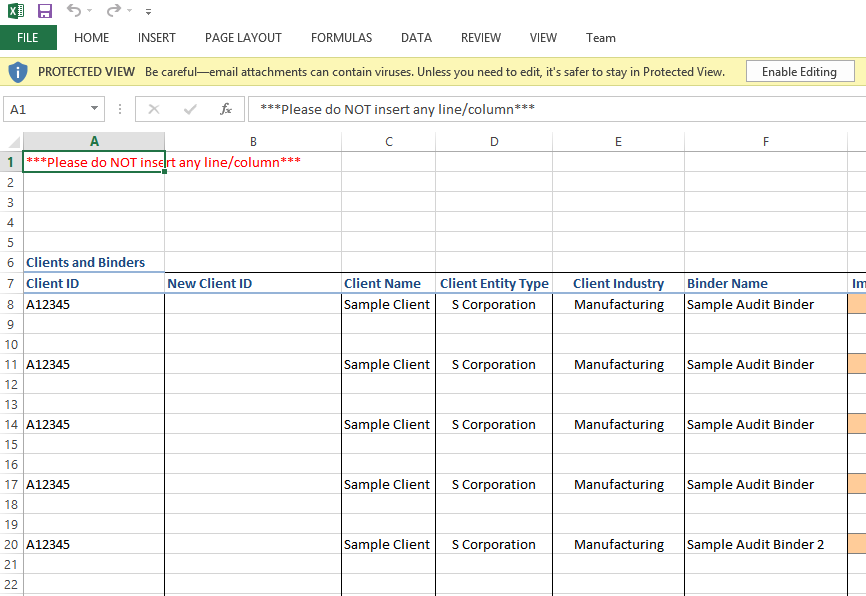
Note: For the [Template] section in this ini file, the import will try to match the keyword with the ‘Client Industry’, if it fails to find a match then it will use the ‘Default’ option. In ProSystem fx Engagement, the Client Industry is specified from the Client Index in the Client Properties dialog in the field Industry type, as seen in the below image. All template files installed on your computer will be added into the drop-down list within the Excel configuration file, however, they will need to be listed in this ini file.
default=C:\Users\*name*\wp15 091\Data\Financial\Samp01
Financial Institution=C:\Users\*name*\wp15 091\Data\Financial\Samp01
Note: If your ProSystem Fx Engagement file has a ‘Financial Institution’ Industry, samp01 would be used as the template file.
[Grouping]
Note: For the [Grouping] section, the import will match ‘Group name’ and the appropriate ‘CWGrouping’.
Financial Statements=1
Note: If your ProSystem Fx Engagement file has a grouping with name of ‘Financial Statements’, the destination group would be 1. For example :
Consolidation=1
where...
- C:\Users\*name*\... is the pathname for the directory containing the templates, final destination of the Working Papers files, and any grouping / mapping relationships.
- Samp01.ac is the name of the Working Papers file.
-
Save the file as CCHBulkAutofill.ini.
CCHMapping-grouping.ini
This file will help generate the mapping and grouping similar to the Automap function within Working Papers. The Bulk-conversion process will fill out the mapping number and grouping number in the new Working Paper file specified in this ini file.
-
From the main Notepad menu, select File then New.
-
If your ProSystem Fx Engagement file has the grouping number 1100.1100.10, and you want it to correspond to the mapping number 11.210 in your template, the syntax will be:
[MappingCWGroup1]
1100.1100.10=11.210
Note: If your ProSystem Fx Engagement file has the grouping number 1100.1100.10, and you want it to import it to CaseWare Group 1 within group B, then the syntax will be:
[GroupingCWGroup1]
1100.1100.10=B
Note: You can specify multiple sections by using [MappingCWGroup2], [MappingCWGroup3], to [MappingCWGroup10]. For example:
[MappingCWGroup1]
1100.1100.10=11.210
[MappingCWGroup2]
1100.1100.20=11.220
- Save the file as cchmapping-grouping.ini.
Procedure
- Run Working Papers as Administrator. Right-click on the shortcut for Working Papers and select Run as Administrator.
- Create a new Working Papers file or open an existing one.
- In your Working Papers file, select Engagement | Import | ProSystem fx Engagement Import Wizard to begin the import process.
The Welcome to the ProSystem fx Engagement Wizard screen appears.
- Select Advanced Conversionand click Next on the Welcome screen.
- Complete the Import Settings screen.
- Click Next.
- Working Papers will confirm if you want to continue.
- Complete the Import Options screen to specify the information that you would like to import with the wizard.
- Click Next.
- Complete the Client Selection screen. This screen enables you to select the client file that you will be importing. Files are organized according to the Local File Room they are part of and the client name. Click to select all files.
- Click Next.
- In the Bulk conversion options screen, select Create an excel configuration file, click Browse, and locate the CCHBulkAutofill.ini file.
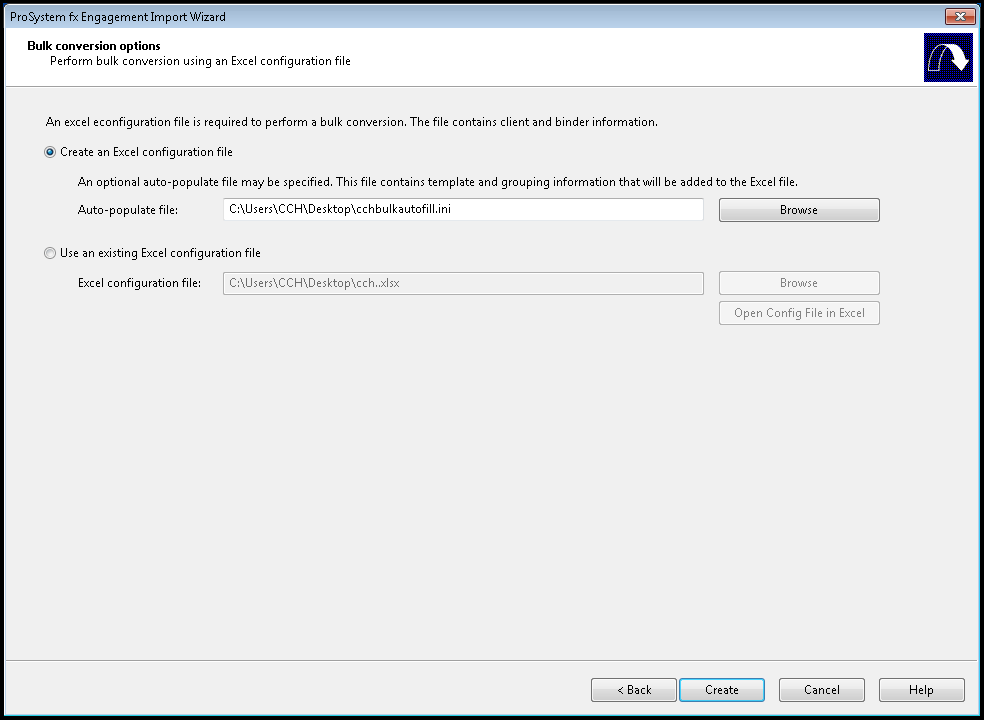
- Click Create to create an excel file that drives the import. Working Papers will automatically open this file for you to review.
- Once the location of the Excel file has been established, the procedure will prompt for confirmation of your settings. Complete the ProSystem fx Engagement Wizard by selecting Convert.
- Select the location of the new Working Papers file folder and the cchmapping-grouping.ini file.
- The Completing ProSystem fx Engagement Wizard screen will indicate the number of files being imported.

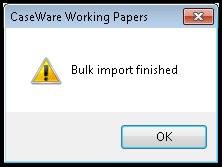
- Working Papers begins processing your data for import and the elapsed time is shown by a green process bar. The process will be completed by a prompt. Click OK.
ProSystem fx Engagement
| Field | Description |
| Version | Select the version of ProSystem fx being used. |
| Program Folder | Enter the path to the folder where your ProSystem fx files are located or use Browse to locate the folder manually, for example C:\Pfx Engagement |
Import Workspace
To prevent modifications to the production version of your files, the Working Papers import copies your ProSystem fx Engagement files from the ProSystem fx program folder to another folder and uses these copied files for the actual import. The copies can either be placed in a temporary folder or in a specific folder depending on the option that you choose here. You can also use files that have already been moved to an import folder.
Note: Do not use a folder located in one of your Windows libraries such as My Documents. The import will not be able to utilize the files correctly. Instead, create an import directory in a location such as C:\ that you have full permissions to administrate.
| Field | Description |
| Copy ProSystem fx Engagement files to a temporary folder | If this option is selected, ProSystem fx files will be copied to a system temporary folder, for example C:\Users%USERPROFILE%\AppData\Local\Temp. The import will use files in this folder. |
| Copy ProSystem fx Engagement files to import folder |
Note: Select this option when importing for the first time. The program will copy ProSystem fx files into the specified folder and will run the import using the files in that folder. |
| Use the ProSystem fx Engagement files located in the import folder |
Note: Select this option when running subsequent imports. The copying step will be skipped and the import will run using the files already present in the specified directory. The copying step is not necessary as the files have already been copied from the first run. |
SQL Server
| Field | Description |
| Local SQL Instance Name | Enter the local SQL instance name that you created. The format of the instance is: computer_name\instance_name. |
| User | Enter the User name. |
| Password | Enter the password for the specified user. |
Select the checkbox to Automatically Stop and Start ProSystem SQL Server Instance (PROFXENGAGEMENT)
Result
Once the import process is completed, you will be returned to the Working Papers interface and your files will be ready to use.


