Configuring Notes
When you have added notes to the Firm Notes to the Financial Statements Library document or to any document that contains notes, you can configure the notes.
Configuring Note Options
Prerequisites
To configure a note, you must first open the Firm Library document for the note area.
Procedure
- Open the Firm Library document for the note area
- Right-click the applicable note heading, select Configure and then select from the following options:
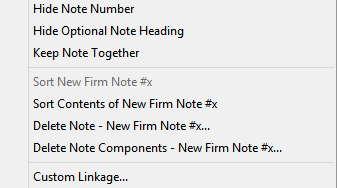
| Option | Description |
|---|---|
| Hide Note Number | Select to hide the note number. The indenting of the note in the document is automatically updated. To show a note number, right show a note number that has been hidden, right-click the heading and select Configure and Show Note Number. |
| Hide Optional Note Heading |
Select to skip a note heading from displaying. The heading changes color from black to blue, indicating that it is no longer displayed, and the indenting of the note in the document is updated. To show a heading that has been hidden, right-click the heading and select Configure and Show Optional Note Heading. Note: Note topics are now skipped when inserted into the financial statements if skipped in the notes knowledge library. |
| Keep Note Together | Specify the behavior when note content extends beyond the page. Select to move the entire note to a new page, or clear it to print the note over two pages. |
| Sort [heading] | Select to sort all note sections at the level of the note heading. The Manual Section Sort dialog appears. To re-order a section, select it and click either Move up or Move down. |
| Sort Contents of [heading] | Select to sort all note sections at the level below the note heading. The Manual Section Sort dialog appears. To re-order a section, select it and click either Move up or Move down. |
| Delete Note [heading] | Delete the selected note. For more information, see Adding and deleting notes. |
| Delete Note Components | Delete a component of a note that contains multiple components. For more information, see Adding and deleting notes. |
| Custom Linkage | Define a custom linkage to a note. For more information, see Creating Custom Linkages. |
Changing Knowledge Library Headings
Procedure
- Right-click the heading that you want to change.
- From the shortcut menu, select Knowledge Library and Change Heading and type the new name.
- From the Content Management tab, select Update Headings in Knowledge Library if it is not already selected. (If a checkmark appears next to Update Headings in Knowledge Library, it is already selected.) In the note to be changed, in the input field, type the new note name.
Results
The knowledge library heading has been updated.
Inserting Jumps
Procedure
- To define the Jump to in the note, right-click on the note heading and select Jump to and then Insert jump to statement. From the Insert Jump dialog, select the statement(s) to relate to the note/policy and click OK.
- To define the Jump to in the statement, right-click on the line item and select Jump to and then select Insert Jump to Notes to the Financial Statements. From the Select the base content window, select the note(s) defined in the previous step and click OK. Repeat this step to create the Jump to for the related accounting policy.
Results
A jump has been inserted.