Firm Library - Working with Tables
The majority of the content in Financials is built using tables. Financials provides Template authors will the ability to customize their tables to fit the needs of their organization, including adding and deleting rows and columns, adding and deleting subtotals, and defining when rows should print.

- Inserting or Deleting Rows
- Adding a Paragraph Before or After a Table
- Editing Table Header
- Showing and Hiding Headings
- Sorting Rows
- Setting the Mapping and Grouping for a Table
Inserting or Deleting Rows
You can insert one or more rows to any table in the financial statements.
Procedure
- In the Firm Library document for the financial statement area, click the row that the new row is to be added after.
- From the Table Tools tab, in the Operations group, click
 (Insert) and select Rows.
 - In the Insert Rows dialog, select from the following options:
| Field | Description |
|---|---|
|
Number or rows to insert |
Select or type the number of unpopulated rows to insert into the table. |
|
Define map/group numbers |
Enter a map/group number or partial map/group number in the field to the right, to filter the map/group structure pane below. In the map/group structure pane, select those numbers to be inserted into the table. For example, selecting three map numbers will insert three rows automatically populated with those mapping numbers. Note: The number of inserted rows, based on the map/group selections, displays below the map/group structure. Where the number of inserted rows exceed the table maximum, only the remaining number of rows before reaching the maximum will be inserted. |
|
Copy content |
If selected, the new rows will be configured with the same row properties as the row containing the cursor. This will also include the map/group selection when the Number of rows to insert option is chosen. |
|
Create Subtotal |
Automatically create a subtotal row that includes all of the inserted rows. |
|
Create collapsible section |
When creating a subtotal, select to insert a title row at the top of the section with a +/- sign. Click the - sign to collapse the section and hide the inserted rows. Only the subtotal displays with the title row description. Click the + sign to expand the section and display all of the lines of the section. |
|
Apply title and subtotal styles |
Select to use the default title and subtotal styles. |
Results
The new rows are added at the specified location. To delete a row, simply select the row you want to delete and from the Table Tools tab, in the Operations group, click  (Delete).
Adding a Paragraph Before or After a Table
Financials provides options that enable you to configure tables in a financial statement area.
You can add a text paragraph either before or after any table.
Prerequisites
You can configure any table after you have added content to a financial statement area. See Adding and organizing content for more details.
Procedure
- In the Firm Library document for the financial statement area, click the table that the paragraph is to be added before or after.
- From the Section menu, select New Paragraph before Table to add a paragraph before the table, or select New Paragraph After Table to add a paragraph after the table.
Results
The text paragraph is added either before or after the table.
Editing Table Header
In a table in a financial statement area, you can add and configure title lines and headings.
When editing content in a financial statement area, you can edit any heading text in a table.
Prerequisites
Title lines and headings can be added to tables after content has been added to a financial statement area. See Adding and organizing content for more details.
Procedure
- In the Firm Library document for the financial statement area, right-click the heading text to be edited.
- Select Edit column heading.
- Type the new text for the heading.
To revert to the original heading text, right-click the heading text and unselect Edit Column Heading.
Results
The table heading text is changed.
Note: Template authors can also add cells or text directly into the table headings if needed. The presence of the  icon indicates where these modifications can be made. Paragraph skip and hide conditions on table headings can also be managed by template authors. Caution should be exercised when managing skip and hide conditions, as the existing conditions are tied into the financial statement options.
Showing or Hiding Headings
In a table in a financial statement area, you can add and configure title lines and headings.
When editing content in a financial statement area, you can specify when table headings are to be printed. You can specify that they are to be always printed, never printed, or printed only when non-zero values exist in the table.
This feature is commonly used if you are combining multiple Do-It-Yourself tables to create a statement or schedule. Each Do-It-Yourself table is provided with a table heading which cannot be deleted, so the best option is to set the headings so that they do not print.
Prerequisites
Title lines and headings can be added to tables after content has been added to a financial statement area. See Adding and organizing content for more details.
Procedure
-
Right click the section not to be printed and select Show/hide heading and select one of the following:
- Show Table Heading With Data - print the table heading if non-zero values exist in the table
- Always Show Table Heading - print the table heading even if no non-zero values exist in the table
- Never Show Table Heading - never print the table heading
Results
The headings are hidden or displayed as specified in the selected option.
Sorting rows
When you are editing content in a financial statement area, you can sort the rows in a section of a table. Sorting can be based on the values in any table column, or can be performed manually.
Prerequisites
To configure rows in a table in a financial statement area, you must have loaded content into the area. See Adding and organizing content for more details.
Procedure
-
In the Firm Library document for the financial statement area, in the section that you want to sort, click in the column that you want to use as the sort criterion, or click in any column if you want to sort the lines yourself.
-
From the Table Tools tab, in the Operations group, click Sort then Rows and select one of the following:
- Ascending - By This Column - sort the section in ascending order, using the column in which you clicked as the sort criterion
- Descending - By This Column - sort the section in descending order, using the column in which you clicked as the sort criterion
- Manually - sort the section manually
-
If you have selected Manually, the Manual Section Sort dialog appears.
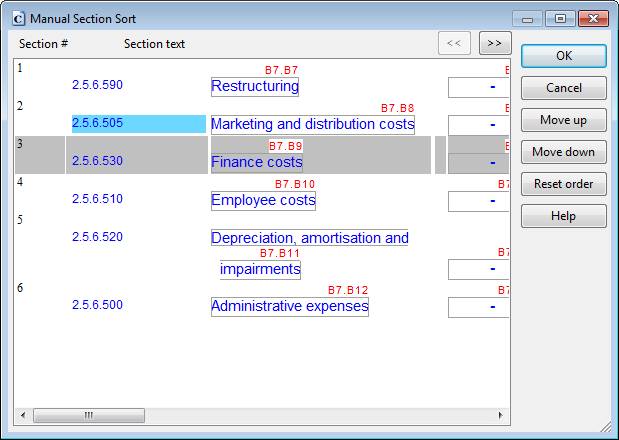
Select the row to sort.
- Click Move up to move the row up in the sort, or click Move down to move it down. Click Reset order to use the original sort order.
- Repeat Steps 3 and 4 until all rows are sorted.
- Click OK.
Results
The rows are sorted as specified.
Setting the mapping or grouping for a table
By default, all tables use the mapping or grouping specified in the Grouping used to build the statements drop-down in the General Settings section of the CL - Organization standards document. Changes to the default grouping for the row will be highlighted in blue, and changes to the table are highlighted in pink.
When editing content in a financial statement area, you can specify the mapping or grouping to use for an entire table or for a single row in a table.
Prerequisites
To edit the mapping or grouping information for a table, you must first add the content to the financial statement area. See Adding and organizing content for more details.
Procedure
- In the Firm Library document for the financial statement area, click in the table whose mapping or grouping is to change.
-
From the Table Tools tab, click
 Edit, select Table Grouping and then the mapping or grouping you want to use.
The map number column changes color, indicating that the mapping or grouping has changed.
- For each row in the table, in the map number column, select the mapping to use. When you change the mapping, the description field also changes.
Results
The selected mapping is displayed in each row in the table. The text in the description column changes to match the changed mapping.