Citrix and Terminal Server Guide
Table of Contents
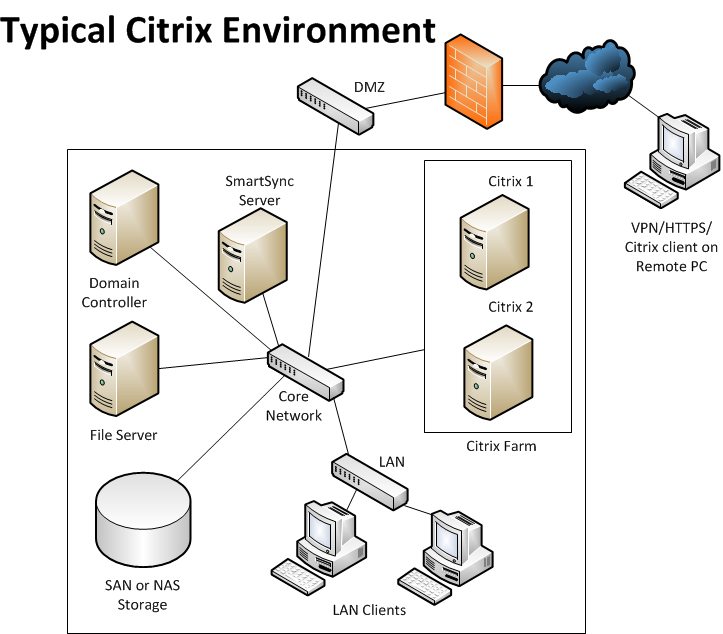
Overview
This guide contains best practices and troubleshooting information for installing and configuring CaseWare products in a Citrix or Terminal Server environment. The document applies to standalone Citrix/Terminal servers and to Citrix server farms.
Installation
Installing CaseWare products on a Citrix/Terminal Server environment involves three basic steps:
- Install the CaseWare products to the Citrix/Terminal server.
- Perform post-installation configuration as detailed in this guide.
- Publish the applications to the various Citrix client sessions (Citrix only).
Three optional steps can be performed to enhance user management and security:
- Use roaming profiles to manage users accessing multiple Citrix servers or a Citrix farm.
- Install the Data Store Administration Tool and create a new Data Store.
- Set up Working Papers Protection if you require it in your environment.
Once these steps have been completed, users should have access to all of the applications.
System Requirements
See Working Papers' System Requirements.
Install Working Papers on Citrix and Terminal Server
Access the Citrix server using remote desktop for all operations listed below.
- Ensure that all previous versions of Working Papers are uninstalled.
- Ensure that all previous versions of Working Papers are removed from the file system. Files in the /data folder can be retained, but all other Working Papers program files must be deleted (both *.exe and *.dll file extensions).
- Use the Citrix Delivery Services Console/App Center to ensure that all previously published Working Papers installations on Citrix Web Access are deleted.
- Reboot the server.
Working Papers can be installed in two different ways:
GUI method:
- Click Control Panel | Programs | Install Application on Remote Desktop.
- Double-click Working Papers.
- After installation is complete, publish Working Papers in the Citrix Delivery Services Console/App Center.
Command line method:
- Open a command prompt and enter the following command to enable Install mode:
- Change User /Install
- Right-click on the Working Papers installation file (Cwin32.exe or Cwin64.exe) and select Run as Administrator to install Working Papers.
- After installation is complete, enter the following command to switch back to Execute mode:
- Change User /Execute
Notes:
- Citrix publishing requires you to specify an executable and a working directory. The executable used to launch Working Papers is called Cwin32.exe (or Cwin64.exe for 64 bit installations). This file is located in the CaseWare root installation folder and should be referenced by the Command line field. The Working directory field should be set to the CaseWare root installation folder.
- More information on publishing applications in a Citrix environment can be found on the Citrix web site. If your Citrix server is running a different version of the software from the version described in the article, you will need to search the Citrix site for more information.
- Working Papers works in Citrix VDI with a network license.
Silent Installation
For information on performing silent (unattended) installations of CaseWare products, see Perform a Silent Installation. Silent installations cannot be performed with electronic licensing copies.
Best Practices
This section details Working Papers features that can be modified to improve performance on a Citrix or Terminal server.
Performance Considerations
Working Papers' performance in a Citrix or Terminal Server environment can be affected by two main factors: CPU usage and network bandwidth.
If you are experiencing any performance issues, verify that you have allocated adequate resources in these areas.
The following recommendations apply to the storage of Working Papers files in your Citrix environment.
- Never store Working Papers files on the local drive (tsclient) of the PC accessing the Citrix environment.
- In order to ensure your Working Papers files are available to clients who are not using a Citrix session, store your files on an area of your network that can be accessed under Windows as a mapped drive.
Network Licensing
The Commuter License Check Out feature is designed for users who check out portable work computers. When it is used in a Citrix environment, one user can sometimes lock all other users on the network out of Working Papers. We recommend not using Commuter License Check Out in a Citrix/Terminal Server environment.
Live Update
Live Update immediately distributes changes made in an engagement file to all other users in the same engagement. Any open windows that have their content modified by any user are immediately refreshed, which consumes network bandwidth and CPU processing power.
Live Update should be disabled in a Citrix/Terminal server environment. The best way to ensure that it is always turned off is to add a line to the CV.VER file that Working Papers checks for configuration information on startup.
To disable Live Update:
- Open the CV.VER file in Notepad. This file is located in the root Working Papers installation folder.
- On a new line, enter 'liveupdate=0'.
- Save and close the CV.VER file. Ensure that the Save as type field is set to All Files (*.*) so that you aren't renaming CV.VER as a text file.
Note: Do not use the setting found in Tools | Options | Advanced | Networking to disable Live Update. This setting only affects the active file. Modifying the CV.VER file disables Live Update for all Working Papers files.
User List Pane
The User List pane can cause an increase in network traffic when it is enabled and should be disabled unless it is essential to your processes. This is a per-user setting and should be modified for each user.
To disable the User List pane:
- Open the Start Menu in Windows and either:
- Select Run...
- Select the Search programs and Files field
- Type regedit.exe and press Enter. The Registry Editor opens.
- In the Registry Editor, find the key HKEY_CURRENT_USER\Software\CaseWare International\Working Papers\2018.00\Settings\UserListWindow.
- Double-click the key to open it. Change the value from 1 to 0.
- Click File | Exit.
This registry setting will be applied the next time you open Working Papers.
History Settings
History settings can affect the performance of networked Working Papers environments. These settings are applied on a per-file basis in Working Papers, so you will need to apply these best practices to each engagement file.
To disable History tracking:
- Click Engagement | History | Auto-Compare.
- Ensure that Automatically Compare Documents is set to None.
- Click the Settings tab and clear the check boxes for any items that do not require history tracking in your environment. When you track history for fewer items, you will consume less network bandwidth.
- Click OK.
Background Pagination
Background pagination can consume increased bandwidth on the network.
To disable background pagination:
- Open the CV.VER file in Notepad. This file is located in the root Working Papers installation folder.
- On a new line, enter 'BackgroundPagination=0'.
- Save and close the CV.VER file. Ensure that the Save as type field is set to All Files (*.*) so that you aren't renaming CV.VER as a text file.
Auto-Compare
Auto-Compare can be used to compare documents for changes based on different stages of document preparation. In a Citrix/Terminal Server environment, this feature can consume bandwidth and CPU processing power, and should be enabled only when needed.
To disable Auto-Compare:
- Click Engagement | History.
- Click the Auto-Compare tab and ensure that the drop-down menu displays None.
- Click OK.
CaseView
The CaseView Autosave option requires increased network traffic, and should be disabled if possible in these environments.
To disable Autosave:
- In CaseView, click Tools | Options | Autosave.
- Uncheck Enable Autosave.
- Click OK.
Data Store
The Data Store should be set up using the Data Store Administration Tool for optimal performance.
- In the Settings tab of the Data Store Administration Tool, ensure that the Synchronization field is set to Only on program startup.
- The Track Engagement field, also in the Settings tab, controls how files are tracked by the Data Store. For these environments, either Track But Do Not Share with Firm or Disable Tracking should be selected.
- The ping frequency can be set in the CV.VER file. Pinging only updates the status icon in the user interface. Frequent pinging can reduce the responsiveness of the Data Store. The StorePingFrequency value sets the interval (in seconds) between checks to see if the Data Store is online.
- Open the CV.VER file in Notepad. This file is located in the root Working Papers installation folder.
- Locate the 'StorePingFrequency=xx' entry. The default value is 120 (seconds) but you can increase it to 500 or more.
- Save and close the CV.VER file. Ensure that the Save as type field is set to All Files (*.*) so that you aren't renaming CV.VER as a text file.
Note: The Track and Share with Firm setting should not be selected unless you are using CaseWare Tracker and have a requirement to monitor the files that other users are working on, as this feature consumes increased network bandwidth.
To reduce the ping frequency:
Anti-Virus Software
Some anti-virus software may conflict with Working Papers and SmartSync functionality by locking required files as they are scanned. For a complete list of these files, see Troubleshooting SmartSync.
Citrix and Terminal Server
This section offers some tuning advice specifically geared to Citrix/Terminal Server environments.
- Change User /Install: This command places the server session into Install mode. In this mode, any programs writing to the registry have their keys automatically mirrored to the Shadow Registry.
- Change User /Execute: This command places the server session into Execute mode. This is the default mode that applications are run in.
To populate the Citrix or Terminal Server Shadow Registry with default Working Papers settings:
- Log onto the Citrix/Terminal server and open a command prompt.
- Enter the following command to enable Install mode:
- Change User /Install
- Run Working Papers and set desired program defaults.
- Exit Working Papers and revert to Execute mode with the command:
- Change User /Execute
Check the Shadow Registry to ensure the appropriate Working Papers registry keys are present. As long as they are, any subsequent users logging into the Citrix/Terminal server should have settings automatically pushed to their registry branches.
SmartSync on Citrix and Terminal Server
This section offers best practices when using SmartSync in a Citrix/Terminal Server environment.
Central Administration
SmartSync enables Working Papers users to utilize far fewer network resources when sharing engagement files. SmartSync also enables remote or disconnected users to work on their own local copy of an engagement file, synchronizing their changes to the parent file when connected to the office network.
There are two typical use case scenarios for SmartSync within a Citrix/Terminal Server installation:
- Remote workers who do not have access to the server while offsite.
- Large engagements shared by multiple users where Working Papers performance is unacceptably slow.
Remote Staff and Citrix
Companies will often have remote teams of staff who work on an engagement file at a client site. These staff can use SmartSync to stay updated with each other's changes and work more effectively as a team in the field.
Large Engagements
On large engagements, the performance reduction in the client file can be substantial. This occurs because Windows disables its network caching as soon as two or more people share a file for reading and writing. For large files, this significantly increases the amount of traffic Working Papers sends across the network.
SmartSync can be used to create separate SmartSync children on the network storage. This ensures that each user has a single user copy of the engagement file, allowing Windows network caching to remain active.
SmartSync Path Customization on a Citrix Farm
One best practice is to use a fast network share that is available to all servers to host SmartSync for all Citrix users. This ensures users are managing SmartSync copies from the same location regardless of the server they are currently assigned. Each user should be assigned a unique path on the network share.
Paths in Working Papers always resolve to a UNC entry such as \\FileServer\path\ rather than a locally specified path such as C:\path\. There are two paths in a SmartSync environment that must be set correctly in order to store engagement files in the appropriate folder:
- The Client File Path should be set to the folder containing the Sync Top-Level Parent file that all SmartSync copies are made from.
- The SmartSync Path should be set to the folder where SmartSync file copies will be stored for each user. This should be a different network share for each user. Users who are not in a Citrix session may set a local system path.
After network shares are in place, create a script to set the default SmartSync Path for each user during login. The following script illustrates how user login can be automated in a Citrix environment:
- SET SyncPath = \\File_Server\path\to\sync_copy_folder_root\
- IF NOT EXIST %SyncPath%%UserName% MD %SyncPath%%UserName%
- REG ADD "HKCU\Software\CaseWare International\Working Papers\20xx.xx\Settings" /v SyncPath /t REG_SZ /d %SyncPath%%UserName% /f
In the example above, File_Server\path\to\sync_copy_folder_root\ is the path to your SmartSync network store. Add these scripts to your login script.
To test that your login script performs as expected, launch a copy of Working Papers SmartSync through a Citrix session and ensure the correct SmartSync Path is set in Tools | Options | Default Paths.
Note: Some of your users who work offsite may use a local copy of Working Papers on a laptop or similar device. These users can set their SmartSync path to point to their local drive rather than a network share. If they do, they can work in their SmartSync files offline and can synchronize the files when they return to the office or connect by VPN. If they instead access Working Papers through a Citrix session, their sync copies should not be stored on their local drive.
Troubleshooting
This section contains a list of known issues with Working Papers in Citrix environments. With each issue, we have provided a resolution that you can implement.
Customizing Menus
Issue: Users have installed Working Papers and CaseView on a Citrix server at a client site and have tried to remove access to the export to RTF command in CaseView through the Tools | Customize menu, but the changes are only applied to the original terminal.
Resolution: This is a user setting, not an application setting. Menu settings are saved to the following registry key:
HKEY_CURRENT_USER\Software\CaseWare International\Working Papers\20xx.xx\CaseView\Custom Menus
Once you set up the menu on one profile, you will need to copy this key to each profile on that local machine.
Mapping to local drive from the Terminal Server
Issue: A user is unable to map to a local drive path from the terminal server.
Resolution: This functionality is not supported.
Maxed out processors on Server - Slow performance
Issue: Users attempt to work in a locked down engagement file in Working Papers and the processors on the Citrix/Terminal server are maxed out. When users exit the engagement file, the processor utilization returns to normal.
Resolution: In locked down engagement files, two features - milestone generation and redlining - can cause issues in Citrix/Terminal Server environments. Both of these features should be disabled for locked down engagement files in Citrix/Terminal Server environments:
- To disable milestone generation, select Engagement | History | Settings and ensure that no milestones are being generated for any history events.
- To disable redlining, edit the CV.VER file by adding the line 'NoAutoSetAutoCompareLockdown=1'.
CaseView document does not print
Issue: A user attempts to print a large CaseView document and receives an error indicating that the connection to the server was broken before the entire document was transferred.
Resolution: This issue is a caused by a limitation in the Citrix universal printer driver (UPD), and is related to the size of the document. When CaseView prints to a session printer, the output is captured by the UPD and sent over the network to the client. The UPD in the client then spools the document in a temporary file. If there isn't enough space in the client to store the temporary file, the UPD aborts the printing process and closes the connection.
You have two options for solving this issue:
- Increase the space available for temp files in the client's local hard drive or RAM drive.
- Install the client's native printer driver on the Citrix server.
Error 50
Issue: When a Citrix/Terminal Server user creates a Sync child or goes online with a Sync child after being offline, an Error 50 message is displayed.
Resolution: This can happen in a situation where the user is storing the Sync child on the disk on their workstation while using a copy of Working Papers in a Citrix/Terminal Server session. If Working Papers is used in a Citrix/Terminal Server session then files should be stored either on the Citrix/Terminal server or on a network drive. Files on a workstation disk should only be used with a copy of Working Papers installed directly on the workstation.
CWIN32.exe error
Issue: Working Papers users in a Citrix/Terminal Server environment may receive a CWIN32.exe error when attempting to launch the program. This prevents these users from launching Working Papers.
Resolution: This error can sometimes be resolved by clearing the Working Papers registry settings on the Citrix server. Contact CaseWare Support for more information on how to do this.
You can add the line 'DisableScanning=1' to the CV.VER file if clearing the registry settings does not resolve the issue.
Multiple sync copies when user reconnects
Issue: Multiple Sync copies of an engagement file are observed after a user has been working remotely and Working Papers reconnects to the network containing the Sync Top-Level Parent.
Resolution:: An extra setting is required for users who are working on Sync copies of an engagement file and who do not have continuous connectivity to the network containing the Sync Top-Level Parent.
To add this setting, open the CV.VER file in the CaseWare installation root folder and add the line 'SyncResessionCopy=0'.
CaseWare is not responding
Issue: When SpeedScreen latency reduction manager is on, there is a possibility that CaseWare will not respond.
Resolution: Disable SpeedScreen latency reduction manager or use the SpeedScreen Latency Reduction Manager utility on the MetaFrame server to create exception entries for generic input fields. Once exception entries have been created, SpeedScreen functionality is modified or turned off on the server.
Performance issues working with signed out files
Issue: Performance lags when opening signed out files.
Resolution: Use the command line 'nbtstat -R'. This will clear your NetBios name cache, a known fix for improving performance.
Error 30
Issue: When a user attempts to save or print to PDF after a Windows upgrade, an Error 30 message is displayed.
Resolution: Reinstall Working Papers.
![]()
Visit us: www.caseware.com | Follow us: 


© 2019 CaseWare International Inc. | Privacy | Terms of Use | Trademarks