Defining reporting balances
You can control how balances are displayed in the financial statements. You can specify mapping, foreign exchange application, rounding, and other attributes.

Prerequisites
What do you want to do?
- Specifying and displaying rounding
- Specifying the mapping rounding method
- Selecting the default mapping or grouping
- Applying the foreign exchange calculation
- Obtaining balances from the parent entity only
- Adding or modifying rounding relations
- Deleting a rounding relation
- Applying rounding relations
- Specifying rounding text
Specifying and displaying rounding
In the financial statements, you can specify that values are to be rounded to the nearest thousand or nearest million. You can also indicate rounding descriptions to be displayed in the statement area header or in the table heading line, above the column balances or above the description column.
Procedure
- Open the Financial statements document and select the Global Setup tab
-
In the Global Setup tab, locate the Rounding drop-down. This drop-down can be found in the Balances section of the tab.

-
From the Rounding drop-down, select the rounding to use.
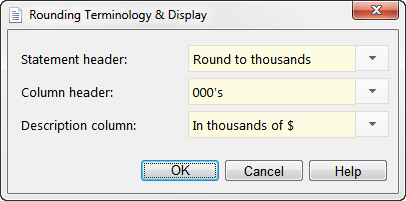
Option Description 1 Do not round numeric values. 1,000's Round numeric values to the nearest thousand. 1,000,000's Round numeric values to the nearest million. The Rounding Terminology & Display dialog automatically appears. You can choose where to display the rounding information in the statements. Options include the statement area header, the column header, or the description column.
Note: Clicking the
 Titles and terms button in the tab launches the same dialog.
 -
From the Statement header drop-down, select or type the text to display in the statement header to indicate that rounding has been specified. The options available will depend on the rounding that you selected in step 2. This drop-down is not available if you have set the value in the Rounding drop-down to 1.

-
From the Column header drop-down, select or type the text to display in column headings to indicate that rounding has been specified. The options available will depend on the rounding that you selected in step 2. This drop-down is not available if you have set the value in the Rounding drop-down to 1.
-
From the Description column drop-down, select or type the text to display in the description column heading to indicate that rounding has been specified. The options available will depend on the rounding that you selected in step 2.
- Click OK to close the Rounding Terminology & Display dialog box.
- If the Settings for Reports dialog box appears, specify the settings to use in reports. For more information on this dialog box, see the Settings for Reports help topic in the Working Papers help. When you have specified the settings, click OK to close this dialog box.
Results
The specified rounding will be employed in the financial statements.
Note: Should you need to change the Rounding Terminology and Display options after you have defined your rounding options, you can select Titles and terms from the Global Setup tab. When the Rounding Terminology & Display dialog box appears, follow steps 3 through 6 in the above instructions to change the specifications.
Specifying the mapping rounding method
The balances for the financial statements are retrieved from the trial balance based on the mapping or grouping numbers. You can specify how the mapped/grouped balances round when inserted into the financial statements.
Procedure
- Open the Financial statements document and select the Global Setup tab
-
In the Global Setup tab, locate the Mapping rounding drop-down. This drop-down can be found in the Balances section of the tab.

-
From the Mapping rounding drop-down, select the rounding method to use:
Option Description Add mapping numbers, then round Add the map numbers and then apply rounding to the total. For example:
Account Value Mapped to 101 10.84 110.100 102 9.51 110.100 103 11.25 110.200 110.100 = 10.84+9.51=20.35 → 20.00
100.* = (10.84+9.51=20.35) + 11.25 = =31.60 → 32.00
Round each mapping number, then add Round each map number and then add the map numbers. For example:
Account Value Mapped to 101 10.84 110.100 102 9.51 110.100 103 11.25 110.200 110.100 = 10.84+9.51=20.35 → 20.00
100.* = (10.84+9.51=20.35 → 20.00) + (11.25 → 11.00) = 31.00
Results
The selected mapping rounding method is used in the financial statements.
Note: If you are using rounding in notes and adding the balances to a table elsewhere, you may want to define linkable columns to link from the note balance directly.
Selecting the default mapping or grouping
Template authors can set the default grouping/mapping used to retrieve values from the trial balance. However, if permitted, you can specify the default mapping or grouping for your financial statements. While this is a global setting, this can also be changed on an individual row or table if necessary.
Procedure
- Open the Financial statements document and select the Global Setup tab
-
In the Global Setup tab, locate the Mapping drop-down. This drop-down can be found in the Balances section of the tab.

- From the Mapping drop-down, select the mapping or grouping to use.
Results
For more information on overriding the default mapping or grouping, see Specifying a table or row mapping or grouping.
Applying the foreign exchange calculation
Financials supports the use of foreign exchange balances in the financial statements. Foreign exchange is defined in Working Papers. For more details on how to specify foreign exchange rates, see the topic Entering foreign exchange rates in the Working Papers help.
Procedure
- Open the Financial statements document and select the Global Setup tab
- Select the Foreign exchange check box.
Results
Foreign exchange balances will now appear in the financial statements.
Obtaining balances from the parent entity only
You can specify that the balances calculated in the parent columns of the financial statements include only the entity specified in the Entity Information tab and does not include any subsidiaries or divisions included in the consolidation structure beneath the parent entity selected.
Select the Parent entity only check box to enable the feature.
If your Financials product enables you to set the entity presentation, and you have selected Consolidation, this option is not available. See Defining entities, titles, and terms for more details.
Procedure
- Open the Financial statements document and select the Global Setup tab
- Select the Parent entity only check box.
Results
The balances are obtained from the parent entity.
Adding and modifying rounding relations
In the financial statements, you can use rounding relations functionality to compare balances in two cells and add the difference to a specified third cell (called the plug cell).
Procedure
-
Open the Financial statements document.
-
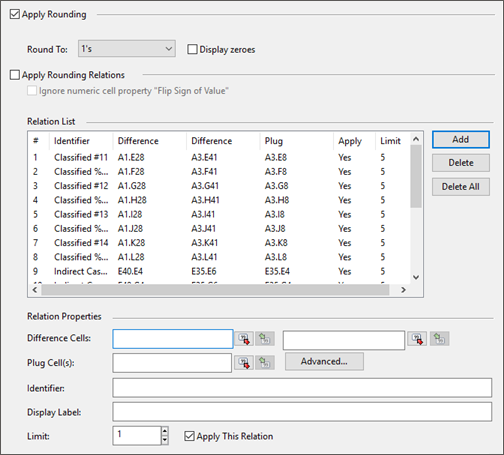
On the ribbon, click Global Setup | Apply relations. The Rounding dialog displays.
-
To add a new rounding relation, click Add.
Note: To modify an existing rounding relation, select it in the Relation List, then modify the Relation Properties.
-
Complete the fields in the Relation Properties.
- Difference Cells: In the first field, enter the first cell (Cell A) to compare in the rounding relation. You can click the Pick Cell icon to pick a cell by clicking on it in the document. In the second field, enter the second cell (Cell B) to compare.
- Plug Cell(s): Enter the cell where the difference between Cell A and Cell B will be stored. You can click the Pick Cell icon to pick a cell by clicking on it in the document. If necessary, create conditional plug cells. >>How Do I?
- Identifier: Enter a brief description of the new rounding relation.
- Display Label: Enter a description to display in the Recalculation Error dialog when a rounding error occurs. This label helps you identify the area of the document where the error is located.
- Limit: Enter the rounding limit. Any rounding differences that exceed this limit will not be rounded. An error message indicating that there is a rounding relation error will display if this occurs.
-
Click OK.
Results
The rounding relation is added to the Relation List.
Note: If an active relation exceeds the rounding limit, then no relations will be applied.
Deleting a rounding relation
You can delete any rounding relation that you have created.
Procedure
- Open the Financial statements document and select the Global Setup tab
- In the Balances section, click the Apply relations link. A rounding relation pane appears.
- Select
 (Delete a rounding relation).
 - From the Label drop-down, select the label of the rounding relation that you want to delete.
- Click Delete. To hide the rounding relation pane, click the Apply relations link again.
Results
The rounding relation is deleted.
Applying rounding relations
You can apply the rounding relations to your financial statements that you have created.
Procedure
- Open the Financial statements document and select the Global Setup tab
- In the Financial statements document, select the Global Setup tab.
- Select the Apply relations check box.
Results
The rounding relations are applied.
Specifying rounding text
If you have enabled rounding, you can include text in the financial statements that indicates the rounding in use. This text can be displayed in the statement header, the column header, and the description column. These same options are available when the rounding is initially being selected.
Procedure
- Open the Financial statements document and select the Global Setup tab
- In the Financial statements document, select the Global Setup tab.
- Select (Titles and terms). The Rounding Terminology and Display dialog box is displayed.
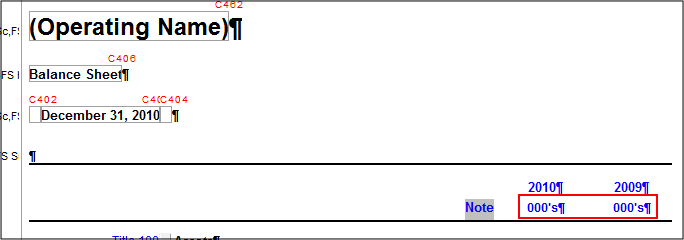
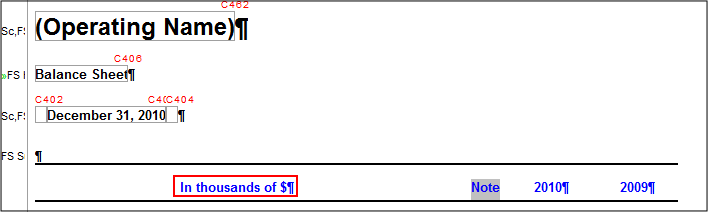
- In the Statement header drop-down, select or type the rounding text to display in statement headers. This text appears just below the date cells.
- In the Column header drop-down, select or type the rounding text to display in column headers. This text appears in all tables.
- In the Description column drop-down, select or type the rounding text to display in the description column. This text appears in all tables.
- Click OK to close the dialog box.
Results
Text describing the rounding in use is displayed in the specified locations.


