Create a freeze
A freeze is a type of document header that you can populate with functions and commands that are typically restricted to Design Mode. These functions and commands can include right and left-click menus, check box style formatting options and buttons to perform a variety of tasks. Commands in the freeze can even be built to access the Knowledge Library or Knowledge Library Index and enable you to insert prebuilt notes as required. Content in the freeze does not print with the document and is visible when viewing the document in Form Mode and Form Mode with editing enabled.
To create a freeze:
- Ensure you are working in Design Mode.
- On the ribbon, click Document | Modify. In the Header/Footer dialog, select Freeze and click OK. Alternatively, you can click the Modify drop-down menu and select Freeze from the list.
- The Freeze pane displays at the top of the document. Enter the functions and commands that you want to display in the freeze.
- On the ribbon, click Modify again to close the Freeze pane and save the freeze.
The freeze is created and will automatically display when viewing the document in Form Mode and Form Mode with editing enabled. To customize how the freeze will look in Form Mode, on the ribbon, click Document | Settings | Freeze and select any of the applicable options.
Sample freeze functions and commands
Through the use of cell events and browses, you can create specific functionality that greatly enhances the usability of the document for your staff. Use the following sample functions and commands to obtain a better understanding of how to customize your freeze.
| Sample | Description |
|---|---|
|
A check box that toggles the visibility of the prior year column in a table
|
First we create a new cell (cell number C36) in the freeze with the Check Box cell type. In the Calculation box of the cell, we'll enter a skip/hide condition of C36<>1 for the prior year column of the table. Now the check box will display the prior year column in the table when checked (check box value of 1) and hide the column if unchecked (check box value of 0). To finalize the function, we enter a description "Show prior year column?" in plain text next to the check box cell. |
|
A check box that controls whether to use singular or plural pronouns in the Notice to Reader
|
In the Notice to Reader, we create a new cell (cell number C46) containing the word "We" with a skip/hide condition of C56<>1. Next we create another cell (C51) immediately beside C46 containing the word "I", with a skip condition of C56=1. Finally, we create a cell (C56) in the freeze with the Check Box cell type and enter the description "Pluralize Notice to Reader?" in plain text next to the check box cell. By clicking the check box, the Notice to Reader would display "We". When unchecked, it would display "I". |
|
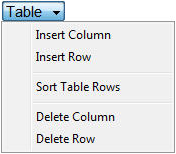
A "Table" drop-down menu that manages table columns and rows in the document
|
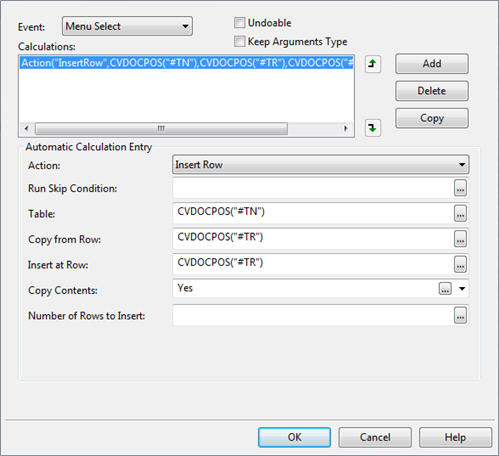
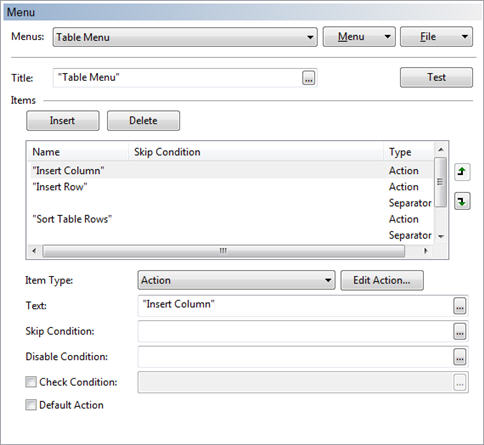
First we create a new cell in the freeze with the Button cell type. In the Menu drop-down, we select Left Click Menu. In the Calculation box of the cell, we'll enter a name for the menu in double-quotes, in this case, we'll enter "Table". Next we'll build the menu. On the Menu tab, click Menu | New... and name the new menu "Table Menu". Click + to add a new item. For each item we click Edit Action... and enter the applicable event function based on our requirements, for example, the CVDOCPOS function, which uses the cursor's current position as the basis of the command.
When a user places their cursor in a table and clicks Table | Insert Row from the customized button menu, CaseView uses the table name ("#TN") and row selected ("#TR") as the point of insertion. Finally we add a title in the Text field. Additionally, you can add Separator lines to group certain actions.
|
|
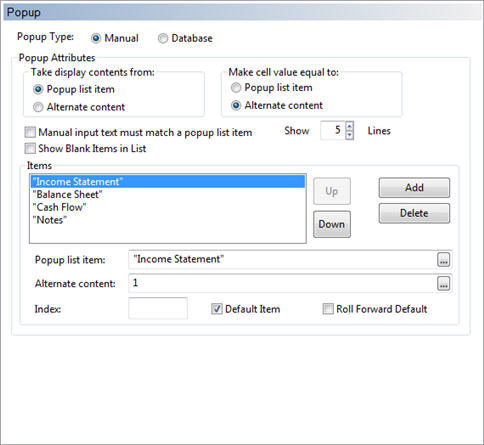
A popup cell that jumps to a bookmarked paragraph in the document
|
First we create a new cell in the freeze and select Popup Cell under the Calculation Properties group. On the Popup tab, under Make cell value equal to, we select Alternate content. Next, we add content titles to match the bookmarked paragraphs that we want to jump to and mark each with an alternate content value of 1, 2, 3, etc.
In the Events tab, we'll change the Event drop-down to On Selection Change and click Add. We can now change the action to the Jump to bookmark event, and create a calculation in the Bookmark field that references the cell itself. For example:
This calculation reads that if cell C24 has a value of 1 (which we assigned as the alternate value to the first bookmarked paragraph), jump to the bookmark "Income Statement". If the value is 2, jump to "Balance Sheet", etc. |


![]()
Visit us: www.caseware.com | Follow us: 


© 2022 Caseware International Inc. | Privacy | Terms of Use | Trademarks