Insert a document or object
You can insert documents and objects from a variety of different file formats into a CaseView document.
- Sub-documents (other CaseView documents)
- External documents (PDFs, Word & Excel documents)
- Miscellaneous objects (any other supported file type)
Inserted documents will display as icons which you can double-click to open. Inserted objects will display content from the source object that you can double-click on to modify.
Insert a sub-document
You can insert other CaseView documents into your document as a 'sub-document'. Sub-documents are particularly useful for dividing the information in large reports into smaller areas. Sub-documents function as a separate entity, independent from the main document. When you modify a sub-document, your changes are reflected in the main document so that a reviewer or client can examine the main document periodically.
To insert a sub-document:
- In the main document, place your cursor where you'd like to insert the sub-document.
- On the ribbon, click Insert | Sub Document.
- The Open Client Document dialog displays. Select a document to insert and click OK.
-
In the Sub-Document dialog, complete any additional settings as required.
Option Description File The location of the sub-document file. Click Browse... to relaunch the Open Client Document dialog and select a different sub-document. Restart page numbering starting at page Select to specify the starting page number for the sub-document. If you do not select this option, the sub-document pages will be numbered continuously as they display in the main document when printed.
Always modifiable in Enable Editing Select to allow modifications to sub-document content if the mode is set to Form Mode with editing enabled. This option gives users who do not typically have permission to edit sub-documents the ability to edit this particular sub-document.
Click OK.
The sub-document is inserted into the main document. Double-click the icon to open it, or right-click the icon and select Edit to modify the sub-document.
Insert an external document
You can insert external documents into your document to include them in the printed output. Supported file types include PDF documents, Word documents and Excel workbooks. By default, CaseView will start a new page where it finds the external document and increment the page numbers in the external document.
Notes:
- When printing an external document, headers and footers from the main document will be used and the external document's page size is automatically reduced to accommodate them.
- You cannot print or preview password protected PDFs.
To insert an external document:
- In the main document, place your cursor where you'd like to insert the external document.
- On the ribbon, click Insert | External Document.
- The External Document dialog displays. Select From Document Manager to insert a document from within the current Working Papers file, or From File Path to insert a document from a file path on your workstation.
-
Complete any additional settings as required.
Option Description Modifiable in Form Mode Select to allow modifications to external document content if the mode is set to Form Mode. For example, a template designer could insert a blank external document and a user could specify the actual external document at a later date.
Print all visible Excel sheets
Select to include all visible Excel sheets when printing the document. This option is only applicable if the external document is an Excel workbook.
Select Excel sheets to print
Select to specify which Excel sheets to include when printing the document. This option is only applicable if the external document is an Excel workbook.
Click OK.
The external document is inserted into the main document. Double-click the icon to open it, or right-click the icon and select Edit to modify the external document. You can also perform a print preview to display the total amount of page numbers of the external document.
Insert an object
Miscellaneous documents and files are referred to as 'objects' in CaseView. You can create new objects from within CaseView, or insert an object from your computer's hard drive, and the contents of the object will be embedded into your main document for easy viewing.
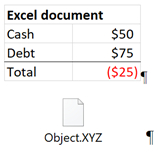
Note: Unknown or less common object types may display as icons which you can double-click to open in the relevant application.
To insert an object:
- In the main document, place your cursor where you'd like to insert the object.
- On the ribbon, click Insert | Object.
-
The Insert Object dialog displays. Select an option to determine how to insert the object.
Option Description Create New Select to create a new object using an external application. In the Object Type list, select the application to use. The available applications are based on what is installed on your hard drive.
Create from File Select to insert an existing object. Click Browse... to navigate to the object, select it and click Open.
- Link: Select to keep the object linked to the original object on your hard drive. This ensures that any changes made to the object through either CaseView or the object's original application will update the object in both locations. If you do not select this option, the objects will be managed separately.
Display As Icon Select to display the object as an icon while you work in the main document.
Click OK.
The object is inserted into the main document. Double-click the object to open it and make modifications. You can also resize the object by clicking an outside edge or corner and dragging it to the desired height and width.
![]()
Visit us: www.caseware.com | Follow us: 


© 2022 Caseware International Inc. | Privacy | Terms of Use | Trademarks