SmartSync Server Upgrade Guide
This page describes the best practices on how to upgrade your SmartSync server and Working Papers. Note that:
- You should update the SmartSync Server at the same time that you update the Working Papers client application to a newer version.
- You must install the same version of Working Papers on both the SmartSync FileService Server and the end users’ workstations. If end users are expected to continue working on the prior version of Working Papers on their workstation, then that version of Working Papers must remain on the server. Also, if you want to keep archive copies of non-converted engagement files, then you must keep a compatible version of Working Papers on the server for working with the archive copies.
- You should perform the update outside regular business hours.
We strongly recommend that you upgrade your SmartSync Server by performing the steps below.
- Review the Release Notes and System Requirements
- Perform a Backup
- Reassign Port Binding to the default Port 80
- Upgrade the SmartSync Server
- Install Working Papers on SmartSync Server (If upgrading Working Papers for End Users)
- Index Files
1. Review the Release Notes and System Requirements
Before upgrading, you should review the release notes for your update to gain a better understanding of any new features and fixes. Also, check that your system meets the recommended system requirements before upgrading.
2. Perform a Backup
Before proceeding with the upgrade, you should back up your configuration and engagement files. As a best practice, you should backup these files frequently.
We also recommend that you do not use backup or replication systems that lock engagement files during business hours. These systems can lead to file corruption.
For more information on how to make a backup, see Backup in SmartSync.
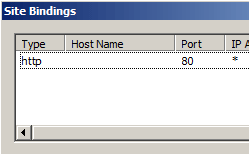
3. Reassign Port Binding to the default Port 80
Before updating, ensure that the http port binding is set back to the default port 80 in the IIS Manager as the installer cannot handle non-default ports during the upgrade. The port binding can be set back to the original value after the installation.
- Open the Internet Information Services (IIS) Manager.
- In the Connections pane, expand the server name, expand Sites, and then ensure the CaseWare SmartSync Server http is reassigned to the default port 80.
4. Upgrade the SmartSync Server
You can upgrade the SmartSync Server using one of the following methods:
Note: The installation method must be the same as the method used to install the SmartSync Server initially. This means you cannot upgrade using the wizard method if you manually installed the SmartSync Server by using a command line.
Using the Wizard
The wizard automatically stops the SmartSync server and walks you through the upgrade process. Follow the instructions in SmartSync - Wizard Installation.
The wizard is designed to create a clean configuration and therefore currently overwrites file directory and CWRequests folder permissions, including high and low sub-folder. If you would like to preserve these settings then you will need to:
- Rename the folder to prevent the SmartSync Wizard from overwriting it.
- Once SmartSync server installation is complete, delete the folder the installer created and rename the original sync folder to its original name.
Note: This change is only temporary.
Manual Installation by using a command line
Only use this method if you want to configure the Smartsync server with a domain account (instead of a network service or local service account) or if you need additional instances of SmartSync services.
Before performing a manual upgrade, you must stop the SmartSync server and the SmartSync FileService. For this reason, the best practice is to perform the upgrade outside business hours to minimize disruption to end users. SmartSync Server runs as an application under the Default Web Site (or any other specific website) on Internet Information Services (IIS).
To stop the SmartSync Server and SmartSync FilesService, follow these steps:
- Launch Internet Information Service (IIS) Manager.
- Locate CaseWareAppPool in IIS Application Pools. Right-click the pool and select Stop.
- From the Windows start menu, in the search box, type Services.msc
- Locate the SmartSync FileService and click Stop.
Follow the upgrade instructions in SmartSync - Manual Installation.
5. Install Working Papers on SmartSync Server (If upgrading Working Papers for End Users)
Install the latest Working Papers SmartSync version on the same server as the SmartSync File Service.
6. Index Files
After the update is completed, the SmartSync Server will restart. The restart will cause a reindex of the entire files directory. The indexing may take a considerable amount of time depending on the number of files.
Note: A 584 connection error may appear if reindexing takes longer than 20 minutes. Ignore the error and wait for the reindexing to finish. Do not reboot the server as this will restart the reindexing process.
Check the about.sync page in the browser to ensure the correct version of SmartSync Server is running after the upgrade. See SmartSync Server Services for more information.
Review your new configuration files and compare them to the configuration files from your backup. If there is a discrepancy, replace the new ones with the backups. As mentioned above, the wizard will not retain file directory or CWRequests folder permissions. If you did not perform the steps mentioned above to preserve these permissions when installing SmartSync Server with the Wizard, you will need to re-apply custom permissions to the files directory.
If applicable, you can now set your port bindings to your original values. To ensure that it is operating as expected, test the SmartSync Server by publishing a new file using a regular user account.


