Cell Options command
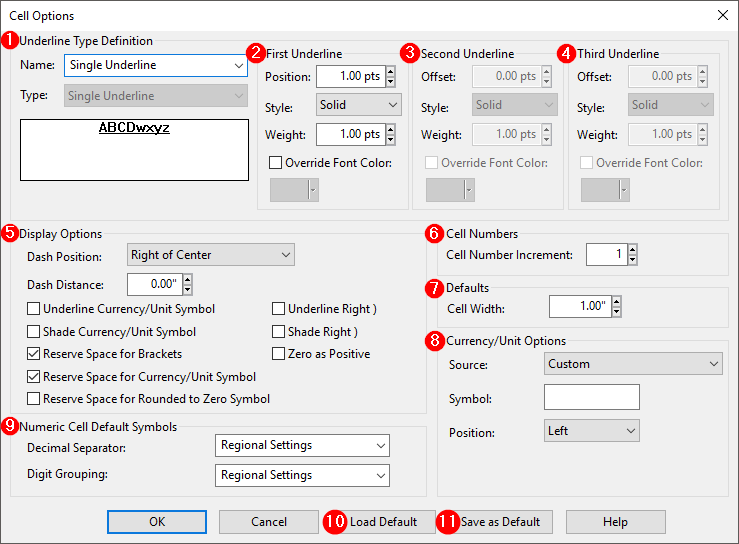
The Cell Options dialog enables you to define universal cell options for the document. When formatting cells using the Alignment and Formatting cell options, selecting Default implements the corresponding setting from this dialog.
| Number | Description | Options |
|---|---|---|
|
|
Underline Type Definition Select any required cell underline options. Changes made here affect cell underlining for all cells in the current document. |
Name Displays the name for the line style. For standard CaseView styles the name and the type will be identical. CaseView allows the user to create up to 7 user-defined styles. Type To create different underline styles to apply to cells, select an underline type and then modify the style, weight, spacing, and display options for each of the lines as necessary. The Sample box displays the effects of the changes. |
|
|
First underline Define the style for the first of the underlines. |
Position Type or select the baseline spacing. This number represents the distance between the cell contents and the underline. Style Select the type of underline line style.
Weight Type or select the line thickness for the underline expressed in points (1/72 inch). Thicknesses can range from 0.01 pts to 12 pts. Override Font Color Select to allow the underline color to differ from the font color. Color Select a color for the underline. |
|
|
Second and third underlines Define the style for the second and, if required, third of the underlines. This option only turns on for double and triple underline styles. All the characteristics of the second or third underline can be different from the first underline and from each other, if so desired. |
Offset Type or select the offset spacing. For the second underline, this number represents the distance between the first underline and the current underline. For the third underline, it represents the distance between the second and third underlines. Note:When exporting a CaseView document to PDF, a double underline may appear as a single thick underline onscreen (though depending on printer driver it typically prints correctly). Due to screen resolution limitations, the offset may not be presented at magnifications below 150%. To compensate for this, set the offset to 1pt or higher. |
|
|
Display Options Select any required cell display options. |
Dash Position Select the orientation of the printed dash within the cell.
Dash Distance Type or select the distance from the selected dash position. This feature enables very precise positioning of the dash. Underline Currency/ Unit Symbol Underlines the currency sign or percent symbol when underlining cells. Underline Right ) Underlines the right bracket when underlining cells. Shade Currency/ Unit symbol Shades currency sign or percent when shading cells. Shade Right ) Shades the right bracket when shading cells. Reserve Space for Brackets Select this option to ensure that figures in brackets align with figures without brackets. In the event of a negative balance surrounded by brackets, the number will still appear in alignment with the other numbers in the column as a space has been reserved. Zero as Positive Displays negative zeros as positive zeros. For example in the event that the calculated value of a cell is -0.00 it will be displayed as 0.00 instead. Reserve Space for Currency/ Unit symbol Reserves space for currency signs. Select this option to ensure that figures with currency signs are in alignment with figures without currency signs. Reserve Space for Rounded to Zero Symbol Reserves space for rounded-to-zero symbols. Select this option to ensure that figures with rounded-to-zero symbols are in alignment with figures without rounded-to-zero symbols. |
|
|
Cell Numbers Select options for controlling how cells are numbered. |
Cell Number Increment Type or select the automatic increment between cells that are created. |
|
|
Defaults Select options that will appear as defaults throughout the program. |
Cell Width Type or select the default cell width. |
|
|
Currency/ Units option Select the default currency unit source, symbol, and position to be used in numeric cells. To use this default in a numeric cell, in the Cell dialog for the cell, click Numeric. Under Currency/ Units symbol, select the option to "Use Cell Options" in the Source combo box. |
Source
Symbol Type the symbol to use as a numeric cell default. Position Select either left or right of the cells contents as the default. |
|
|
Numeric Cell Default Symbols |
Decimal Separator It is possible to override the decimal separator chosen in Regional Settings. The symbol can be typed in or chosen from the list provided. Digit Grouping It is possible to override the digit grouping symbol chosen in Regional Settings. The symbol can be typed in or selected from the drop-down list. |
|
|
Load Default Loads the default global cell options into the current document. |
|
|
|
Save as Default Saves the current settings as the default global cell options. Default settings may be applied to other documents as needed. |


