Managing SmartSync Servers in Tracker
You can use CaseWare Tracker to manage your SmartSync Server engagement files.
To add a SmartSync Server to Tracker:
- From the menu, click Tools | Manage SmartSync Servers.
- The Manage SmartSync Servers dialog displays. On the Servers tab, click Click here to add a server.
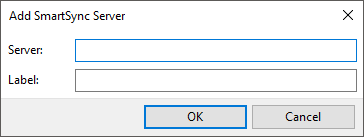
- In the dialog that displays, enter the IP address of your SmartSync server to the Server field. You can name the server in the Label field. Click OK.
- Enter the password to add the SmartSync Server to the server list.
- Click OK to close the dialog.
Tracker connects to the SmartSync Server.
Adding SmartSync Server files
When you've added a SmartSync Server, you can scan for your engagement files to add them to Tracker.
To add SmartSync Server engagement files to Tracker:
- From the menu, click Tools | Scan SmartSync Servers.
- Tracker begins the scan. You can view the progress and result in the Output pane.
The files are added to Tracker. Use the default SmartSync Server view to see the list of engagement files, or create your own view.
SmartSync Server Scan Options
Files added to Tracker during a file scan are based on a user and their access rights. A user can only add files they have access to.
You can specify the user whose access you want to use from Tools | SmartSync Server Scan Options.
![]()
| Option | Description |
|---|---|
| Any User | Scans for files that any user can access. |
| Current User | Scans for files that the current user can access. The current user name is specified. |
| Specific User | Scans for files that the specified user can access. Choose a user from the drop-down menu. |
Scan SmartSync Servers to add engagement files to Tracker based on the selected user.


