Configuring the balance sheet (statement of financial position)
Note: Some features described here are not available in all products.
You can specify options that control the display of the Balance Sheet (or Statement of Financial Position) area of the financial statements. Options not defined here are included in Configuring common options.
In Financials IFRS:

In Financials GAAP:

What do you want to do?
- Selecting the balance sheet presentation method
- Displaying the liabilities and equity area and the total liabilities row
- Creating a two-page balance sheet
- Displaying the additional note area in the balance sheet
- Adding signature lines to the balance sheet
- Specifying the approval text
Selecting the balance sheet presentation method
Note: This feature is not available in all products.
Financials enables you to specify the presentation format of the statement, such as classified or unclassified.
When you specify a presentation method, only the financial statement area formats that follow the selected method will appear in the Knowledge Library index.
Procedure
- Open the Financial statements document.
- Click in the Balance Sheet or Statement of Financial Position area.
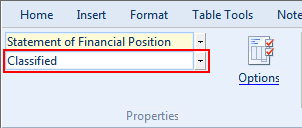
- Select the Balance Sheet or Statement of Financial Position tab.
-
From the Balance Sheet or Statement of Financial Position tab, select the Presentation drop-down. This drop-down can be found in the Properties group of the tab.
In Financials IFRS:
In Financials GAAP:
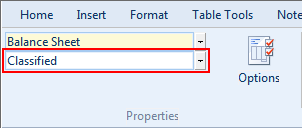
- From the Presentation drop-down, select the balance sheet presentation method to use.
Results
The balance sheet uses the selected presentation method.
Note: If you change the presentation method after you have started preparing the financial statements, a new format will be inserted and any customization you have added to the balance sheet will be lost.
Displaying the total liabilities row
Note: This feature is not available in all products.
You can also display a Total Liabilities row. This displays the total of current and long-term liabilities before equity.
Procedure
- Open the Financial statements document.
- Click in the Balance Sheet or Statement of Financial Position area.
- Select the Balance Sheet or Statement of Financial Position tab.
-
Click
 (Options). The Options dialog appears.
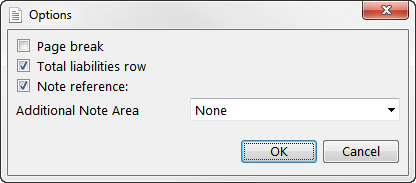
- To display the total liabilities row, select the Total liabilities row check box.
- Click OK to close the dialog.
Results
The liabilities and equity area and the total liabilities row are displayed if specified.
Creating a two-page balance sheet
Financials provides the option to specify that the balance sheet be two pages, with assets on the first page and liabilities and equity on the second page. The appropriate headers and footers will be applied to the second page and the Table of Contents will update properly to reflect the two pages if multiple page entry has been enabled.
To enable a two-page balance sheet, select the Page break check box in the options dialog.
Procedure
- Open the Financial statements document.
- Click in the Balance Sheet or Statement of Financial Position area.
- Select the Balance Sheet or Statement of Financial Position tab.
- Click (Options). The Options dialog appears.
- Select the Page break check box.
- Click OK to close the dialog.
Results
The balance sheet is displayed over two pages.
Displaying the additional note area in the balance sheet
In the Balance Sheet (or Statement of Financial Position) area, you can display an additional note area.
Procedure
- Open the Financial statements document.
- Click in the Balance Sheet or Statement of Financial Position area.
- Select the Balance Sheet or Statement of Financial Position tab.
- Click (Options). The Options dialog appears.
-
From the Additional note area drop-down, select one of the following:
Option Description None Do not display the additional note area. This is the default. After Total Liabilities and Equity Display the additional note area after the Total Liabilities and Equity row. - Click OK to close the dialog.
Results
The additional note area is displayed.
Adding signature lines to the balance sheet
You can add a maximum of two lines to the bottom of the Balance Sheet statement area for signatures.
Procedure
- Open the Financial statements document, click in the Balance Sheet statement area, and select the Balance Sheet or Statement of Financial Position tab.
- From the Signatures drop-down, select the number of signature lines to add.
Results
The signature lines are added to the Balance Sheet statement area.
Specifying the approval text
If you have added signature lines to the balance sheet, you can specify the title to be displayed above the signature section.
Procedure
- Open the Financial statements document, click in the Balance Sheet statement area, and select the Balance Sheet or Statement of Financial Position tab.
-
From the Balance Sheet or Statement of Financial Position tab, select the Approved drop-down. This drop-down can be found in the Sign-off group of the tab.
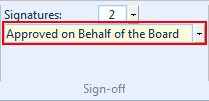
- In the Approved drop-down, select or type the approval text.
Results
The approval text is displayed in the balance sheet.


