Time and Expense properties and options
The process time and expense dialogs enable you to prepare and edit time sheets and expense reports. Entries are posted directly to the work in process (WIP) and automatically update all documents. Time and expense for each day or for any other appropriate period included in the Company Profile can be entered. Entries are subject to the following:
- An unlimited number of time and expense entries are allowed (subject to disk space).
- Any time or expense entry in the current period, if not approved or billed, can be deleted by selecting the line and pressing CTRL+D. Approved entries cannot be deleted.
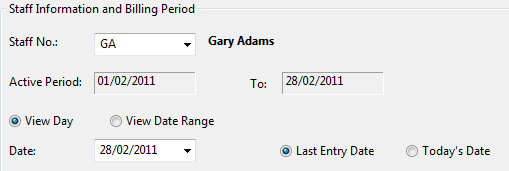
Staff Information and Billing Period
Use this portion of the dialog to select the date of the time or expense entry and the staff member who completed the work.
| Description | |
|---|---|
| Staff No. |
Select a staff number from the Staff List. When protection is ON then this list displays the ID of the user logged in by default. If the user is restricted to only his own entries, then this field is grayed out and can't be changed. Click the look-up button |
| Active Period |
Displays the current active period of the file. If the date selected is after the ending date of the active period, then FUTURE displays beside the date. Although, you are allowed to input time, the active period and year to date totals are not updated. These will be updated when that future period is reached. Entering of future time is useful if the next calendar month has begun, but the current active period in the Time file is not completed. Instead of delaying entry of time sheets until the month-end is completed, staff can continue to enter their time sheets without interruption. This is also useful at the end of a year if the file has not been year ended, and staff want to continue entering time sheets for the new year. |
| View Day or View Date Range |
This is set by default to the selection in the Company Profile -a range of dates or a single date. If this is not applicable for this entry, use the radio buttons and the calendar to change to the appropriate date or date range. Selecting a range of dates allows you to see what has been input already. It also speeds up entering several days worth of time or expenses by letting you make one entry to cover a range of days. For a single date,click Last Entry Date to use the date of the last time entry for this staff member; OR Today's Date to enter today's date in the Date field. Time: You can use the period end date if you are entering a time sheet in a batch mode and have summarized your time for that period (frequently used by accountants manually) or individual dates (generally used in a real time mode where time is not summarized by period). The chargeable and non-chargeable time entered for the active period and year to date along with the active current period are also displayed at the bottom of the dialog. |
| Select All/Deselect All |
Use these buttons to approve or cancel approval of multiple entries. Note: To approve all but one or two entries quickly, click Select All and then deselect the unapproved entries. |
Enter information for the time or expense entries. To resize the columns in this portion of the screen, click a vertical line and drag it right or left as needed. Right click a vertical line to establish a fold line, which indicates that information to the left of the fold line is static and information to the right of the fold line is scrollable.
| Description | |
|---|---|
| Work Code |
Click the look-up button When work codes are selected you will see a preview of the code description below the time or expense entries table. |
| Client | Represents the client number. Click the look-up button to display a list of all active client numbers. When displaying the client list, type the first letters of the client short name or number to scroll to the client with these letters. Note: If the work code selected is non-chargeable a client number is not allowed. |
| Name | The name of the client is displayed once the client number is entered. |
| Project No. | If the file has been set up to use them, the default project for the client is displayed. Use the look-up button  to change this as needed.
This column appears only if projects or sub projects have been activated in the Company Profile. Note that the heading of this column may vary depending upon the wording chosen in the Company Profile. to change this as needed.
This column appears only if projects or sub projects have been activated in the Company Profile. Note that the heading of this column may vary depending upon the wording chosen in the Company Profile. |
| SubProj. | If the file has been set up to use them, the default subproject for the client is displayed. Use the look-up button to change this as needed. |
| Office | This column appears if the use of Offices has been activated in the Company Profile. The office chosen in the staff member's profile is entered by default on a new entry. If the applicable office is not the default, select the one that pertains to this entry. |
| Department | This column appears if the use of Departments has been activated in the Company Profile. The department chosen in the staff member's profile is entered by default on a new entry. If the applicable department is not the default, select the one that pertains to this entry. If the department wanted is not in the pop-up list it needs to be assigned to this office by clicking Setup | Assign Areas. |
|
Time (Time entries only) |
Enter the amount of time in hours for the work code. |
| Rate |
The rate for the work code appears automatically when the work code is selected. Note: For expense entries you can modify the rate as needed. |
| Amount |
|
| Status |
If a transaction has been entered and billed in the same period, "B" or "Billed" is displayed in the Status column. Modification of billed time transactions is not permitted. Note: You can modify how the status is displayed in the table list field style specified in Tools | Options | General tab. |
| Reference |
Enter a description or reference for the entry. If it's more than 15 characters long, either
keep typing and the extended description dialog will automatically open to allow completion of the memo, OR
Click the For entries with an extended reference the button displays as |
| Approve | Click the check box to approve the time or expense entry for billing. The user must have rights to approve entries. To approve all unapproved entries for this staff member quickly, click Select All. This column does not appear unless time/expense approvals have been activated in the Company Profile Firm tab. |
| Approver | Once the entry is approved, the ID of the approver appears as read-only. |
|
Qty (Expense entries only) |
Enter the quantity for the work code. A total is calculated at the end of the column. |
|
Surcharge (Expense entries only) |
The surcharge amount is calculated automatically when the work code is entered. |
 button to open the extended description dialog.
 and displays only the first 15 characters of the extended reference in the short reference. The extended descriptions are independent from the short reference, so modifications to one are not reflected in the other.
When exporting the data to PDF or Excel, extended descriptions appear on Expense Entries detail reports and WIP detail reports. Unlike the rest of the exported data, the extended description appears on a separate row beneath the related time or expense entry. Extended descriptions may occupy multiple rows in the PDF and Excel documents.
and displays only the first 15 characters of the extended reference in the short reference. The extended descriptions are independent from the short reference, so modifications to one are not reflected in the other.
When exporting the data to PDF or Excel, extended descriptions appear on Expense Entries detail reports and WIP detail reports. Unlike the rest of the exported data, the extended description appears on a separate row beneath the related time or expense entry. Extended descriptions may occupy multiple rows in the PDF and Excel documents.Summary Information (Time)
Daily, current period, and year to date time entries, with the corresponding amounts of pay and percentages of the total, are displayed in an easy to read columnar format.

| Description | |
|---|---|
| Billable | Represents the hours and dollar amount of any billable time entered for the staff member for the date entered in the Date box, for the current active period, and for the year to date. |
| Non Billable | Represents the hours and dollar amount of any non billable time entered for the staff member for the date entered in the Date box, for the current active period, and for the year to date. |
| Totals | Represents the total hours and dollar amount of any time entered for the staff member for the date entered in the Date box, for the current active period, and for the year to date. |
| Daily | These columns display totals for time entered on the day selected in the Date field. |
| Active Period | These columns display totals for the current active period as chosen in the Company Profile. The totals for the entire period will be shown, including entries made on dates subsequent to the day selected. |
| Year To Date | These columns display totals for the current year to date as chosen in the Company Profile. The totals for the periods up to, and including, the current period will be shown. Entries attributed to future dates in the current year are not included in this column. |
| Select All/Deselect All |
Use these buttons to approve or cancel approval of multiple entries. Tip: To approve all except one or two entries quickly, click Select All and then deselect the unapproved entries. |
Comments and suggestions about this article and our software are greatly appreciated. As a user of our products, you are in a unique position to provide ideas that have an impact on future releases of this and other products.
Before contacting Technical Support, please consult the online Help and any other documentation included with this package as your first source to solve the problem.
If you require additional assistance, you can contact CaseWare® Technical Support by contacting your nearest CaseWare distributor.
When you contact CaseWare® Technical Support, you should be at your computer and have your documentation at hand. Be prepared to provide the following information:
- Your Client Number.
- The product version number, found by clicking the Help menu and selecting About.
- The type of computer hardware you are using.
- The software version number of MS-Windows.
- The exact wording of any messages that appear on your screen.
- A description of what happened and what you were doing when the problem occurred.
- A description of how you tried to solve the problem.
CaseWare Support
NORTH AMERICA
Email: support@caseware.com
Phone: 416-867-9504
GLOBAL

Copyright ©2017 CaseWare International Inc
| Visit us: www.caseware.com
Follow us


