Creating Custom Labels
If the type of labels that you want to use is not already set up in CaseView, you can create your own custom labels.
- Double-click the labels document to launch CaseView.
-
Click View | Enable Editing (to use the Edit Mode)
OR
Click View | Design Mode.
These are the modes in which editing of document appearances is possible.
-
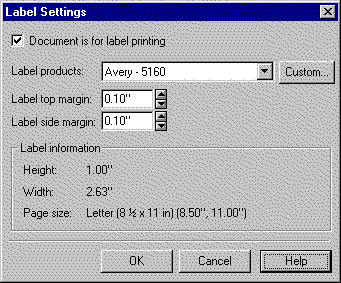
On the Tools menu, click Labels.
-
In the Label products box, select Custom….
-
Click the Custom button.
-
In the Label Settings dialog, specify the custom settings for the label document, and click OK.
-
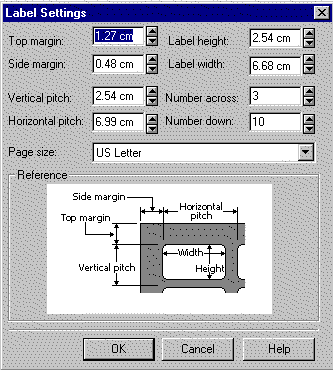
Compare the label dimensions and the number of labels across and down to the labels you are using.
-
Adjust the dimensions and label layout to match those of your labels. The Reference section of the dialog illustrates how to measure for the required settings.
Note: Measure the labels carefully. The actual label size might be smaller than the size indicated by the label manufacturer. For example, a 1-by-2-inch label might actually be 15/16-inch high and 1-15/16-inches wide.
- Click OK to return to the label dialog.
- As needed, increase or decrease the amount of white space around the text of the label by adjusting the Label top and side margins.
- Click OK.
Tip
- The Label dialog is also accessible by clicking the File menu | Page Setup, and then clicking the Label button.


Legal
Related Help