Changing Statement Defaults
Although GASB Financials - SPG is intended to be an out-of-the-box solution for your financial reporting needs, there are some options you may wish to redefine given your circumstances. Many of these defaults can be easily changed using the context specific statement tabs in the Ribbon.
Fundamental Topics
- Changing statement names
- Changing heading and footer text
- Changing terminology
- Changing the statement of Cash Flow defaults
Changing statement names
CaseWare International has set the default statement names, but you are able to modify the names to suit your needs. The method for changing these statement names is essentially the same throughout the statements.
Many of the statement areas can be changed using a drop down located in the context-sensitive Statement tab in the Properties group. Some areas, like the Statement of Revenues, Expense and Changes in Net Position need to be changed using the Titles and Terms button located throughout the template ribbons.
Procedure
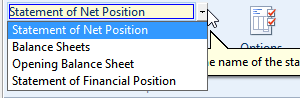
- Click in the financial statement area, for example, Statement of Net Position, that you want to rename.
- Select the Statement tab in the ribbon for this financial statement area.
-
Select the Statement name drop-down in the Properties group section in the tab.
- In the Statement name drop-down, either select a name or type the statement area name.
Results
The statement area is updated to use the specified name and is updated in the table of contents.
Modifying the header and footer text
The financial statements have defined headers and a footer. Header text is unique to each statement area while the footer text is global and applies to all statements. The notes to the financial statements only have the page number in the footer which can’t be changed. If necessary changes can be made to the statement headers and footer.
Procedure
- Open the Financial statements document, click in the financial statement area, for example, the statement of Net Position, in which the header is to be modified, and select the ribbon for the financial statement area.
- Click
 (Text). The Header/Footer Text dialog appears.
 - In the Year-end date field, select or type the year-end date to use.
-
If you change the year-end date, an additional dialog box appears that asks you whether you want to change the year-end date in all of the financial statement areas. Click Yes to change the date in all areas, or click No to change the date in this area only.
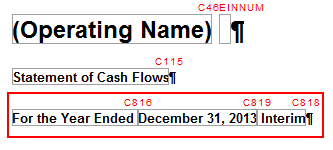
- In the Text before date field, select or type the text that is to appear before the year-end date. The options available depend on the financial statement area for which you are supplying the text.
- In the Text between dates field, type the text that is to appear between dates. This field is available only when the Year-end date field has been set to specify a start date and an end date.
- In the Footer text in statements field, type the text that is to appear in the first line of the footer. This text is only visible in print preview and applies to all statement areas except the notes to the financial statements.
- In the Additional footer text field, type the text that is to appear in the second line of the footer, if needed.
- Click OK to close the Header/Footer Text dialog.
Results
The header and footer text is added to the financial statement area.
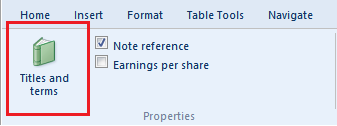
Changing Terminology
Throughout the financial statements you will see the Titles and terms button. Depending on where your cursor is in the financial statements, the options in this button change. For example, in the Statement of Revenues, Expenses and Changes in Net position, you are able to change how income and loss are referred to in the statement. In the Global Setup tab, in the Balances group, you can define the rounding terminology.
Changing line item descriptions in the financial statements is accomplished by typing over the existing description. The prompt “Would you like to update all instances of this description” appears and clicking Yes will ensure that wherever this description appears in the statements will have the same terminology.
Changing the Statement of Cash Flow defaults.
By default the cash flow statement is set to show the following:
- Cash flow components
- Supplementary cash flow information
- Operating activities reconciliation
These options can be disabled by accessing the Options button from the Statement of Cash Flows context tab.
Comments and suggestions about this article and our software are greatly appreciated. As a user of our products, you are in a unique position to provide ideas that have an impact on future releases of this and other products.
Before contacting Technical Support, please consult the online Help and any other documentation included with this package as your first source to solve the problem.
If you require additional assistance, you can contact CaseWare® Technical Support by contacting your nearest CaseWare distributor.
When you contact CaseWare® Technical Support, you should be at your computer and have your documentation at hand. Be prepared to provide the following information:
- Your Client Number.
- The product version number, found by clicking the Help menu and selecting About.
- The type of computer hardware you are using.
- The software version number of MS-Windows.
- The exact wording of any messages that appear on your screen.
- A description of what happened and what you were doing when the problem occurred.
- A description of how you tried to solve the problem.
CaseWare Support
NORTH AMERICA
Email: support@caseware.com
Phone: 416-867-9504
GLOBAL


