Getting Started with GASB Special Purpose
Thank you for purchasing CaseWare® Working Papers and GASB Financials - Special Purpose Governments (GASB - SPG) bundle.
CaseWare® Working Papers is a document management and working trial balance software that is designed to automate the entire working paper file quickly and efficiently. Working Papers accommodates journal entries of any description or type so you can automatically create full accrual versus modified accrual reports and working papers.
CaseWare ® GASB Financials - Special Purpose Governments is a companion application to CaseWare Working Papers and contains a financial statement template with supporting lead schedules. With CaseWare ® GASB Financials - Special Purpose Governments, you integrate your trial balance directly to your government agency’s annual financial report, or comprehensive annual financial report. The seamless integration with Working Papers enables you to quickly produce your annual financial statements and supporting work papers each year.
Getting Started:
- Installing and Licensing Working Papers and GASB
- Creating a New File
- Importing Your Financial Data
- Assigning Groupings
- Completing Validation
Installing and Licensing Working Papers
Procedure
- Download the Working Papers and GASB install files from here. Before installing, ensure that you meet the system requirements.
- Run setup.exe.
- Follow the instructions on the screen.
- Once Working Papers is installed, the template installer will start.
- Define the path of your Working Papers program and the path of the Document Library folder located within your Working Papers program directory. We strongly recommend leaving the CaseWare defaults.
- Click Finish. Upon successful completion of the template installation, a dialog will appear indicating such. Click the Close button to continue
Note: If the downloaded file is zipped, ensure to uncompress the zip file contents before proceeding to run setup.exe.
Results
Demo version of Working Papers is installed. You will need to license the product in order to use all functions in the template and remove the demo watermark. See Licensing Working Papers and GASB Special Purpose Governments for more information.
Creating a New File
Once you have installed both Working Papers and GASB - SPG you will need to create a client file. The client file is what you work in each year to produce your financial statements and supporting working papers. When you create your client file it will contain the relevant documents you need to begin.
Procedure
- In CaseWare® Working Papers, select File and New, then select Create a new file. Click OK.
- Type a name for your client file and select the GASB Financials file as the base file. All components of the GASB Financials template are copied automatically to your new client file.
-
At the Financial Statement Profile dialog, select the applicable report, either CAFR or Annual Report. For more information, see Engagement Profiles. Once selected, the correct report and supporting work papers will be added to the file.
-
After copying is completed, the Engagement Properties dialog is displayed. Select the beginning and ending dates for your client's fiscal year. Click OK.
Note: We recommend appending the year end date to the file name to assist with organizing your files. For example, ABC Municipality 06-30-15.
Importing Your Financial Data
The next step in the process is to import your trial balance from your accounting software into CaseWare Working Papers. You will need to export your trial balance from your accounting software. Follow the prerequisites before exporting. The prerequisites also provide information on the fields you need to export from your system.
Prerequisites
- Do not close income statement accounts to your equity accounts
- Trial balance is balanced
- Credits and debits are denoted in the export file. Separate credits using either brackets or - sign in front or separated in a different column.
- It is recommended that the following fields are included in your export file prior to importing:
- Fund Name
- Account Number
- Account Description
- Account Type
- Sign
- Current Year Ending Balance
- Prior year Ending Balance
- Any column headings or subtotals in the export file should be removed before importing. We recommend exporting your data to Excel and performing the clean up in Excel.
Procedure
- From the Engagement tab, in the Data group, select Import | Excel File
- The Welcome to the Import Wizard screen will display. The default Components to import should be left as is. Click the Browse to select the trial balance exported from your account software and then click Next.
- If you cleaned up your import file in Excel as specified in the prerequisites then you can click Next to continue.
- In the Field Details screen, you will need to define the fields that are being imported into Working Papers from Excel. To define a column, simply click the heading of a column and select an applicable heading for that data. If your import file contains the fields defined in the prerequisites then use the following settings:
Fund name - Account details | Entity description
Account number - Account details | Account number
Note: If the account number string includes the fund this should be defined.
 Example
The third group of numbers is the fund in the account number string. Enter “-” in the Field separator and then click Advanced to define that portion of the account number string as the Entity (fund).
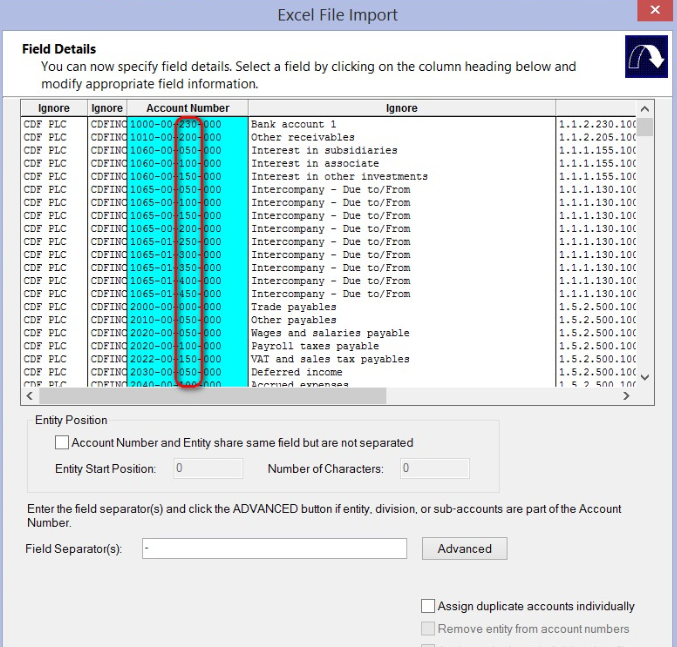
If there were no separators in the account string, select the Account number and Entity share the same field. In the above example, the Entity start position for the entity field is 7 and the Number of characters is 3.
Account description - Account details | Account description
Account type - Account details | Statement type
Sign - Account details | Normal sign
Current year ending balance - | Balances | Current year balance | Opening balances
Note: If debits and credits share the same field, leave the default selection for Field information, otherwise define which columns contain debits and credits.
Prior year end balance - | Balances | Prior year 1 balance | Opening balances
- Once all columns are defined, click Next to proceed.
- The assign entity screen will appear. If there are any accounts that are not assigned to an entity(fund), then you can assign those accounts here. Click Next to proceed.
- Keep the defaults in the Advanced Specifications screen and click Next to proceed.
- Review the import summary and click Next to proceed.
- Click Import to complete the wizard.
Results
Your trial balance is now imported. To save time in the future, you can save the settings you just defined by entering the path and name in the Record layout file (optional) field, or clicking Browse to navigate to a location where you want to save the settings. The next time you import your trial balance you would select the layout file after you select your Excel import file.
Assigning Groupings
Grouping is a unique Working Papers tool to effectively group your trial balance accounts together for financial statement reporting and analysis purposes. The Assign Groupings plugin lets you quickly and easily assign your accounts to the groups within the template.
Procedure
- Open the GASB Assign Groups CaseView document
- In the Group drop-down, select Special Purpose and click Assign to launch the dialog.
- Filter by typing in the text box above each column or sort by clicking the column header.
- Assign by dragging from the left panel to the appropriate grouping on the right
Results
Once all accounts have been assigned to the Special Purpose grouping, the financial statements and supporting work papers will populate with the related balances.
Can’t find a grouping that matches your needs? The GASB Financials - Special Purpose Governments template contains a predefined grouping that should match all your needs. If you don’t see a grouping that reflects your situation, you can change the description name. For example, in the Capital assets grouping, you can just change an existing description to meet your needs or add a new group number. See Group Numbers for more information on grouping.
Completing Validation
After importing and assigning groupings in your file, we recommend validating the contents by opening the Financial Statements and comparing values from prior years printed reports. Performing this process, you should ensure that the prior year reclassification entries have been made and ensure that your accounts have been grouped properly.
For more information on reclassification entries, see Posting Adjusting Journal Entries. Repeat the steps outlined in Assign Grouping if balances don’t match the prior year presentation.
Procedure
- From the Document Manager, open SPGCAFR document.
- A prompt will ask whether you want to add recommended content, click Yes.
- Navigate to applicable statements by using the Document Map on the left or from the Navigate tab, click Area.
- Compare prior year values imported with prior year printed reports.
Working with GASB Special Purpose Template
You are ready to start working on your file! Click below to view more tutorials:
Interface
Initial Setup
Working with Tables
Notes
Formatting
Schedules
Cash Flow
Year End Close
Updates
Comments and suggestions about this article and our software are greatly appreciated. As a user of our products, you are in a unique position to provide ideas that have an impact on future releases of this and other products.
Before contacting Technical Support, please consult the online Help and any other documentation included with this package as your first source to solve the problem.
If you require additional assistance, you can contact CaseWare® Technical Support by contacting your nearest CaseWare distributor.
When you contact CaseWare® Technical Support, you should be at your computer and have your documentation at hand. Be prepared to provide the following information:
- Your Client Number.
- The product version number, found by clicking the Help menu and selecting About.
- The type of computer hardware you are using.
- The software version number of MS-Windows.
- The exact wording of any messages that appear on your screen.
- A description of what happened and what you were doing when the problem occurred.
- A description of how you tried to solve the problem.
CaseWare Support
NORTH AMERICA
Email: support@caseware.com
Phone: 416-867-9504
GLOBAL


