Updating Client Files
Financials enables you to update the functionality and content in your client file when a template has been updated.
When you receive an updated master from the template owner you must install the revised template. You will receive a message to overwrite your current installation; this is expected and is appropriate.
Updating Client Files for Functionality
Automatic Updates
- Open your client file.
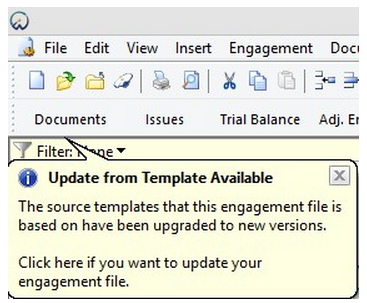
- You will receive a prompt to update your client file.
- You will be prompted to create a backup before the update continues. We strongly recommend you create a backup at this time.
- Click the message to begin updating your client file for the latest functionality changes. You will receive a message when the update has successfully completed.
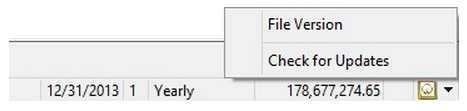
- If you choose not to update at this time, you can initiate this routine again by selecting the Check for Updates from the drop down in the bottom right of the Document Manager beside the value for net income.
- When opening your Financial Statements you will also be prompted to update your content, if updates are available. This is the automated prompt for the Check for Updates button in the Content Management ribbon.

Click to Play

Troubleshooting Templates
If you are not prompted to update your client file, perform the following steps:
- Delete document CQ - Organization Settings, which is typically found in the Customizing for the Organization folder.
- Make sure to clear out the Recycle Bin to permanently delete the document.
- Re-add the CQ - Organization Settings document by selecting Document | From Document Library
- Change the Source to GASB Financials and then navigate to the Customizing for the Organization folder.
- Highlight the CQ - Organization Settings document and then click Add.
Updating Client File Content
Typically, CaseWare International releases functional and content updates together. When a combined update occurs, users are notified of the content update at the completion of the functional update as described in Automatic Updates.
Occasionally, changes to standards do not coincide with our combined updates which therefore necessitates a separate content update. Users must therefore check the content in their client files to ensure it is up to date.

What do you want to do?
- Checking for content updates
- Comparing notes with the Knowledge Library
- Highlighting out of date and expired content
Checking for content updates
All content stored in the Knowledge Libraries include a version number. As content is updated by CaseWare International, the version number is incremented. The Check for Updates feature compares all content in the financial statements to the knowledge libraries and lists all content with differences in version numbers. You can select those items to update immediately or at a later time.
When updating content that is determined to be out-of-date, we will preserve as much local customization as possible. The Visual Merge feature provides the ability to quickly recreate customizations not automatically preserved during the update process.
Schedules update differently from other financial statement areas. Since a schedule in the Generic Schedules category can be inserted from the Knowledge Library multiple times, a one-to-one relationship is not maintained. To update these inserted schedules, you must manually delete the schedule and reinsert the schedule from the Knowledge Library. All customizations must be recreated. Schedules in the Formats category behave the same as other financial statement areas.
Procedure
- Open the Financial statements document and select the Content Management tab.
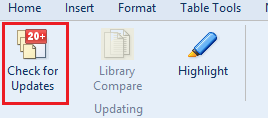
- The Check for Updates button will automatically display the number of updates available. Click the button to examine a list of updates that has been created.
- Select the items that you want to update and click OK.
- Depending on the settings defined by the template author, a Visual Merge dialog may appear. This dialog provides the opportunity to retain customizations that may not otherwise be retained, such as new columns added in a Do-It-Yourself table.
- Click Close to accept the update.
Results
Your client file is updated to include the latest content.
Comparing notes with the Knowledge Library
You can compare a note in the financial statements with the same note stored in the Knowledge Library. This allows you to view any differences made to the note in either the financial statements or the library. You can then replace your note to include the revised or original library content.
Procedure
- Open the Financial statements document and select the Content Management ribbon.
- Select any note or policy in the client file.
- Click
 (Library Compare).
 - The note content in the financial statements is compared with the Knowledge Library.
Results
The notes in the financial statements are updated to include the latest content.
Note: Notes imported from another financial statement cannot be compared.
Highlighting out of date and expired content
Financials includes a highlighting option which is a convenient way to see which notes in the client file are out-of-date or expired compared to the knowledge library version of the note.
Procedure
- Open the Financial statements document and select the Content Management ribbon.
- To enable highlighting indicators, click
 (Highlight).
 - To disable highlighting indicators, click (Highlight) again.
Results
The selected content is highlighted.
The following highlighting indicators may appear beside the note name:
| Indicator | Description |
|---|---|

|
The content is up-to-date. |

|
The content is out-of-date. Tip: Click on the icon to update the out of date content. |

|
The content has expired. Tip: Click on the icon to update the expired content. |

|
The note content was imported from a client file and is no longer linked to the Knowledge Library. Content updates are not available. A tooltip indicates the user, date of import and the source financial statement. |

|
The note is a generic note. Content updates are not available. |
Comments and suggestions about this article and our software are greatly appreciated. As a user of our products, you are in a unique position to provide ideas that have an impact on future releases of this and other products.
Before contacting Technical Support, please consult the online Help and any other documentation included with this package as your first source to solve the problem.
If you require additional assistance, you can contact CaseWare® Technical Support by contacting your nearest CaseWare distributor.
When you contact CaseWare® Technical Support, you should be at your computer and have your documentation at hand. Be prepared to provide the following information:
- Your Client Number.
- The product version number, found by clicking the Help menu and selecting About.
- The type of computer hardware you are using.
- The software version number of MS-Windows.
- The exact wording of any messages that appear on your screen.
- A description of what happened and what you were doing when the problem occurred.
- A description of how you tried to solve the problem.
CaseWare Support
NORTH AMERICA
Email: support@caseware.com
Phone: 416-867-9504
GLOBAL


