Working with Tables
All the statements, schedules and notes in GASB Financials are constructed using tables. The information provided here is applicable for all tables.
Fundamental Topics
- Setting Row Attributes
- Manual Input on Rows
- Printing Rows
- Adding or deleting a subtotal
- Inserting paragraph before or after a table
- Sorting Rows
- Table Column Properties Dialog
Setting Row Attributes
Row attributes define the behavior of the rows in the table. By default most rows are data rows where the information is automatically pulled from the trial balance. Attributes like input and title, enable you to change the default behavior of the row.
Procedure
- Click in the row where you want to change its row attributes
- From the Tables Tools tab, in the Row Properties group, click

- The Attributes dialog will display. Select from the following options:
| Option | Description |
|---|---|
| Title Row |
By default, all rows in a table are data rows, but you can specify that a row in the financial statements is to be a title row. The style applied to the row will change and the numeric cells will hide for the row. |
| Switch Sign |
You can specify that the display sign for a table row is to be switched. This means that a balance of 20 is displayed as -20, and vice versa. A |
| Subtract |
By default, all values in a subtotal or total are added. It may be necessary, as in the case of Other Income and Expenses, to subtract values in the subtotal. A |
| Currency | Typically, currency symbols are displayed on the first row of the table and/or the total row. In Financials, you can display a currency symbol in any row. |
| Keep cell properties |
If the properties for a row are different from the properties defined for the cell group to which the row belongs, you can specify that these changed row properties are to be preserved.
|
 (subtract) icon appears next to the row that is subtracted.
Manual input on rows
All rows in the template have calculations that pull data from the trial balance. You can easily change a row to accept a manual entry if necessary. Manual entries will display an override indicator, and the input values will properly flow to prior year columns on year end close.
Note: The description column for a row is always an input cell. An override indicator will be displayed if the default description is changed.Changing the description cell, you will be prompted to save the description to the database. Doing so will ensure that the description will be the same throughout the file.
- From the Tables Tools tab, in the Row Properties group, click

Printing rows
Typically all rows in a table will print unless the row has no numeric value in both the current and prior year; non-printing rows appear blue. There are times when you may want to print these rows, or disable printing on a row that will print by default.
Procedure
- From the Tables Tools tab, in the Row Properties group, click

- The Row Print Options dialog appears. Select one of the following radio buttons.
Radio Button Description Print if there is a balance Print the row if it contains at least one non-zero balance. Print always Always print the row. Never Print Never print the row. Print if more than one balance in the sub-total Print the subtotal row if more than one of the rows that is being summed contains a non-zero balance. This radio button is available for subtotals only. - In the Printed columns pane, select the check boxes next to the columns that you want to print.
Adding or deleting a subtotal
Subtotal rows are marked with on the far left. Any rows that are added in a table will automatically be included in the calculation for the subtotal. You can delete existing, or add new subtotals.
Procedure
- Click in the table that you want to add a subtotal.
- From the Table Tools tab, in the Operations group, click the Subtotal drop-down and select one of the following options:
| Option | Description | ||||||||
|---|---|---|---|---|---|---|---|---|---|
| Add |
Add a subtotal in the specified table. In the dialog that appears, select the lines to include in the subtotal. Select the Create collapsible section option to insert a title row above the selected rows with a +/- sign. The - sign collapses the section and hides the selected rows. Only the subtotal displays with the title row description. The + sign expands the section and displays all of the lines of the section. Uncheck Apply title and subtotal styles if you do not want to use the default title and subtotal styles. Click OK when finished. |
||||||||
| Delete |
Delete a subtotal from the specified table. In the dialog that appears, select the subtotals to delete and click OK. Note: Deleting all rows that make up a subtotal also deletes the subtotal, and where applicable, the collapsible section. |
||||||||
| Subtract |
Perform a subtract operation. . By default, all subtotals add the values in a column. There are instances where you need to subtract a subtotal from another subtotal, for example to calculate operating income. From the shortcut menu that appears, select one of the following:
|
Inserting/deleting a row
If you want to show more detail in the statements, schedules or notes, you can insert rows as needed. Rows added to tables will be retained when you perform a check for updates.
Procedure
- Click in the table that you want to add a row.
- From the Table Tools tab, in the Operations group, click
 drop-down and select insert rows.
 -
In the Insert Rows dialog you can choose to insert a certain number of rows, or you can choose the map/group numbers you want to add into the table.
-
Selecting the Copy Content button will apply the same properties of the row immediately preceding the new rows.
-
If more than one row is added, the Create subtotal option becomes available. This will automatically subtotal the added rows.
-
The Create collapsible section will include a +/- sign at the start of the subtotal section to easily expand/collapse the details of the subtotal.
-
Apply title and subtotal styles option will bold the heading and subtotal line for the section.
-
- Click OK.
- From the Table Tools tab, in the Operations group, click
 (Delete) drop-down and select Delete rows.
 - At the prompt, select Yes.
Inserting a paragraph before or after a table
Financials has very defined rules of where you can add text content. If you are working in a note with a table and no text, you must use these options to add text in the note.
Procedure
- Click in the table that you want to add the paragraph before or after.
- Select the Table Tools tab, and from the Operations group, click .
- From the drop-down, select Paragraph before to add a paragraph before the table, or select Paragraph after to add a paragraph after the table.
Results
The paragraph is inserted.
Sorting Rows
In a table, you can sort rows based on the description column or the numeric columns. By default rows in a table are based on the order of the mapping/grouping.
Procedure
-
Click in the table column that you want to sort.
-
From the Table Tools tab, in the Operations group, click
 (Sort) drop-down then select Rows.
 -
You can sort automatically in ascending/descending order, or you can choose to sort manually.
Option Description Ascending - By This Column Sort the rows in ascending order. The sort criterion is the column in which your cursor is located. Descending - By This Column Sort the rows in descending order. The sort criterion is the column in which your cursor is located. Manually Display the Manual Section Sort dialog to enable you to specify the sort order. In this dialog, use the Move Up and Move Down buttons to reorder the rows. Click OK when you have finished sorting.
Table Column Properties Dialog
Just like rows, the tables and the columns in the tables are controlled by properties that you can change if they do not have the desired formatting. Changes to table and column properties are performed on a table by table basis except for the shading, this applies globally to all tables.
Table Options
Table options control the layout of the table as well as the printing options for wide tables.
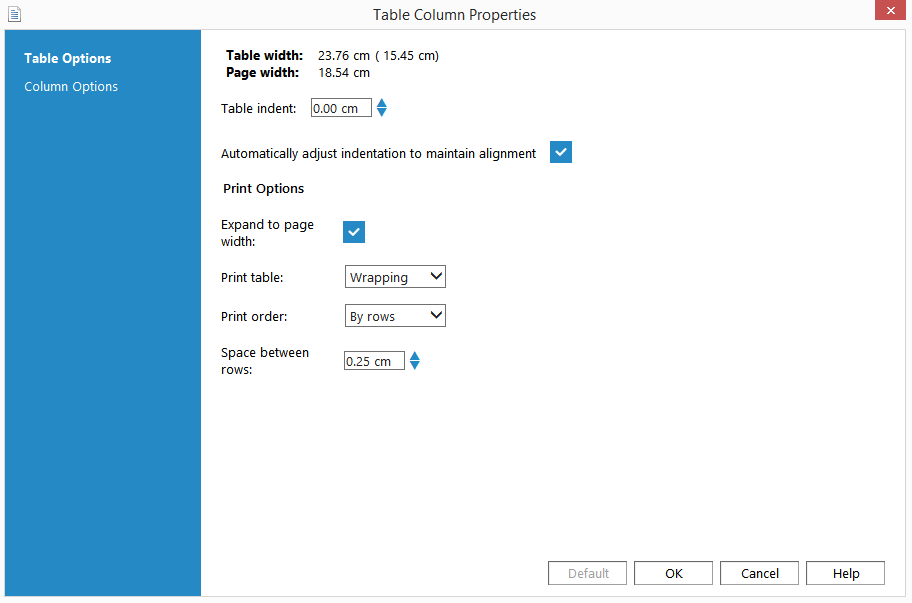
| Field or check box | Description |
|---|---|
| Table indent |
The amount to indent the column from the left margin. The default is 0. The indent shifts the entire table to the right by the indicated amount. (Note tables only) Setting the indent will mark the table as an exception, and will no longer follow the indentation strategy for notes. |
| Automatically adjust indentation to maintain alignment | (Note tables only) By default, all tables automatically adjust their indentation when the associated note number or note heading is hidden. If you do not want the table to automatically indent, de-select this option. |
| Expand to page width | By default, all tables will expand to page width. If you are only printing specific columns, the table will automatically expand to the width of the page. If you do not want the table to span the page, de-select this option. |
| Print table |
One of the following options:
For example, if a document was made up of one short paragraph of text followed by a short but wide table that spanned two pages, followed by several more paragraphs with no page breaks, the printing order would be as follows:
Page two would contain the remaining columns of the table. If there was a page break inserted after the table, the text after the table appears on page three, after the rest of the table. Extremely tall tables should not be set to wrap, as it may make them hard to read. In addition, printing a tall wrapping table on a page that has a large header, footer, or carry forward header could cause content to be lost when printing. |
| Print order | When printing wide tables, Print order determines what content will print on the second page of the wide table. If printing by rows, the same rows will be printed on the second page with the new columns - for example, a table with 10 rows and 10 columns. If printing by column, then the second page will have the same columns but the new rows. |
| Space between rows | The spacing between rows when wrapping a wide table. |
Column Options
With columns you can manage the size, formatting and borders in the Column Options dialog.
Tip: To navigate columns, simply click  to go the next column and
  to go to the previous column. To change the properties on multiple columns, click
  beside each column name in the drop down.
Column Size
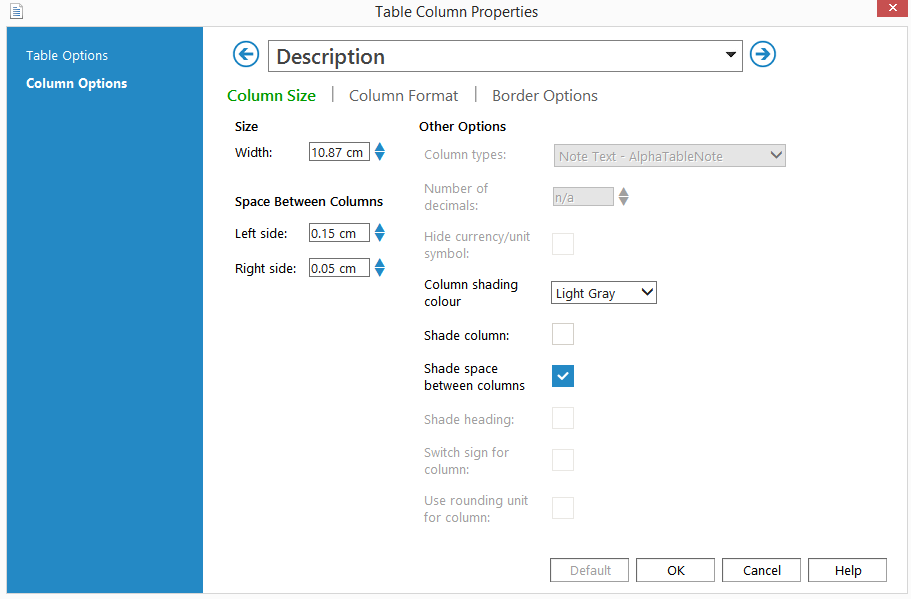
| Field or check box | Description |
|---|---|
| Width |
The width of the column. The space between columns is calculated as part of the total column width, so the total of the spaces between columns must be at least .10 less than the width of the column as a whole. |
| Space Between Columns | The space or padding to the left and right of the cell in the column. |
| Column Types | The cell groups to apply to the selected column. Permission to change the cell group is not available on all columns. |
| Number of decimals |
The number of decimals to be set on an individual column. This is available in Numeric or Percent columns only. |
| Hide currency/unit symbol | Force the rising or sinking currency/unit symbol to hide on the numeric column selected. |
| Column shading colour |
Shading color to apply to columns. |
| Shade column | Shade the selected column. This setting is a global option and applies to all tables. |
| Shade space between columns | Include the shading on the space between columns. This setting is a global option and applies to all tables. |
| Shade heading | Include the column heading in the Shade column option. This setting is a global option and applies to all tables. |
| Switch sign for column |
Specify that the numeric values in the column are to have their sign switched for display purposes. This means that numbers are displayed as positive if stored as negative, and vice versa.
Columns with a switched sign are marked with the This provides the ability to display debits and credits with their natural sign, as is expected in the Nonoperating revenues and expenses section of Revenues, Expenses and Changes in Net Position. |
| Use rounding unit for column | If unselected, rounding will not be applied to the column. |
Column Format
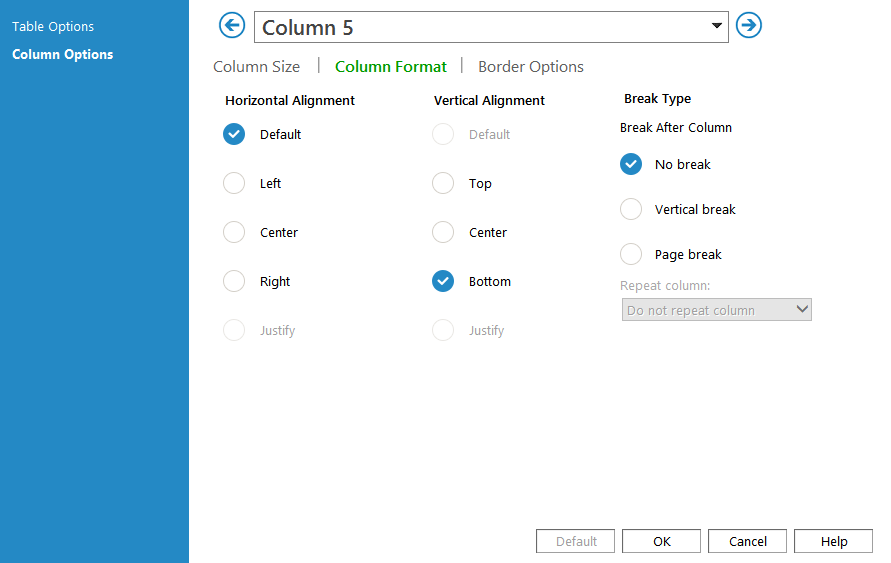
| Field or check box | Description |
|---|---|
| Horizontal Alignment | The alignment of the cell contents horizontally within the cell. |
| Vertical Alignment | The alignment of the cell contents vertically within the cell. |
| Break After Column |
(Wide tables only) Control where the table breaks if a table must be split to fit properly on a page. There are two options available for breaking up the table:
|
| Repeat columns | For wide tables, set columns (such as the description column) to repeat printing on subsequent pages. |
Comments and suggestions about this article and our software are greatly appreciated. As a user of our products, you are in a unique position to provide ideas that have an impact on future releases of this and other products.
Before contacting Technical Support, please consult the online Help and any other documentation included with this package as your first source to solve the problem.
If you require additional assistance, you can contact CaseWare® Technical Support by contacting your nearest CaseWare distributor.
When you contact CaseWare® Technical Support, you should be at your computer and have your documentation at hand. Be prepared to provide the following information:
- Your Client Number.
- The product version number, found by clicking the Help menu and selecting About.
- The type of computer hardware you are using.
- The software version number of MS-Windows.
- The exact wording of any messages that appear on your screen.
- A description of what happened and what you were doing when the problem occurred.
- A description of how you tried to solve the problem.
CaseWare Support
NORTH AMERICA
Email: support@caseware.com
Phone: 416-867-9504
GLOBAL


