Adding a Project Template
Project templates enable you to quickly create client projects populated with general engagement details such as budgets, issues, and staff assignments. Templates can represent general services provided by your firm or more granular engagement tasks.
![]() Note: For Time users with Cloud Integration enabled, this operation can only be performed from Time.
Note: For Time users with Cloud Integration enabled, this operation can only be performed from Time.
Prerequisites
- Projects must be activated from the Company Profile to use this feature.
![]() With Protection activated, you require the following right in the file
With Protection activated, you require the following right in the file ![]()
- Project Template: Create/Delete under the Setup: Project category
![]() If Cloud Integration is enabled,
If Cloud Integration is enabled,
You must be Online to perform this operation. When you are Offline, this operation is disabled. ![]()
Procedure
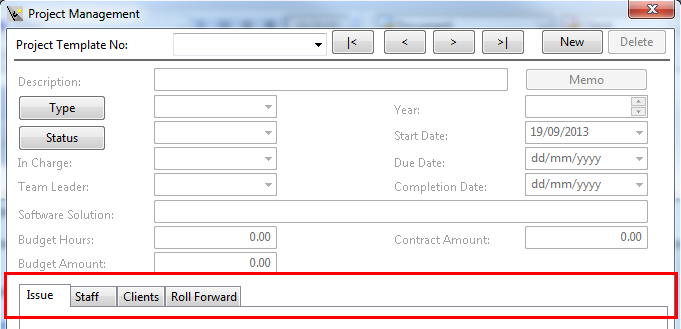
- Access the Project Management dialog from the menu Setup | Project Management.
-
Specify a Project Template No.
Enter an alphanumeric value up to fifteen (15) characters long. Avoid using the characters *, ? and " in the identification.
Note: If the form is empty you can enter one immediately, otherwise click New to clear the dialog first.
- Use the Description field to specify a service category such as auditing.
-
Complete the remaining Project Template fields. Use the tabs in this dialog to file other general project details for this template.
-
Issues
Issues are defined tasks for a given project. When you create a Project Template, issues are generic items that apply for the specific project type. You can apply default issues for each project type and assign the issue to staff as necessary once the project starts.
-
Staff
You can assign staff to project templates and to client projects. Assigning staff to project templates offers you a default set of staff members that are assigned to the client projects you create based on this project template.
-
Clients
You can assign multiple clients to use a project template. Assigning a client to a project template creates a custom project for that specified client.
-
Roll Forward
Roll Forward enables you to expedite the process of creating projects and setting their default attributes for subsequent project cycles. Use this feature to automatically create project templates or client projects for the next project cycle based on existing project templates or client projects.
-
-
Click Close to finish or New to add another project template.
 Note: If Cloud Integration is enabled and you are working Online, then a merge is automatically performed with CaseWare Cloud immediately after this step.
Results
After setting up a project template, you can proceed to adding subproject templates or creating client projects.
Comments and suggestions about this article and our software are greatly appreciated. As a user of our products, you are in a unique position to provide ideas that have an impact on future releases of this and other products.
Before contacting Technical Support, please consult the online Help and any other documentation included with this package as your first source to solve the problem.
If you require additional assistance, you can contact CaseWare® Technical Support by contacting your nearest CaseWare distributor.
When you contact CaseWare® Technical Support, you should be at your computer and have your documentation at hand. Be prepared to provide the following information:
- Your Client Number.
- The product version number, found by clicking the Help menu and selecting About.
- The type of computer hardware you are using.
- The software version number of MS-Windows.
- The exact wording of any messages that appear on your screen.
- A description of what happened and what you were doing when the problem occurred.
- A description of how you tried to solve the problem.
CaseWare Support
NORTH AMERICA
Email: support@caseware.com
Phone: 416-867-9504
GLOBAL

Copyright ©2017 CaseWare International Inc
| Visit us: www.caseware.com
Follow us


