Installing Time for Multi-User Setup
For easy management of files, install the Time program, the SQL programs, and the Time supplementary file folder on the same server. For larger firms with an IT department, installing the Time program and the SQL programs on separate servers may improve performance.
Note: If you choose the option Network with SQL Express, you must run the installer on the network server that Microsoft SQL Server Express 2008 will be installed on (refer to the ‘Network with SQL Express’ diagram). The installation will automatically install SQL Server Express 2008 in the “Program files\Microsoft SQL Server” folder.
Only one user needs to install Time on the network server.
- Launch the Time installer. Double-click the setup.exe file provided to you.
- Follow the instructions on the screen.
-
At the Setup Type screen, select the type of installation to run.

- Network with SQL Express: Select this option if you do not have a SQL program and you want Time to install Microsoft SQL Server Express 2008. If you choose this option, you must run the installer from the same machine that Microsoft SQL Server Express 2008 will be installed on. The installation will automatically install SQL Server Express 2008 in the Program files/Microsoft SQL Server folder.
- Network: Select this option if you already have a SQL program installed.
-
At the Choose Destination Location screen, ensure that the Destination Folder is a network folder; otherwise, use the Browse button to change the location. Install Time in a directory that is different than previously installed versions.
Note: Install Time 2015 in a directory different from the one used for prior versions of Time. This directory must be shared. In addition, all Time users MUST have full access rights to the Time program and Time data file folders.

-
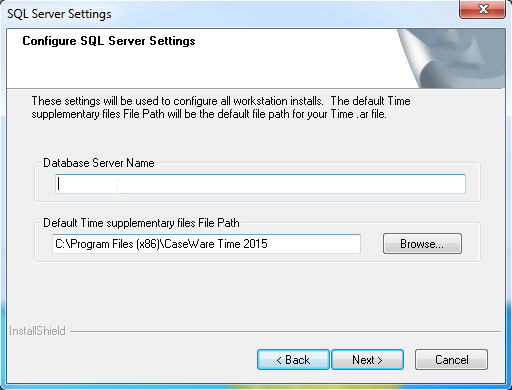
At the SQL Server Settings screen, specify the following:
- Database Server Name: This is the server the SQL software is installed on. If Time is installing Microsoft SQL Server Express 2008 then the server is the machine you are installing on.
- Default Time supplementary files File Path: This is the folder that will store the Time .ar file and other non-SQL files. This path needs to be shareable.
-
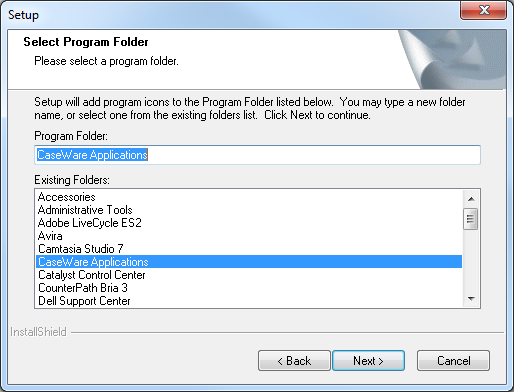
Type a new folder name, or select a folder from the Existing Folders list. Click Next.
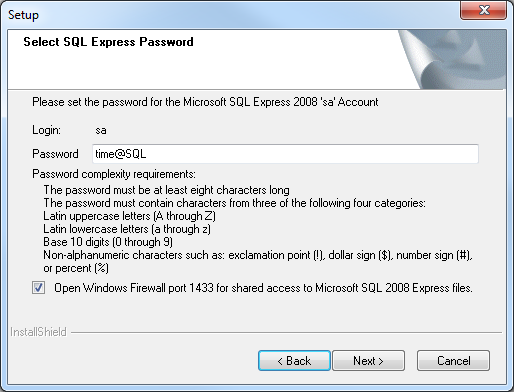
If you choose the 'Network with SQL Express' option
- Login: The default login is ‘sa’.
- Password: Select the password for the SQL administrator account. The default password is time@SQL. This account is needed to connect to Microsoft SQL Server 2008 Express. Save the login and password to be used to connect to the SQL server to create, convert and restore Time files.
- Open Windows Firewall port: Select the Open Windows Firewall port 1433 for shared access to Microsoft SQL 2008 Express files option. This allows all computers on the local network to connect to the SQL Server. Click Next.
Workstation Install
Each user will need to perform a workstation install to install the files necessary to connect to the Time program on the server.
During the network install a sub-folder called Netsetup was created in the Time program directory with the files necessary to run the workstation install.
- Locate the sub-folder Netsetup in the Time program directory. This was created during the Network installation.
- Double-click the Setup.exe file. This starts the installation.
- Follow the instructions on the screen.
Remote access
Ensure remote connections are enabled when your Time 2015 is running on a machine different from the database. In the Setup Type screen of the Installation Wizard if you select a Network setup type, you may need to enable remote connections on your existing Network Server. If you select Network with SQL Express setup type or Local setup type, a remote connection is enabled by the Installation Wizard.
If your Network Server is a version of SQL Server from Microsoft, your remote connection may be disabled. The following steps are required to enable remote connection:
- Start the Microsoft SQL Server Configuration Manager, select Start | All Programs | Microsoft SQL Server | Configuration Tools | SQL Server Configuration Manager.
-
Select SQL Server Network Configuration (32bit) from the left-hand navigation panel and expand its navigation tree to select Protocols for MSSQLSERVER.
- On the right-hand display panel, right-click on TCP/IP and select Enable.
-
Select SQL Server Services from the left-hand navigation panel
- On the right-hand display panel, right-click on SQL Server (MSSQLSERVER) and select Restart.
Your SQL Server restarts with remote connection enabled.
Notes
If the workstation cannot connect to the SQL server, refer to these links to troubleshoot the errors:
- Error: Cannot open database "TimeDB..." requested by the login
- Error: Windows Cannot Find SQLProv.exe
Comments and suggestions about this article and our software are greatly appreciated. As a user of our products, you are in a unique position to provide ideas that have an impact on future releases of this and other products.
Before contacting Technical Support, please consult the online Help and any other documentation included with this package as your first source to solve the problem.
If you require additional assistance, you can contact CaseWare® Technical Support by contacting your nearest CaseWare distributor.
When you contact CaseWare® Technical Support, you should be at your computer and have your documentation at hand. Be prepared to provide the following information:
- Your Client Number.
- The product version number, found by clicking the Help menu and selecting About.
- The type of computer hardware you are using.
- The software version number of MS-Windows.
- The exact wording of any messages that appear on your screen.
- A description of what happened and what you were doing when the problem occurred.
- A description of how you tried to solve the problem.
CaseWare Support
NORTH AMERICA
Email: support@caseware.com
Phone: 416-867-9504
GLOBAL

Copyright ©2017 CaseWare International Inc
| Visit us: www.caseware.com
Follow us


