Adding a Client
Set up clients from the Clients dialog to file your client information, configure client options related to reporting and documents, and assign or associate clients to other features in Time.
![]() Note: For Time users with Cloud Integration enabled, this operation can also be performed from CaseWare Cloud. See more...
Note: For Time users with Cloud Integration enabled, this operation can also be performed from CaseWare Cloud. See more...
Prerequisites
![]() With Protection activated, you require the following right in the file
With Protection activated, you require the following right in the file ![]()
- Clients: Create/Delete under the Setup: Clients category
![]() If Cloud Integration is enabled,
If Cloud Integration is enabled,
-
You must be Online to perform this operation. When you are Offline, this operation is disabled.

- Your account on Cloud must be assigned a role that grants Create permission on the Entity object.
Procedure
- Access the Clients dialog from the menu Setup | Client.
-
Specify a Client No..
Note: If the form is empty you can enter one immediately, otherwise click New to clear the dialog first.
-
*Required Step* Specify a Name for the client under Client Information.
By default, the Short name is automatically populated with the first 10 characters in the client Name. This can be changed.
 Note: If Cloud Integration is enabled and you are working Online, then a merge is automatically performed with CaseWare Cloud immediately after this step.
 -
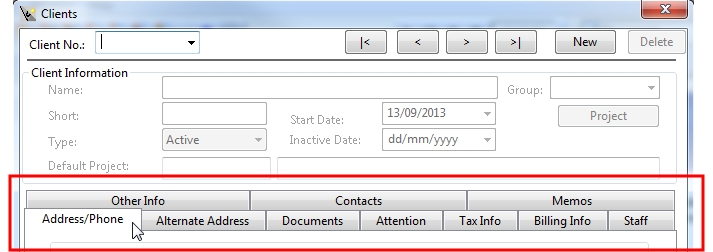
Complete the remaining Client Information fields. Use the tabs in this dialog to file additional information on this client. >>Quick Reference
-
Documents
Configure the address that appears on client letters, invoices, statements, and credit notes.
-
Attention
Set up to four contacts to appear on document attentions.
-
Tax Info
Set up tax codes and tax rates for this client's jurisdiction.
-
Billing Info
Enter payment information and configure billing options.
-
Staff
Assign staff members to this client.
-
Contacts
Assign contacts to this client.
-
- Click Close to finish or click New to add another client.
Results
After the client is added to the file, you can reference this client when entering time and expense.
Tips
- Summary or detail Client Lists can be printed using the automatic documents on the Document Manager.
 Show me
Comments and suggestions about this article and our software are greatly appreciated. As a user of our products, you are in a unique position to provide ideas that have an impact on future releases of this and other products.
Before contacting Technical Support, please consult the online Help and any other documentation included with this package as your first source to solve the problem.
If you require additional assistance, you can contact CaseWare® Technical Support by contacting your nearest CaseWare distributor.
When you contact CaseWare® Technical Support, you should be at your computer and have your documentation at hand. Be prepared to provide the following information:
- Your Client Number.
- The product version number, found by clicking the Help menu and selecting About.
- The type of computer hardware you are using.
- The software version number of MS-Windows.
- The exact wording of any messages that appear on your screen.
- A description of what happened and what you were doing when the problem occurred.
- A description of how you tried to solve the problem.
CaseWare Support
NORTH AMERICA
Email: support@caseware.com
Phone: 416-867-9504
GLOBAL

Copyright ©2017 CaseWare International Inc
| Visit us: www.caseware.com
Follow us


