Row Properties Tab - Table Properties Dialog
Minimum height of row
Select this option and enter the minimum height desired for each row. You can use this option to regulate the height of the entire table, by setting the height on each row.
Context Menu
To enable an existing menu of selections to be available from this table row, select its name in the list.
Edit Menus
Click the button to add, copy, rename or delete a context menu.
Allow row to span multiple pages
Select to allow natural page breaks in the middle of the row. If the box is not checked, page breaks occur either after or before the row allowing the row to remain intact.
This option is disabled if either wide tables are in use or a minimum row height has been specified.
Carry-forward header/footer row
Set the current row to repeat as a carry-forward header or carry-forward footer if the table spans multiple pages. Only rows at the top of a table may be specified as carry-forward header rows, and they must be contiguous. That is, row 1 may be designated as a carry-forward header row, or rows 1, 2, and 3 together. Row 1 and row 3 may not be selected as they are not contiguous, and row 3 alone may not be selected as it does not include the first two rows.
The same logic applies to the selection of the carry-forward footers. The last row, or a contiguous series of rows ending with the last row of the table, may be selected.
Notes
- The border between the carry-forward header and the main area of a table is the bottom border of the last visible row of the header. This takes precedence over the top border of the regular row that follows the header.
- The border between the carry-forward footer and the main area of a table is the top border of the first visible row of the footer. This takes precedence over the bottom border of the regular row that precedes the footer.
Print row only when the table splits
Select to skip the row designated as a carry-forward header or footer and only display it on the second (and subsequent) page spanned by the table. This option allows the contents of the carry forward row to be different from the first or last printed row of the table.
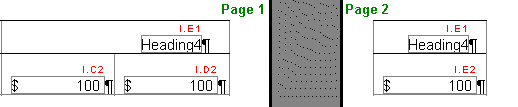
Allow merged squares to split
If you are using merged table squares to act as a heading for the row after it and you have set the table to use Wide Table Printing, the merged squares have to be allowed to split when the page breaks between the table cells that they span.
Note: For Wide Table Printing, you may need to specify alignment for any text in your table header to appear on the first page in a print preview.
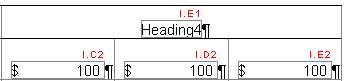
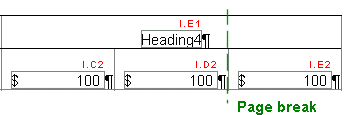
Select this check box to allow such table cells to "break" across the page break by appearing on both pages and repeating the first paragraph in each portion of the split. For the above table, the following results:
Skip and Hide Top/Bottom Border with Row
When selected, the top or bottom border applied to a row will skip or hide when the row itself is skipped or hidden. By default, CaseView tries to preserve the top border of the first row, and the bottom border of the last row, since these are usually a part of a border around the entire table. For example, if row 1 is set to skip and you want row 2 to be the top border then CaseView will make row 1 the top border even though row 1 was set to hide or skip. Thus, selecting this option will make row 1 to skip and make row 2 as the top border.
Skip logic
Sets skip print logic for the selected row or rows.
Skip print
Determines an automatic skip printing condition for a row. Select the desired condition from the drop-down menu.
|
Selection |
What it does |
|
None |
Does not skip. |
|
If all numeric, radio buttons and check boxes cells zero |
Skips when all numeric cells in the row are zero. |
|
If all numeric cells zero |
Skips when all numeric cells, but not controls (radio buttons, check boxes), are zero. |
|
If all cells blank |
Skips when all the cells in the row are blank. |
|
If all numeric, radio buttons and check boxes cells zero in non skipped columns |
Skips when numeric cells, radio buttons and check boxes are zero in columns marked as non-skipping. |
|
If all numeric cells zero in non skipped columns |
Skips when numeric cells are zero in columns marked as non-skipping. |
|
If all cells blank in non skipped columns |
Skips when numeric cells are blank in columns marked as non-skipping. |
|
Always |
Always |
Tip: If a paragraph is skipped because of a paragraph skip condition, yet the column is displayed, the cells in that paragraph are still considered. This option allows the user to exclude 'control' columns (columns that hold information used to make the table work but always formatted as skipped).
Skip condition
Rows can be hidden. Enter a logical skip condition to prevent the row from printing when the skip criteria are met. Click  to access the Calculation Editor and create a skip condition.
Notes
- Relative column functionality is available in row skip conditions. As an example, if the paragraph skip condition for cell ABC.A1 was RC(4)=1 then CaseView would look 4 columns to the right to find ABC.E1 and determine if the value was 1. This function required a starting point to determine which column was to be used.
- Now that RC() can be used in the skip condition of a row, the starting position is considered to be the first column in the row. As an example, a universal skip condition of RC(4)=1 could be entered for each row, and the cell in column E on each row would determine if that row should be skipped.
Hide logic
Sets hide logic for the selected row or rows.
Hide only if row skipped
Select to use the hide criteria only when the row is set to skip when printing.
Hide action
Determines display conditions in the Form Mode if skipping criteria for the row is met. If hiding options are not used for the Form Mode, access Print Preview to view the document as it will print with all skips considered.
|
Selection |
What it does: |
|
None |
Displays the row in the Form Mode at all times. |
|
Hide if show button is not pressed |
Displays the skipping row in the Form Mode if Skipped text on the View tab is checked. |
|
Always hide |
Hides the skipping row in the Form Mode at all times |
Hide condition
If applicable, type a logical condition to hide this row from the user in the Form Mode. This option is only applicable if the Action if skipped box displays Hide if condition is true. You can use any expression to determine the displaying of the skipped row in the Form Mode. For example, c100=500 always hides the skipped row if cell number c100 has a value of 500.
Click to access the Calculation Editor and create a hide condition.
![]()
Visit us: www.caseware.com | Follow us: 


© 2019 CaseWare International Inc. | Privacy | Terms of Use | Trademarks